Lesson Plans - An Explanation
Skip to
Related Lesson Plan Topics
Related Topics
Introduction to Lesson Plans
Creating a Lesson Plan allows you to figure out all the details of the work you wish to assign - explicit directions, combinations of assignments that go together, and the specific pages, lessons or chapters
to be assigned - without having to tie yourself down to specific dates. Lesson Plans can then be used to create the actual Assignments for your Students using the
Scheduler tool.
|
There are two primary benefits to using a Lesson Plan:
|
- Lesson Plans are not tied to a particular student or school year, so you can use them over and over again throughout your homeschooling career.
- You can plan out the work you will be assigning without committing to any particular dates. This means that you can submit the work to the assignment grid just before you're ready to assign it
- whether that's a day, week, or month at a time. It's up to you. That way, when things take more or less time that you expected, or when there are interruptions to your schedule, you don't
have to waste a lot of time rescheduling things back and forth.
|
To access the Lesson Plan area, click or touch 'Lesson Plan' under the 'Schedules and Planning' section of the HSTOnline menu.
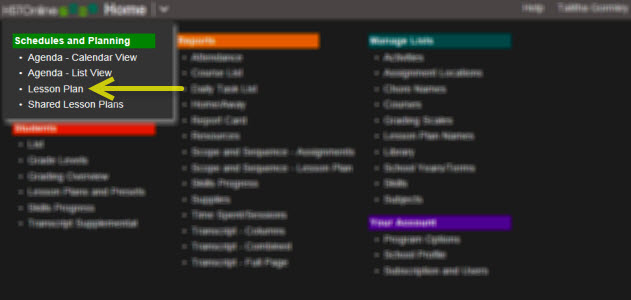 HSTOnline Menu - Lesson Plans
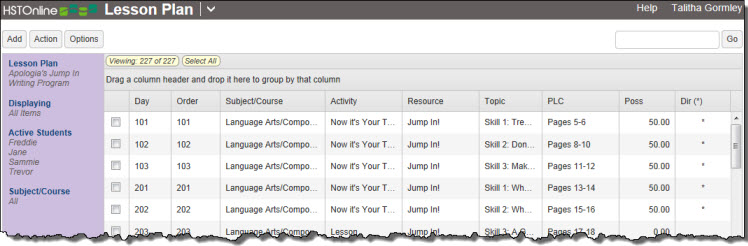 Lesson Plan Grid
To optimize performance, the Lesson Plan displays no more than 500 items at a time. If you have more than 500 items in a Lesson Plan, the list will be divided into additional pages of no more than 500 items
each. Searching or filtering a list will search the entire list, not just the items currently in view. For more information on paging, please see:
Customizing the Data Display: Automated Paging.
We recommend that you put items in a Lesson Plan that are dependent on each other. For example - if you have a History textbook as well as historical fiction that covers the same time period, you might want to
put those items together into one plan. This will help you keep track of both types of lessons at the same time. But we would not recommend putting your Math and History in the same Lesson Plan. You may if you
wish, of course, but it is probable that you will get ahead in one area and fall behind in another, and that can become confusing when trying to manage the Lesson Plan.
HSTOnline will keep track of which Lesson Plan items have been used to create Assignments for which Students by marking them as 'Used' to help you stay on top
of your Student's progress.
The Day Field
Each item in your Lesson Plan has a Day number. A 'Day' represents a day of school for that subject. Lesson Plan items with the same Day value will be placed on the same date when using the Scheduler
function to create Assignments. Day numbers are not tied to specific dates or days of the week. They simply provide a way to order and organize your lesson plan items. Day and date details are set as part of
the Scheduler process of creating Assignments from your Lesson Plan items. If you have a Subject/Course that you only assign on certain days of the week
(for example, Science is only taught on Tuesdays and Thursdays), you can use the Presets feature to assist in assigning just to those days of the week,
or you can use the Weekly feature in the Day Options area to choose specific days of the week on which to assign items.
|
So in a History Lesson Plan, all the items with Day 1 will be assigned on the first day you do History, all the items with Day 2 will be on the 2nd day you do History, etc. You can place each item
on a separate Day number, or you can have multiple items on the same Day number. Day 1 and Day 2 may be Monday and Tuesday of the same week, or they can be September 1 and October 1, it will all
depend on how you choose the create the Assignments when you are ready to do the work.
|
|
If you have a Grammar workbook that has 180 lessons, you might create a Lesson Plan where you have one lesson per day so that it spreads out evenly over your school year. If you also have a phonics
workbook, you might choose to put that in the same plan, and have a phonics lesson every other Day - so that one day there is just a Grammar lesson, and the next there is a Grammar and a Phonics
lesson. You can create any pattern you like with your plans.
|
Here is a list of actions that can be performed with Lesson Plans, with their Help Page links:
|
- Add a single item to a Lesson Plan
- Add multiple items to a Lesson Plan with repeating or incremented Page/Lesson/Chapter text.
- Change Day Numbers for selected Lesson Plan items.
- Copy a Lesson Pan item to create more Lesson Plan items with repeating or incremented Page/Lesson/Chapter text.
- Copy Lesson Plan items into a new or existing Lesson Plan
- Create a Lesson Plan with a repeating pattern
- Create Assignments from Lesson Plan items using the Scheduler tool
- Delete one or more Lesson Plan items
- Edit one or more Lesson Plan items
- Export Lesson Plan items to a .CSV file
- Import a Lesson Plan that has been shared by another HSTOnline user
- Set the Used status for a Student for selected Lesson Plan items
- Share all or part of a Lesson Plan with other HSTOnline users
- Generate a list of Topics from a Lesson Plan using the Scope & Sequence - Lesson Plan Report
- Generate a list of Supplies from a Lesson Plan using the Supplies Report
|
Lesson Plan Fields
Below is a list of all the possible fields for any Lesson Plan item you create. The only required fields are Lesson Plan name and
Subject/Course. You may enter any additional details you want or need for your homeschooling records. You can enter these details when creating the
Lesson Plan item, or you can go back and add additional information after the fact using the Edit features.
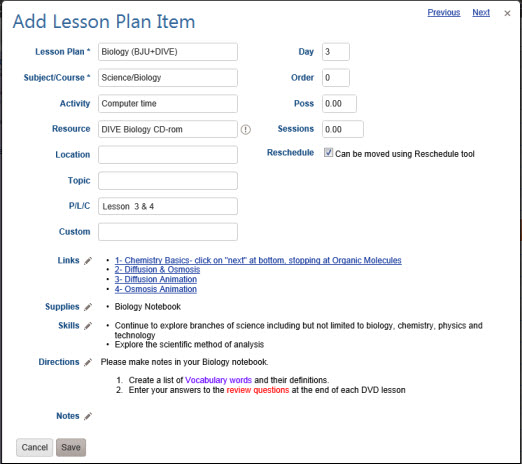 Add Lesson Plan Item Form
| Field Name |
Notes |
Status |
| Lesson Plan |
Each LP item must be attached to a specific Lesson Plan Name. If you are viewing a specific Lesson Plan when you click the Add button, that Lesson
Plan Name will be auto-filled into the Lesson Plan field. You may change it to a different name if you want to create an item for a different Lesson Plan than the one you are currently viewing.
The Lesson Plan field is a Smart-Entry Field, allowing you to create a new Lesson Plan Name on the fly while creating a new LP item. |
Required |
| Subject/Course |
Select a Subject or Subject and Course from the list you have created. The Subject/Course field is a
Smart-Entry Field, allowing you to create a new Subject or Course on the fly while creating a new LP item. |
Required |
| Activity |
A short description of the type of work to be done, e.g. Lesson, Test, Reading, Worksheet, etc. Select an Activity from the list you
have created. The Activity field is a Smart-Entry Field, allowing you to create a new Activity on the fly while creating a new LP item. |
Optional - Enabled |
| Resource |
Select a Resource from the list. Your options will be limited to those Resources which are tied to the Subject or Subject/Course for this Assignment
and those tied to the All Subjects option. The Resource field is a Smart-Entry Field, allowing you to create a new Resource on the fly while
creating a new LP item. |
Optional - Enabled |
| (Assignment) Location |
Allows you to track the location where teaching/learning took place. This is especially helpful for homeschoolers in areas where one is required to
document the number of hours of schooling that take place inside vs. outside the home. These details can be documented in the Home/Away Report.
The Location field is a Smart-Entry Field, allowing you to create a new Location on the fly while creating a new LP item. |
Optional - Disabled |
| Topic |
An optional field of up to 150 characters where you can enter a short description of the material covered in the lesson. Topics can be used to create a
Scope & Sequence Report. |
Optional - Disabled |
| PLC (Page/Lesson/ Chapter) |
A field of up to 150 characters to contain the actual Page, Lesson, Chapter or other identifying information for the Student on where the work is to be found in the textbook. The copy functions of
HSTOnline allow you to create multiple LP items where the PLC field is automatically incremented (Lesson 1, Lesson 2, Lesson 3, etc.)
based on parameters you set. |
Optional - Enabled |
| Custom |
An optional field where you can enter up to 150 characters with any custom text you want to further classify the LP item for your own use. |
Optional - Disabled |
| Day |
The Day field creates the sequence in which Lesson Plan items will be assigned. A 'Day' represents a day of school for that subject. Lesson Plan items with the same Day value will be placed on the
same date when using the Scheduler function to create Assignments. |
Required |
| Order |
When you have multiple items set for the same Day, you can use the Order field to determine which items should be done first, second, third, etc. |
Optional - Disabled |
| Poss |
When creating your Lesson Plan items, you can enter the Points Possible that will apply for the Assignments generated from this item. |
Optional - Enabled |
| Time Spent |
An optional method for keeping track of how much time is spent on each subject/course. |
Optional - Enabled |
| Sessions |
An optional method for keeping track of how often your student studies a subject/course. Choose to use Sessions instead of Time Spent in
Program Options or you can choose to disable both fields. Only one or the other can be active at any one time. |
Optional - Disabled |
| Reschedule |
Check the box to allow Assignments created from this Lesson Plan item to be moved as part of the Reschedule process. Uncheck the box to prevent the
created Assignments from being moved with Reschedule. The checkmark to enable Rescheduling is applied by default. |
Always visible |
| Links |
Use this field to enter URLs of websites that are related to the LP item you are creating. |
Optional - Disabled |
| Supplies |
You may enter a list of Supplies that will be required to complete an assignment. When entering Supplies, you can enter a name for the supply item as well as a
quantity needed, and print a Supplies Report. |
Optional - Disabled |
| Skills |
You can attach one or more Skills to any LP item to track your Student's progress in that area. |
Optional - Disabled |
| Directions |
Enter any directions you want the Student to have when completing the Assignment. |
Optional - Enabled |
| Notes |
The Notes section is intended as a place for the Teacher to enter notes. Notes will not appear on the Assignment window when logged in under a
Student User Account. Notes can be included in the Daily Task List if desired. |
Optional - Disabled |
Sharing Lesson Plans
You can make your Lesson Plans available to other HSTOnline users and/or peruse the Lesson Plans that others have elected to share. You might find it helpful to review some of these
shared plans to see if any meet your needs, thereby cutting down on the data entry you need to do, or even just to get ideas of how you might want to set up your own Lesson Plans. You can opt to share all or
part of any Lesson Plan you have created.
| Do not share copyrighted materials |
| While we encourage you to share Lesson Plans you may not share copyrighted materials. Please honor the licensing rights of others. Shared Lesson Plans found to contain copyrighted materials will
be removed from the Shared Lesson Plans list. If you find a Lesson Plan on the list which you believe violates this standard, please contact
Homeschool Tracker Support Staff. Thank you for your cooperation.
|
Please refer to the Sharing Lesson Plans Help Page for full instructions on sharing your plans or importing plans that others have made available for sharing.
Exporting Lesson Plan Items
See the Export Help Page for information on other data that can be exported from your HSTOnline database.
You can use the Export option in the Lesson Plan Action button to create a .CSV file of displayed items. You can then use the data in the file in whatever way
you need.
All of the items in the view will be included in the .CSV file that is created. There is no need to select specific items. Use the search and filter capabilities of the Lesson Plan page to limit the display,
or leave everything set to 'all' to choose every possible item for inclusion. See the Lesson Plan Display and Filters Help Page to learn more about the
filtering options available.
 Lesson Plan Action Menu
- On the Lesson Plan page, set the filters to display the items you want to copy to an exported file.
- Click or touch the Action button and choose Export.
- When the file is ready, your browser will prompt you to open or save the file. The program used to open the file will depend on your computer settings for CSV files. Typically, they are opened in a
spreadsheet program.
- Data from all possible columns will be included in the exported file.
- Data appears in the export file exactly as it does in the grid you are viewing: numbers in Links, Supplies, and Skills fields; asterisks in the Dir (*) and Notes (*) fields, the first 150
characters in the Directions (Preview) and Notes (Preview) fields.
- Use the features of your spreadsheet or other program to adjust column widths, sort data, and make whatever other changes you wish.