Page/Lesson/Chapter Copy Options
Introduction
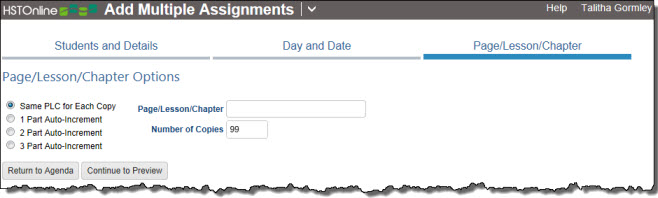
The Page/Lesson/Chapter field (PLC) tells the Student where to turn in his textbook to complete the Assignment. When creating multiple Assignments or Lesson Plan items, use the Page/Lesson/Chapter field copy
options to complete this field for all items created. You can elect to have the same text repeated in the Page/Lesson/Chapter field for each item created, or you can or set parameters to have HSTOnline
auto-increment the data in this field. If you have disabled the Page/Lesson/Chapter field under the Program Options: Optional Fields, the only option
available to you is to set the number of copies to be created.
- A Same Page/Lesson/Chapter entry might be: Do the next lesson.
- A 1-part auto-increment might be: Lesson 1, Lesson 2, Lesson 3, or Pages 1-5, Pages 6-10
- A 2-part auto-increment might be: Lesson 1-A; Lesson 1-B; Lesson 1-C; Lesson 2-A; Lesson 2-B
- A 3-part auto-increment might be: Chapter 1-Section 1.1, Chapter 1-Section 1.2, Chapter 1-Section 2.1, Chapter 1-Section 2.2
|
 PLC Options - Default View
 PLC Options - When PLC Field is Disabled
Enabling the PLC field
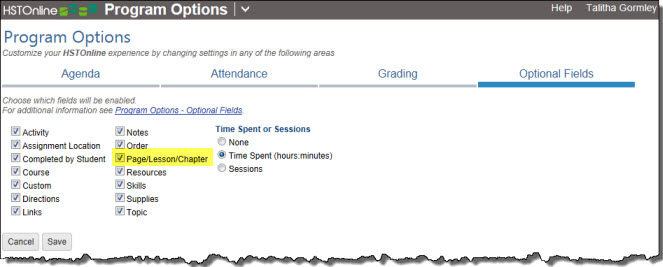
The PLC field is optional and can be enabled and disabled via Program Options in the HSTOnline menu. By default, the PLC field is enabled.
 Enable PLC Field
Disabling this field will:
- Remove the PLC field from the Assignment and Lesson Plan add/edit windows
- Remove the PLC column from the Agenda - List View and Lesson Plan list
- Set the PLC Options to 'Number of Copies' only
- On the HSTOnline menu, click or touch Program Options.
- On the Program Options page, click or touch Optional Fields.
- Click or touch the box next to Page/Lesson/Chapter to add a checkmark to enable the field; or to remove a checkmark to disable the field.
- Click or touch Save to keep your changes.
- Click or touch 'Ok' on the 'Changes Saved' window.
Making Copies with PLC Field Disabled
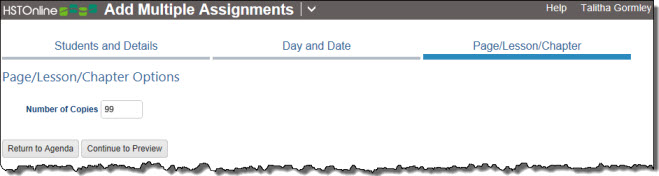
The Page/Lesson/Chapter field is optional, and you can choose to disable the field if you wish.
- When PLC is disabled, the only option you have for this area is to set the number of copies you want.
 PLC Field Disabled - Options
- Number of Copies: Enter the number of copies you wish to make. The default entry is 99. HSTOnline will remember your settings.
- Click or touch Continue to Preview to review the items that will be created.
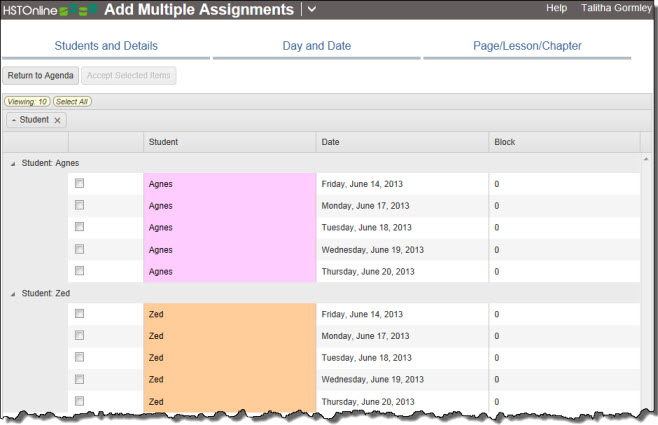 PLC Field Disabled - Preview
- If the results are not what you expected, you can click or touch one or more of the tabbed areas to reset your options and then click or touch the Return to Preview button
to see the new results.
- Once you are satisfied with the items displayed in the Preview, you can select the items you want to add to your Agenda. Click or touch the Select All badge to select all
the items in the list. Alternatively,
- you can click or touch the checkbox for each item you want to accept.
- you can use your mouse to click and drag over contiguous entries in the list to select those items.
- on a touch device, you can touch and drag your finger over contiguous entries in the list to select those items.
- Click or touch Accept Selected Items to add the highlighted items to your Agenda or Lesson Plan.
Using the 'Same Page/Lesson/Chapter' Option
Use this option to create Assignments or Lesson Plan items with the same text in the Page/Lesson/Chapter field for each item, or to leave the PLC field blank for each item.
- The 'Same Page/Lesson/Chapter' option will be selected by default.
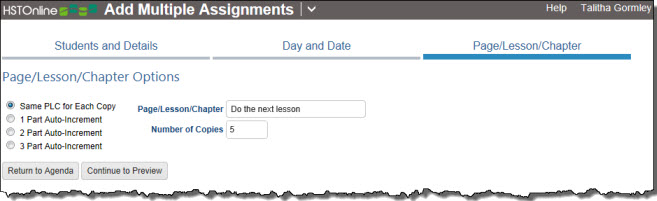 Same Page/Lesson/Chapter - Options
- Page/Lesson/Chapter: Type in the text you want to use, up to 150 characters. You can leave the Text field blank if you prefer.
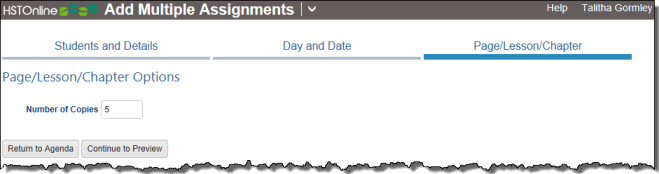
- Number of Copies: Enter the number of copies you wish to make. The default entry is 99. HSTOnline will remember your settings.
- Click or touch Continue to Preview to review the items that will be created.
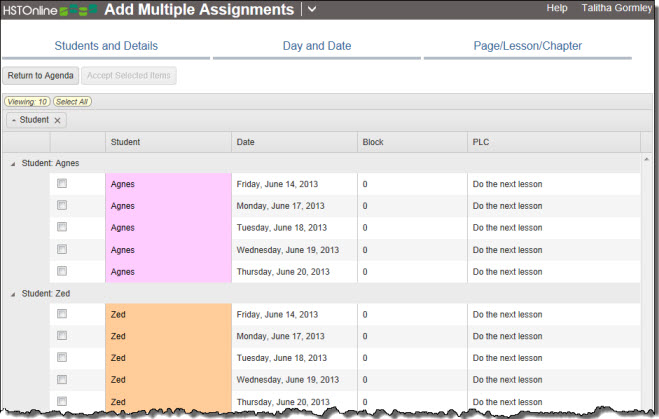 Same Page/Lesson Chapter - Preview
- If the results are not what you expected, you can click or touch one or more of the tabbed areas to reset your options and then click or touch the Return to Preview button
to see the new results.
- Once you are satisfied with the items displayed in the Preview, you can select the items you want to add to your Agenda. Click or touch the Select All badge to select all
the items in the list. Alternatively,
- you can click or touch the checkbox for each item you want to accept.
- you can use your mouse to click and drag over contiguous entries in the list to select those items.
- on a touch device, you can touch and drag your finger over contiguous entries in the list to select those items.
- Click or touch Accept Selected Items to add the highlighted items to your Agenda or Lesson Plan.
Creating a '1-Part Auto-Increment' Pattern
Use the 1 Part Auto-Increment option to note the lesson or chapter number, or to indicate a page or page range. For this example, we will create a 1-part auto-increment that will create the result of:
Page(s) 1-2, Page(s) 3-4, etc.
- In the Page/Lesson/Chapter options tab, click or touch 1 Part Auto-Increment.
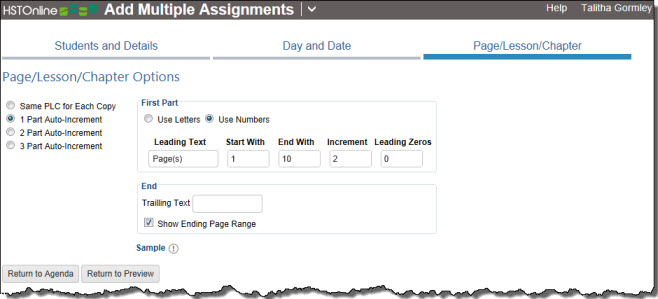 1 Part Auto-Increment Options
- First Part:
- Use Numbers/Use Letters: Choose whether you'd like to use letters or numbers in your increment label. The default option is set to use numbers.
- Leading Text: Enter your Leading Text, up to 20 characters. The default entry is Page(s), but you can enter any text you like, or leave it blank.
- Start With: Enter the first page, lesson or chapter number you will be assigning. Our example starts on Page 1, so we'll enter a 1 in this box.
- End With: Enter the last page, lesson or chapter to be included in this assignment series. For our example, we're going to assign the first 10 pages, so the
entry here is 10.
- Increment: The increment field allows you to specify how many units pass by before the beginning of the next assignment. Our Assignemnts are two pages long, so
we'll set the increment to 2.
- To figure what your increment should be subtract the starting page number of the first entry by the starting page entry of the second entry. In our case, that's 3-1=3. So our increment
is 2.
- Leading Zeros: If you have elected to Use Numbers, you can enter the number of Leading Zeros you want, from 0 to 3. The default entry is zero.
- The purpose of this option is to allow you to sort an assignment list by the Page/Lesson/Chapter field and keep your items in order.
- Click here to see an example of sorting with and without leading zeros.
- End:
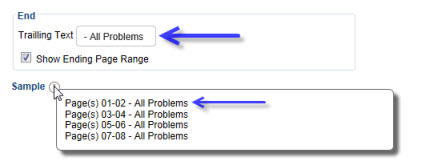
- Trailing Text: The Trailing Text option allows you to add the same notation to the end of each Page/Lesson/Chapter entry. For example, in a Math assignment series,
you might choose to enter 'Odds Problems Only', to tell the student to skip even-numbered problems. This field is blank by default.
- Show Ending Page Range: When your First Part Increment is greater than one, check this box to show the ending range of each PLC entry. The box is checked by default.
- In our example we are assigning two pages at a time so checking this box will display that Page/Lesson/Chapter fields as:
Page 1-2, Pages 3-4, Pages 5-6, etc.
- If the box is unchecked, the Page/Lesson/Chapter field in this example will show just the starting page number for each item:
Page 1, Page 3, Page 5, etc.
- Click the Sample icon to see what the Page/Lesson/Chapter field will look like for the first four items in your series. If there is a problem, tweak your
1 Part Auto-Increment settings as needed and check the sample again. If you like what you see, you can continue to the Preview of all the items to be created.
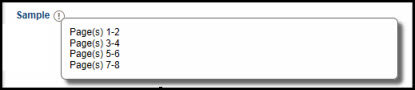 Sample Pattern
 Sample Pattern - with Trailing Text
- Click or touch Continue to Preview to review the items that will be created.
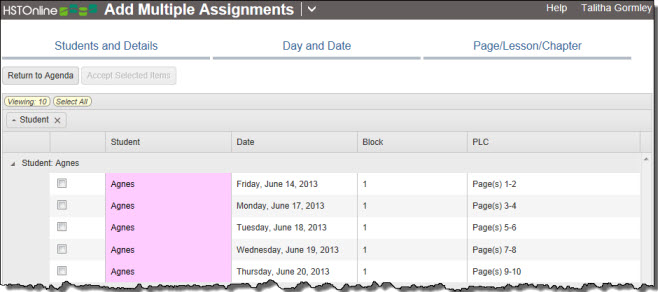 1 Part Auto-Increment - Preview
- If the results are not what you expected, you can click or touch one or more of the tabbed areas to reset your options and then click or touch the Return to Preview button
to see the new results.
- Once you are satisfied with the items displayed in the Preview, you can select the items you want to add to your Agenda. Click or touch the Select All badge to select all
the items in the list. Alternatively,
- you can click or touch the checkbox for each item you want to accept.
- you can use your mouse to click and drag over contiguous entries in the list to select those items.
- on a touch device, you can touch and drag your finger over contiguous entries in the list to select those items.
- Click or touch Accept Selected Items to add the highlighted items to your Agenda or Lesson Plan.
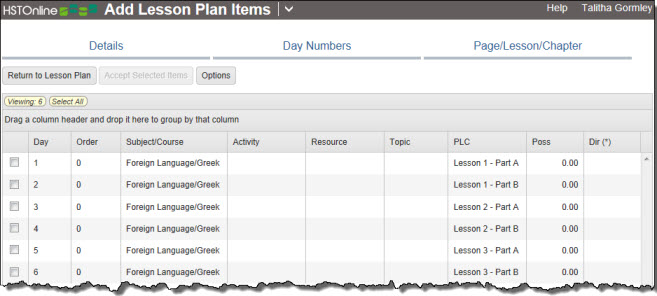
Creating a '2-Part Auto-Increment' Pattern
Use the 2-part increment option to create Assignments or Lesson Plans where the chapter or lesson has multiple parts, such as: Lesson 1 - Part A; Lesson 1 - Part B; Lesson 2 - Part A; Lesson 2 -B, etc.
When using this increment pattern, the first entry from each part is used, then the pattern in the Second Part is run through until completion, then the first part is incremented and the pattern in
the Second Part is exhausted again, then the First Part is incremented again, and so on until the First Part pattern has been exhausted. For example:
- Your book has 3 lessons, each chapter has 2 parts
- The First Part of your auto-increment is set to create items for Lesson 1 through Lesson 3
- The Second Part of your auto-increment is set to create the 2 parts in each chapter
- The created items will be:
- Lesson 1 - Part A; Lesson 1 - Part B
- Then, since the Part 2 items have run through the entire pattern (Parts A and B), Part 1 will be incremented to create the next batch of items
- Lesson 2 - Part A; Lesson 2 - Part B
- and so on...
When setting up a Lesson Plan, you can use this 2-part increment even if your Chapters have different numbers of lessons - Lesson 1 has 3 parts, Lesson 2 has 4 parts, Lesson 3 has 4 parts,
Lesson 4 has 3 parts, etc. Set the 2-part increment so that the First Part covers all of your Lessons, and then set up the Second Part to create items for the
maximum number of Parts for any of your chapters. In this example - some Lessons have 3 parts and some have 4, so set the Second Part of the increment pattern
to create enough items for 4 parts per lesson. Then, in the preview window, you can deselect the 'extra' parts for lessons where they are not needed. Or you can accept them all and delete the extras after
saving to your Lesson Plan.
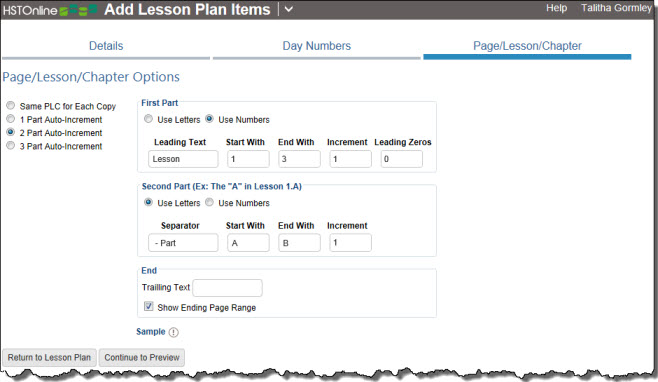
- In the Page/Lesson/Chapter options tab, click or touch 2 Part Auto-Increment.
 2 Part Auto-Increment - Options
- First Part:
- Use Numbers/Use Letters: Choose whether you'd like to use letters or numbers in your increment label. The default option is set to use numbers.
- Leading Text: Enter your Leading Text, up to 20 characters. The default entry is Page(s), but you can enter any text you like, or leave it blank. For this example,
we'll enter Lesson.
- Start With: Enter the first page, lesson or chapter number you will be assigning. Our example starts on Lesson 1, so we'll enter a 1 in this box.
- End With: Enter the last page, lesson or chapter to be included in this assignment series. For our example, we're going to assign the first 3 Lessons, so the
entry here is 3.
- Increment: The increment field allows you to specify how many units pass by before the beginning of the next assignment. This field defaults to 1.
- Leading Zeros: If you have elected to Use Numbers, you can enter the number of Leading Zeros you want, from 0 to 3. The default entry is zero.
- The purpose of this option is to allow you to sort an assignment list by the Page/Lesson/Chapter field and keep your items in order.
- Click here to see an example of sorting with and without leading zeros.
- Second Part:
- Use Numbers or use Letters: Choose whether you'd like to use letters or numbers in your increment label. The default option is set to use letters, which is
what we're using in our example as well.
- Separator: Use this field to separate the first part from the second part.
- You can use a dash, colon, semicolon, period, spaces, or even text as your separator, up to 20 characters.
- In our example, we'll use a dash and the word Part (- Part).
- Start With: Enter the letter or number for the section. For our example, our lessons have two parts: A and B. Enter A in this field.
- End With: Enter the last letter or number for the section. For our example, enter B.
- Increment: The increment field allows you to specify how many sections to assign at a time. The default is set to 1.
- Leading Zeros: If you have elected to Use Numbers, you can enter the number of Leading Zeros you want, from 0 to 3. The default entry is zero.
- The purpose of this option is to allow you to sort an assignment list by the Page/Lesson/Chapter field and keep your items in order.
- Click here to see an example of sorting with and without leading zeros.
- End:
- Trailing Text: The Trailing Text option allows you to add the same notation to the end of each Page/Lesson/Chapter entry. This field is blank by default.
- Show Ending Page Range: When your Second Part Increment is greater than one, check this box to show the ending range of each PLC entry. The box is checked by
default. The 'Show Ending Page Range' applies only to the last section of your pattern, in this case the Second Part of the 2 Part Auto-Increment.
- Click the Sample icon to see what the Page/Lesson/Chapter field will look like for the first four items in your series. If there is a problem, tweak your
2 Part Auto-Increment settings as needed and check the sample again. If you like what you see, you can continue to the Preview of all the items to be created.
- Click or touch Continue to Preview to review the items that will be created.
 2 Part Auto-Increment - Preview
- If the results are not what you expected, you can click or touch one or more of the tabbed areas to reset your options and then click or touch the Return to Preview button
to see the new results.
- Once you are satisfied with the items displayed in the Preview, you can select the items you want to add to your Agenda. Click or touch the Select All badge to select all
the items in the list. Alternatively,
- you can click or touch the checkbox for each item you want to accept.
- you can use your mouse to click and drag over contiguous entries in the list to select those items.
- on a touch device, you can touch and drag your finger over contiguous entries in the list to select those items.
- Click or touch Accept Selected Items to add the highlighted items to your Agenda or Lesson Plan.
Creating a '3-Part Auto-Increment' Pattern
Use the 3-part increment option to create Assignments or Lesson Plans where the chapter or lesson has multiple parts, each of which also have multiple parts, such as:
- Lesson 1 - Part A: Section 1
- Lesson 1 - Part A: Section 2
- Lesson 1 - Part A: Section 3
- Lesson 1 - Part B: Section 1
- Lesson 1 - Part B: Section 2
- Lesson 1 - Part B: Section 3
- Lesson 2 - Part A: Section 1
- Lesson 2 - Part A: Section 2
When setting up a Lesson Plan, you can use this 3-part increment even if the number of multiple parts is different between your items. Set the 3-part increment so that the First Part covers all of your
Lessons, and then set up the Second Part and Third Part to create the maximum number of Parts for any of your Lessons. Then, in the preview window, you can
deselect the 'extra' parts for lessons where they are not needed. Or you can accept them all and delete the extras after saving to your Lesson Plan.
- In the Page/Lesson/Chapter options tab, click or touch 3 Part Auto-Increment.
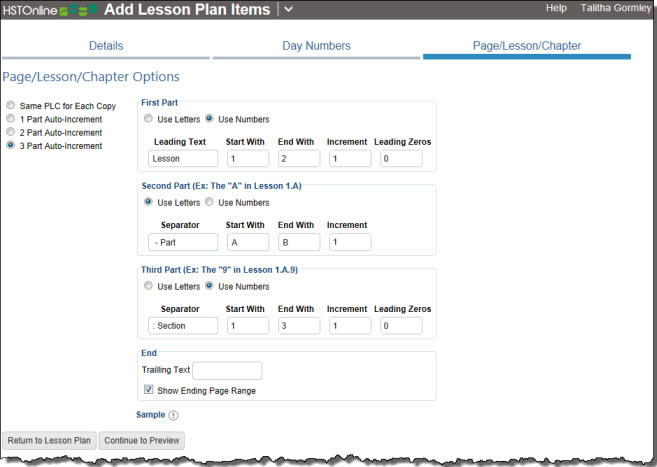 Auto-Increment 3-Part Options
- First Part:
- Use Numbers/Use Letters: Choose whether you'd like to use letters or numbers in your increment label. The default option is set to use numbers.
- Leading Text: Enter your Leading Text, up to 20 characters. The default entry is Page(s), but you can enter any text you like, or leave it blank. For this example,
we'll enter Lesson.
- Start With: Enter the first page, lesson or chapter number you will be assigning. Our example starts on Lesson 1, so we'll enter a 1 in this box.
- End With: Enter the last page, lesson or chapter to be included in this assignment series. For our example, we're going to assign the first 2 Lessons, so the
entry here is 2.
- Increment: The increment field allows you to specify how many units pass by before the beginning of the next assignment. This field defaults to 1.
- Leading Zeros: If you have elected to Use Numbers, you can enter the number of Leading Zeros you want, from 0 to 3. The default entry is zero.
- The purpose of this option is to allow you to sort an assignment list by the Page/Lesson/Chapter field and keep your items in order.
- Click here to see an example of sorting with and without leading zeros.
- Second Part:
- Use Numbers or use Letters: Choose whether you'd like to use letters or numbers in your increment label. The default option is set to use letters, which is
what we're using in our example as well.
- Separator: Use this field to separate the first part from the second part.
- You can use a dash, colon, semicolon, period, spaces, or even text as your separator, up to 20 characters.
- In our example, we'll use a dash and the word Part (- Part).
- Start With: Enter the letter or number for the section. For our example, our lessons have two parts: A and B. Enter A in this field.
- End With: Enter the last letter or number for the section. For our example, enter B.
- Increment: The increment field allows you to specify how many sections to assign at a time. The default is set to 1.
- Leading Zeros: If you have elected to Use Numbers, you can enter the number of Leading Zeros you want, from 0 to 3. The default entry is zero.
- The purpose of this option is to allow you to sort an assignment list by the Page/Lesson/Chapter field and keep your items in order.
- Click here to see an example of sorting with and without leading zeros.
- Third Part:
- Use Numbers or use Letters: Choose whether you'd like to use letters or numbers in your increment label. The default option is set to use numbers, which is what
we're using in our example as well.
- Separator: Use this field to separate the second part from the third part.
- You can use a dash, colon, semicolon, period, spaces, or even text as your separator, up to 20 characters.
- In our example, we'll use a colon and the word Section (: Section).
- Start With: Enter the letter or number for the section. For our example, our sections have three parts. Enter 1 in this field.
- End With: Enter the letter or number for the section. For our example, our sections have three parts. Enter 3 in this field.
- Increment: The increment field allows you to specify how many sections to assign at a time. This defaults to 1.
- Leading Zeros: If you have elected to Use Numbers, you can enter the number of Leading Zeros you want, from 0 to 3. The default entry is zero.
- The purpose of this option is to allow you to sort an assignment list by the Page/Lesson/Chapter field and keep your items in order.
- Click here to see an example of sorting with and without leading zeros.
- End:
- Trailing Text: The Trailing Text option allows you to add the same notation to the end of each Page/Lesson/Chapter entry. This field is blank by default.
- Show Ending Page Range: When your Third Part Increment is greater than one, check this box to show the ending range of each PLC entry. The box is checked by
default. The 'Show Ending Page Range' applies only to the last section of your pattern, in this case the Third Part of the 3 Part Auto-Increment.
- Click the Sample icon to see what the Page/Lesson/Chapter field will look like for the first four items in your series. If there is a problem, tweak your 3 Part
Auto-Increment settings as needed and check the sample again. If you like what you see, you can continue to the Preview of all the items to be created.
- Click or touch Continue to Preview to review the items that will be created.
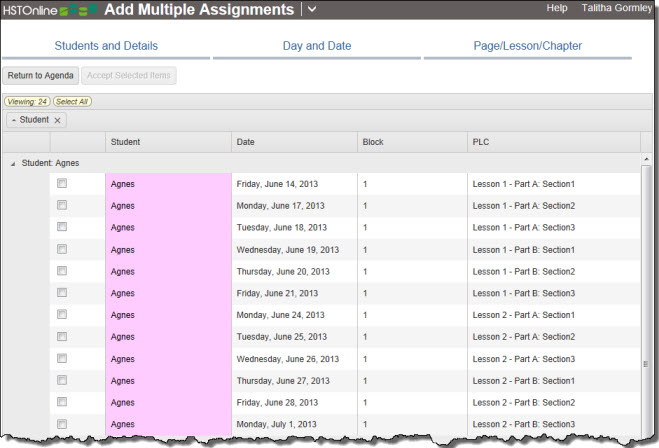 3 Part Auto-Increment - Preview
- If the results are not what you expected, you can click or touch one or more of the tabbed areas to reset your options and then click or touch the Return to Preview button
to see the new results.
- Once you are satisfied with the items displayed in the Preview, you can select the items you want to add to your Agenda. Click or touch the Select All badge to select all
the items in the list. Alternatively,
- you can click or touch the checkbox for each item you want to accept.
- you can use your mouse to click and drag over contiguous entries in the list to select those items.
- on a touch device, you can touch and drag your finger over contiguous entries in the list to select those items.
- Click or touch Accept Selected Items to add the highlighted items to your Agenda or Lesson Plan.
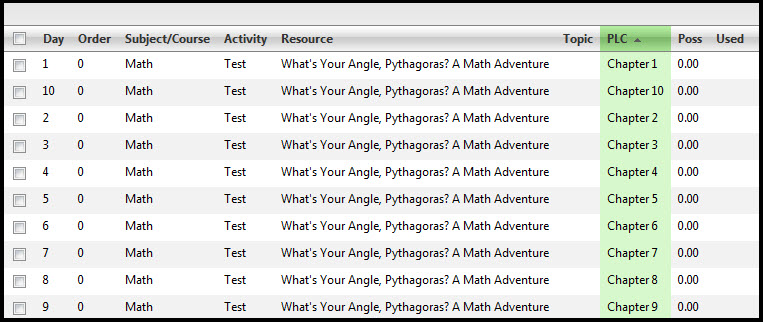
Why use Leading Zeros?
The Add Multiple and Copy features of Lesson Plan items and Assignments give the option to add Leading Zeros to your Page/Lesson/Chapter field entries. Why is this important?
- The Page/Lesson/Chapter field is an alphanumeric field, accepting letters and numbers
- When an alphanumeric field is sorted, the program does not sort the 'number' field separately.
- When the PLC field contains items of Lessons 1 through 10, the alphanumeric sort will place Lesson 10 immediately following Lesson 1. (Fig. 1)
- By using the Leading Zeros option, your items will show Lesson 01, Lesson 02, etc., so that the sort will display as desired. (Fig. 2)
 Sorting Page/Lesson/Chapter without Leading Zeros (Fig. 1)
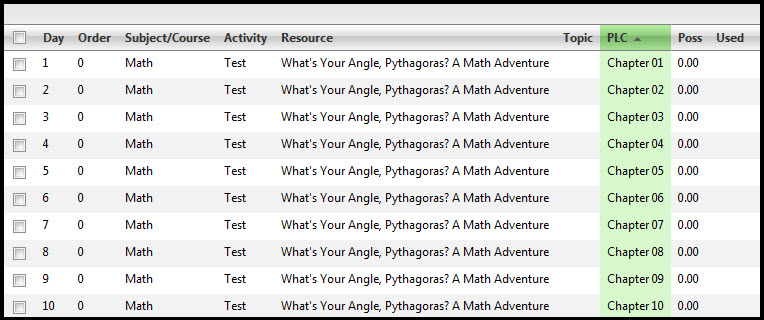 Sorting Page/Lesson/Chapter with Leading Zeros (Fig. 2)