Changing Day Numbers of Lesson Plan Items
Skip to
Related Lesson Plan Topics
Related Topics
Introduction to the Day Field
The Day field represents a day of school work. The items that you want to accomplish on the first day you use a Lesson Plan will all get a sequence number of 1; the items to be done on the second day that you
use the plan will get a sequence number of 2. It does not matter if the actual dates on which the work is done are sequential or not. Days 1 and 2 could be Monday and Tuesday in the same week, or September 1
and October 1, whatever meets your needs for the area of study. You can place each item on a separate Day number, or you can have multiple items on the same Day number.
Day numbers are not tied to specific dates or days of the week. They simply provide a way to order and organize your lesson plan items. Day and date details are set as part of the
Scheduler process of creating Assignments from your Lesson Plan items. If you have a Subject/Course that you only assign on certain days of the week (for example,
Science is only taught on Tuesdays and Thursdays), you can use the Presets feature to assist in assigning just to those days of the week, or you can
use the Weekly feature in the Day Options area to choose specific days of the week on which to assign items.
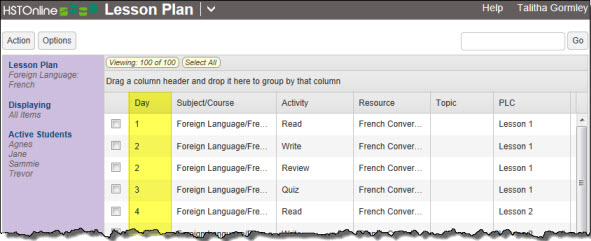 Lesson Plan Day Numbers
Sometimes you may find it helpful to resequence the items in a Lesson Plan. HSTOnline gives you an easy way to accomplish this task. Perhaps you decided to omit certain items from your original Lesson
Plan. After you delete them you can use this feature to reorder the items that come after to remove any sequence number gaps. This is not required, but for those of us who like things neat and orderly the
ability to renumber is crucial!
If you wish, you can edit each individual Lesson Plan item to change the existing Day number, using the Previous or Next links to move between the items in the Lesson Plan. However, if you have a large number
of items to change, that process becomes tedious very quickly. You can use the Lesson Plan Change Day Number action to change the Day field for a group of selected Lesson Plan
items using one of the four options outlined below.
You have four options when changing Day Numbers for two or more Lesson Plan items at the same time. See each section below for detailed instructions on using each of these options.
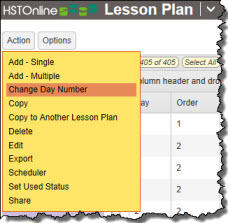 Lesson Plan Action: Change Day Number
- Increase Day Numbers: This option will take the existing Day number for each of your selected items and increases it by the increment you choose. Day numbers can range from 0
to 999. You can use this option to create a 'hole' in your existing items if you have additional lesson plan items to add.
- Decrease Day Numbers: This option will take the existing Day number for each of your selected items and decreases it by the increment you choose. Day numbers can range from 0
to 999. You can use this option to remove a 'hole' in your existing items. HSTOnline ignores gaps in Day numbers, but you might prefer to have things listed in perfect sequential order.
- Reset Day Numbers: The Reset Day Numbers option ignores the existing values and reassigns new Day numbers for the selected items based on the Starting With and Increment values
you provide. The overall order of the original items will be maintained, but the new Day number assigned will be determined by your settings. You can use this option if you want two or more items to have
the same Day Number by setting the starting Day number, and then setting the increment to zero.
- Make it Fit: You might find it necessary to alter your existing lesson plan to get more work done in fewer days. The "Make it Fit" option helps you do that by spreading the
selected Lesson Plan items evenly over the number of Days you specify. Your Number of days must be equal to or less than the total number of items in the Lesson Plan that you want to resequence. Since a
gap between sequence numbers has no meaning in the Lesson Plan Scheduler process, you cannot create gaps with the "Make it Fit" tool.
The 'Change Day Number' menu is a tabbed area. You can move back and forth between the Selection and Options tabs as often as you like by clicking or touching the 'Selections' or 'Options' tab name. The
active tab area is indicated by a dark blue line under the tab name.
This Help Page covers changing Day Numbers of existing Lesson Plan items. You can also preform the following actions on Lesson Plan items:
- Add a single item to a Lesson Plan
- Add multiple items to a Lesson Plan with repeating or incremented Page/Lesson/Chapter text.
- Create a Lesson Plan with a repeating pattern
- Create Assignments from Lesson Plan items using the Scheduler tool
- Delete one or more Lesson Plan items
- Edit one or more Lesson Plan items
- Export Lesson Plan items to a .CSV file
- Import a Lesson Plan that has been shared by another HSTOnline user
- Set the Used status for a Student for selected Lesson Plan items
- Share all or part of a Lesson Plan with other HSTOnline users
- Generate a list of Topics from a Lesson Plan using the Scope & Sequence - Lesson Plan Report
- Generate a list of Supplies from a Lesson Plan using the Supplies Report
|
Selecting LP Items to Change
When changing Day Numbers for Lesson Plan items, you can pre-select the items you want to change, or you can have HSTOnline change the Day Numbers for all of the items in the Lesson Plan starting at
an existing Day Number of your choosing.
Changing Day Number without pre-selecting items
- On the HSTOnline menu, click or touch 'Lesson Plan' under the 'Schedules and Planning' section.
- Set the Lesson Plan and Displaying filters to view the items you want to work with.
- Click or touch the Action button and choose 'Change Day Number' to open the Change Day Numbers window.
 Change Day Numbers - Selection Window
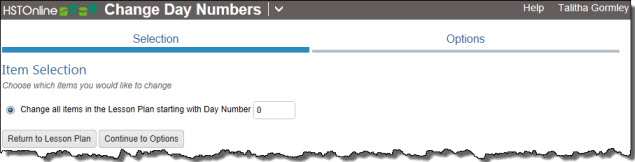
- Enter the Day Number you want to start with. When no items are pre-selected, this entry will default to zero. You can change it to any other number.
- HSTOnline will make the changes you indicate in the Options section to all items in the Lesson Plan beginning with the Day number you enter here.
- Click or touch:
- Return to Lesson Plan to abandon this process and go back to the Lesson Plan you are working with
- Continue to Options to choose how you want to change the Day Numbers for the selected Lesson Plan items. See the sections below for details on setting parameters
for each Change Day Number option:
Pre-selecting the LP items you want to change
- On the HSTOnline menu, click or touch 'Lesson Plan' under the 'Schedules and Planning' section.
- Set the Lesson Plan and Displaying filters to view the items you want to work with.
- Choose the Lesson Plan items you want to change.
- Click the checkbox for each LP item you want to change.
- You can use your mouse to click and drag over contiguous LP items in the list to select those items.
- On a touch device, you can touch and drag your finger over contiguous LP items in the list to select those items.
- Click or touch the Action button and choose 'Change Day Number' to open the Change Day Numbers window.
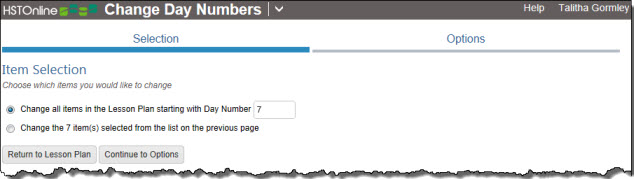
- Two options are presented:
- Change all items in the Lesson Plan starting with the Day Number ___: The suggested 'starting with' number will be the lowest day number from your selected items.
Choosing this option will have HSTOnline ignore the selected items and instead include all items in the Lesson Plan with a Day number equal to or greater than the 'starting with' number -
which may be more items than were originally selected. You can change the starting Day Number to anything you like.
- Change the ___ item(s) selected from the list on the previous page: This option allows you to continue with the Change Day Numbers process using the items which
you have pre-selected from the Lesson Plan.
 Select LP Items to Change
- Click or touch:
- Return to Lesson Plan to abandon this process and go back to the Lesson Plan you are working with
- Continue to Options to choose how you want to change the Day Numbers for the selected Lesson Plan items. See the sections below for details on setting parameters
for each Change Day Number option:
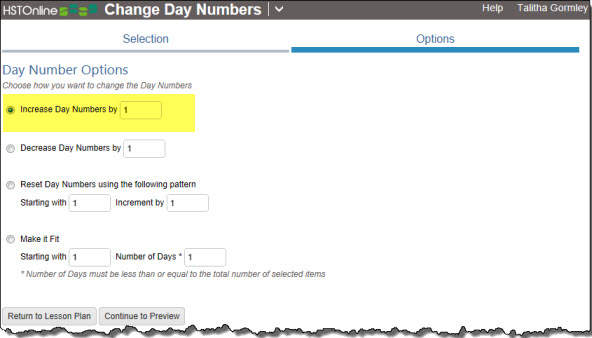
Increase Day Numbers
This option will take the existing Day number for each of your selected items and increase it by the increment you choose. Day numbers can range from 0 to 999. You can use this option to create a 'hole' in
your existing items if you have additional lesson plan items to add.
- If you enter 1 and the existing Day numbers are 1, 2, 3, 4, 5 then the Day numbers after the change will be 2, 3, 4, 5, 6
- If you enter 1 and the existing Day numbers are 995, 996, 997, 998, 999 then the Day numbers after the change will be 996, 997, 998, 999, 999. Since the Day number cannot be more than 999, the item
that was already 999 will stay at 999 and the item that was 998 will increase by 1 and also be at 999.
 Increase Existing Day Numbers
- Select the Lesson Plan items you want to change and click or touch the Continue to Options button or the Options tab name.
- Increase Day Numbers by is the default selection, with a default selection of 1 - which will change each existing Day number for the selected lesson plan items by +1.
- Enter a number in the box.
- Click or touch Continue to Preview.
- Review the Preview, then either change your option settings, or select the items you want to accept for change in the Lesson Plan. See the Preview section below for more
information.
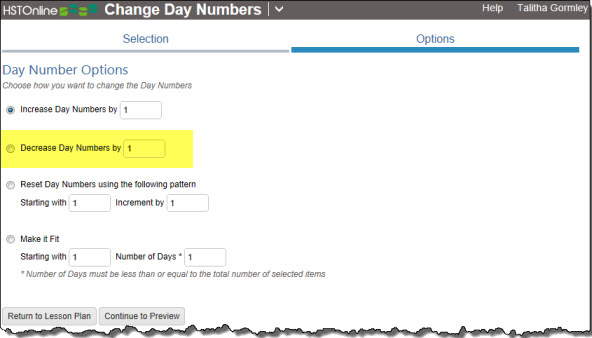
Decrease Day Numbers
This option will take the existing Day number for each of your selected items and decrease it by the increment you choose. Day numbers can range from 0 to 999. You can use this option to remove a 'hole' in
your existing items. HSTOnline ignores gaps in Day numbers, but you might prefer to have things listed in perfect sequential order.
- If you enter 1 and the existing Day numbers are 1, 2, 3, 4, 5 then the Day numbers after the change will be 0, 1, 2, 3, 4
- If you enter 1 and the existing Day numbers are 0, 1, 2, 3, 4 then the Day numbers after the change will be 0, 0, 1, 2, 3. Since the Day number cannot be less than zero, the item that was already zero
will stay at zero and the item that was at 1 will decrease to 0.
 Decrease Existing Day Numbers
- Select the Lesson Plan items you want to change and click or touch the Continue to Options button or the Options tab name.
- Click or touch the radio button for Decrease Day Numbers by.
- The default Decrease value is 1 - which will change each existing Day number for the selected lesson plan items by -1.
- Enter a number in the box
- Click or touch Continue to Preview.
- Review the Preview, then either change your option settings, or select the items you want to accept for change in the Lesson Plan. See the Preview section below for more
information.
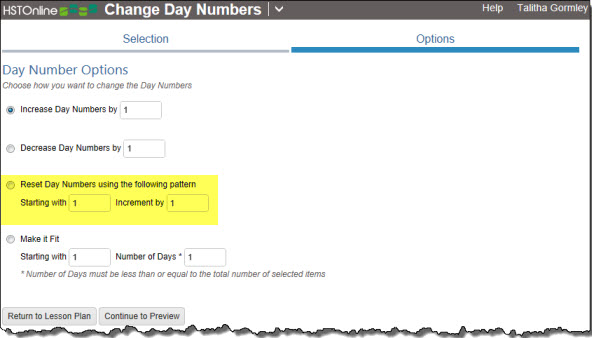
Reset Day Numbers
The Reset Day Numbers option ignores the existing values and reassigns new Day numbers for the selected items based on the Starting With and Increment values you provide. The overall order of the original
items will be maintained, but the new Day number assigned will be determined by your settings. You can use this option if you want two or more items to have the same Day Number by setting the starting Day
number, and then setting the increment to zero.
- If you select 5 Lesson Plan items and enter a Starting With value of 2 and an Increment value of 2 then, no matter what the existing Day numbers are, the
Day numbers after the change will be 2, 4, 6, 8, 10
- If you select 5 Lesson Plan items and enter a Starting With value of 1 and an Increment value of 7 then, no matter what the existing Day numbers are, the
Day numbers after the change will be 1, 8, 15, 22, 29
- If you select 5 Lesson Plan items and enter a Starting With value of 1 and an Increment value of 1 then, no matter what the existing Day numbers are, the
Day numbers after the change will be 1, 1, 1, 1, 1
- Note: If there are duplicate Day Numbers in the original items, there will not be any duplicates after the Reset process.
 Reset Day Numbers
- Select the Lesson Plan items you want to change and click or touch the Continue to Options button or the Options tab name.
- Click or touch the radio button for Reset Day Numbers using the following pattern.
- Enter a number in the Starting With box. This will be the first new Day number assigned.
- Enter a number in the Increment box. This will determine the gap between Day numbers assigned to the selection.
- Click or touch Continue to Preview.
- Review the Preview, then either change your option settings, or select the items you want to accept for change in the Lesson Plan. See the Preview section below for more
information.
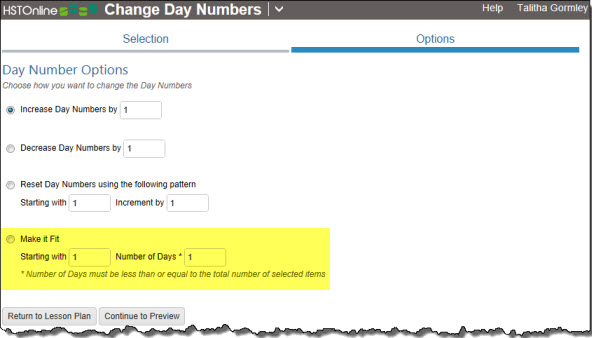
Make It Fit
You might find it necessary to alter your existing lesson plan to get more work done in fewer days. The "Make it Fit" option helps you do that by spreading the selected Lesson Plan items evenly over the
number of Days you specify. Your Number of days must be equal to or less than the total number of items in the Lesson Plan that you want to resequence. Since a gap between sequence numbers has no meaning
in the Lesson Plan Submit process, you cannot create gaps with the "Make it Fit" tool.
- For example, if you are working with 15 items and you choose to Start With 1 and set your number of days to 3; Tracker will resequence the selected 15 items, putting 5 items as Day 1; 5 items as Day 2;
and the last 5 items as Day 3. The overall original order of your items will be maintained as the items are split up.
- If the number of Lesson Plan items selected does not divide evenly over the number of days selected, HSTOnline will split them as equitably as possible over the days allotted.
 Make It Fit
- Select the Lesson Plan items you want to change and click or touch the Continue to Options button or the Options tab name.
- Click or touch the radio button for Make it Fit.
- Enter a number in the Starting With box. This will be the first new Day number assigned.
- Enter a number in the Number of Days box. This will determine number of days over which the selected items will be spread.
- Click or touch Continue to Preview.
- Review the Preview, then either change your option settings, or select the items you want to accept for change in the Lesson Plan. See the Preview section below for more
information.
Previewing Changes
No matter what changes you make using the options above, HSTOnline allows you to preview the changes you're making before committing to them. Unchanged items in the Lesson Plan will appear in the
Preview with a lavender background and items which are being changed will have a white background. (Fig. 1)
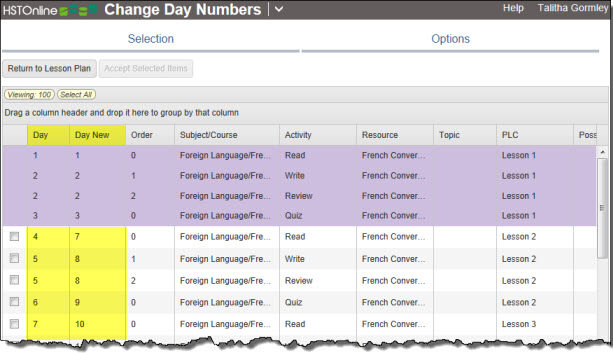 Change Day Number Preview - Increase Day Numbers (Fig. 1)
Carefully review the changes that will be made. You can group and sort the Preview list by any one or more columns to help you determine if you have made the
changes you wanted. In the default preview settings, the Preview is sorted by the Day number column - the original Day number of each item in the Lesson Plan. (Fig. 2)
 Change Day Number Preview - Default Sort by original Day Number (Fig 2.)
In Fig. 3, the Preview has been sorted by the Day New column so that you can view the items in the new order they will have if you accept these changes
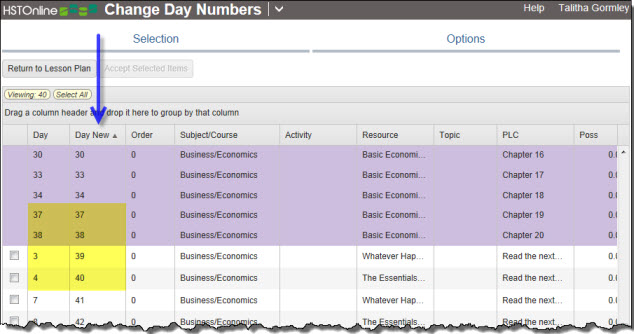 Change Day Number Preview - Default Sort by New Day Number (Fig. 3)
After you have reviewed your changes and are ready to commit to them, select any or all of the changed items. You can click or touch the 'Select All' badge to quickly select all the changed (white) items
at the same time. Once you have selected the items you want, click or touch the 'Accept Selected Items' button to make these changes to your Lesson Plan.
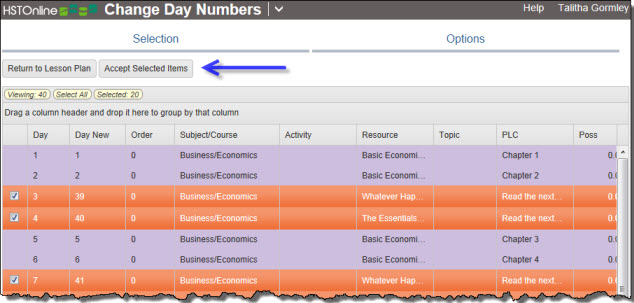 Select and Accept Changes