Creating a Lesson Plan with Repeating Pattern
Skip to
Related Lesson Plan Topics
Related Topics
Introduction
The Lesson Plan Add-Multiple and Copy features can be especially helpful when creating a Lesson Plan where
there is a repeatable pattern of items. Perhaps you have alternating days of lessons and labs in your Science curriculum; maybe it's a math curriculum with lessons followed by a test, followed by more lessons,
and then another test. Nearly any pattern can be designed and entered quickly using the Add-Multiple or Copy functions.
If you have more than one Lesson Plan that follows the same pattern, but with different a different Subject/Course, or a different Resource, etc. you might want to create a sample lesson plan with minimal
details that follows the pattern you need. Then you can use the Copy into another Lesson Plan feature to copy those items into a different plan and
edit the new plan as needed to make it specific to a particular Subject/Course or Resource. You can reuse the sample lesson plan in this way as many times as necessary.
For instance, if you will be using multiple grade levels of a Grammar or Math curriculum, you will likely find that the structure of each grade level is very similar. Set up a sample lesson plan that contains
the pattern you need, then for each Grade Level, you can copy those sample items into a specific plan and adjust the details as needed.
Here is a list of other actions that can be performed with Lesson Plans, with their Help Page links:
|
- Add a single item to a Lesson Plan
- Add multiple items to a Lesson Plan with repeating or incremented Page/Lesson/Chapter text.
- Change Day Numbers for selected Lesson Plan items.
- Copy a Lesson Pan item to create more Lesson Plan items with repeating or incremented Page/Lesson/Chapter text.
- Copy Lesson Plan items into a new or existing Lesson Plan
- Create Assignments from Lesson Plan items using the Scheduler tool
- Delete one or more Lesson Plan items
- Edit one or more Lesson Plan items
- Export Lesson Plan items to a .CSV file
- Import a Lesson Plan that has been shared by another HSTOnline user
- Set the Used status for a Student for selected Lesson Plan items
- Share all or part of a Lesson Plan with other HSTOnline users
- Generate a list of Topics from a Lesson Plan using the Scope & Sequence - Lesson Plan Report
- Generate a list of Supplies from a Lesson Plan using the Supplies Report
|
Determining the Pattern
 Figuring the Lesson/Test Pattern (Fig. 1)
The first step in creating your Lesson Plan with a repeating pattern is knowing what that pattern is. Working it out with pencil and paper is often the fastest way to do so - but whatever works for you. The
key is to know which items are going to end up on which day numbers.
If you are setting up an 'every other day' pattern like one with a Science Lesson one day and a Science Lab, the pattern is pretty simple. Lessons will start on Day 1, increment by 2 so that the resulting
items which are Lessons will fall on Day 1, Day 3, Day 5, etc. Labs will start on Day 2, with an increment of 2 so that the resulting items which are Labs will fall on Day 2, Day 4, Day 6, etc.
For this example, let's tackle something a bit more complex - like the Math curriculum where there are lessons, then a test, then lessons, then a test, etc.
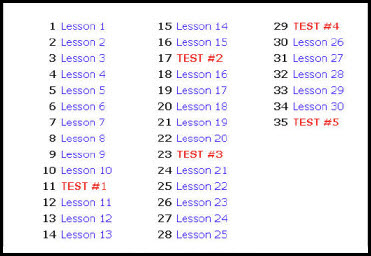
- Write out the Lessons in the order you intend to assign them. Place the Tests or other repeating items where they belong in the list.
- Place a number next to each item as show in the diagram (Fig. 1). These numbers will be the Day numbers you use for the Lesson Plan Items to be created.
- This example presumes that you don't want to have a lesson and a test on the same day. If you do want them on the same day, adjust your numbers accordingly.
- According to the pattern listed in the example, the first Test will fall on Day 11, the next Test on Day 17, then Day 23, Day 29 and Day 35.
To create the Lesson Plan, you will start with the items that occur the fewest times within the plan.
If your Lesson Plan has multiple 'interval' items - perhaps lessons, tests and quizzes - you will want to:
- Work out the pattern as in Fig. 1
- Create the items that recur least frequently in the Lesson Plan.
- If the increment between those items is inconsistent, set the best pattern you can and then edit the Day Numbers to set them exactly as needed, using
the Previous and Next buttons to move easily between them.
- Set your next set of items with the best pattern you can to meet the requirements, and again edit the Day Numbers as needed to get things in the perfect order for your Lesson Plan.
- After you have all of those items set precisely as needed, you can create your daily items to fit around the existing items.
Creating the 'Interval' Items (like Tests)
Start your Lesson Plan creation with the items that occur the fewest times within the plan. In our example, that means we will be starting with the Test items. As noted above,
if the increment between those items is inconsistent, set the best pattern you can, create and accept the interval items, and then edit the Day Numbers to set
them exactly as needed, using the Previous and Next buttons to move easily between them before moving to creating the daily items.
- On the HSTOnline menu, click or touch 'Lesson Plan' under the 'Schedules and Planning' section.
- On the Lesson Plan page, choose a Lesson Plan to view by clicking or touching 'Lesson Plan' in the filter panel.
- Choose a Lesson Plan to view. The Lesson Plan Name field is a Smart-Entry Field so you can:
- press the space bar to see all the active Lesson Plans in your list
- type a few letters into the field to see all active Lesson Plans
- type in a new Lesson Plan Name that you want to create. The new plan name will be added to your Lesson Plan Names list as an active plan.
- Click the Add button and choose Add - Multiple to open the Add Lesson Plan Items page. Note: If you have already started working on the Lesson Plan, you can select an item from the Plan and use the
Action: Copy feature to get started and the Details section of the form will be filled in with the settings from the original item selected.
 Add Lesson Plan Items - Details - Test Items
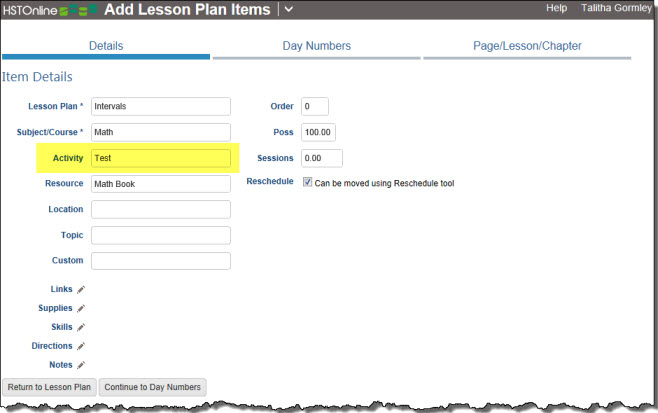
- Details Section:
- Lesson Plan: This field will be auto-completed with the name of the Lesson Plan you are viewing.
- Subject/Course: Select an entry to meet your needs. The Subject/Course field is a Smart Entry Field.
- Activity: For our example, we will enter 'Test' as the Activity. The Activity field is a Smart Entry Field.
- Fill in any other fields as needed that will be the same for all of your Test entries in this Lesson Plan.
- Click or touch Continue to Day Numbers or click or touch the Day Numbers tab to move to the next section.
 Add Lesson Plan Items - Day Numbers - Test Items
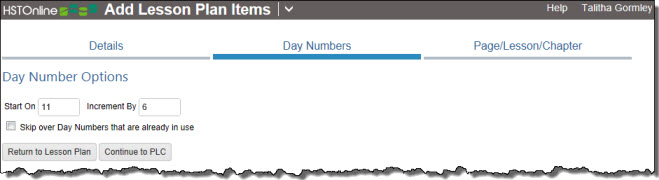
- Day Numbers Section:
- Refer to the pattern worked out above.
- Enter the number next to the first Test entry in the Start On box. In this case, the first test will occur on Day 11, so enter 11 in this field.
- There are five lessons, and then another test - which falls on Day 17. So the increment value is 6 (Day 17 minus Day 11 is an interval of 6).
- Click or touch Continue to PLC or click or touch the Page/Lesson/Chapter tab to move to the next section.
 Add Lesson Plan Items - Page/Lesson/Chapter - Test Items
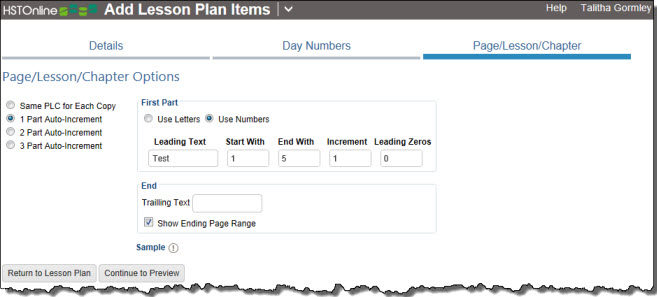
- Page/Lesson/Chapter Section:
- For this example, we will use a 1 Part Auto-Increment.
- You could use the 'Same Page/Lesson/Chapter' option if you prefer and just use the Number of Copies field to indicate the total number of test entries that need to be created.
- Click or touch 1 Part Auto-Increment
- Leading Text: Enter Test
- Start With: Enter 1
- End With: In our example, there are 5 tests, so enter 5 here
- Increment: Enter 1 - which will give us Test 1, Test 2, Test 3, Test 4 and Test 5
- Leading Zeros: When you are using Numbers in your Start With and End With fields, you can enter the number of Leading Zeros you want, from 0 to 3. The default entry
is zero.
- The purpose of this option is to allow you to sort an assignment list by the Page/Lesson/Chapter field and keep your items in order.
- Click here to see an example of sorting with and without leading zeros.
- Click or touch Continue to Preview to view the Test items that will be created
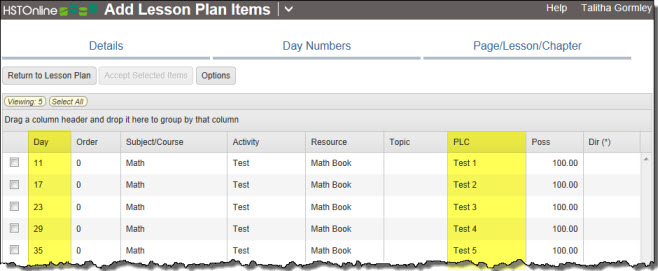 Add Lesson Plan Items - Preview - Test Items
- Notice that the Day Numbers show as 11, 17, 23, 29 and 35, just as they do in our worksheet (Fig. 1)
- Review the items to make sure you have the pattern you want. If you need to adjust, click or touch the Details, Day Numbers, or
Page/Lesson/Chapter tab to make changes and then click or touch Return to Preview to see the new items.
- When you are satisfied with the results, you can select the items you want to add to your Agenda. Click or touch the Select All badge to select all
the items in the list. Alternatively,
- you can click or touch the checkbox for each item you want to accept.
- you can use your mouse to click and drag over contiguous entries in the list to select those items.
- on a touch device, you can touch and drag your finger over contiguous entries in the list to select those items.
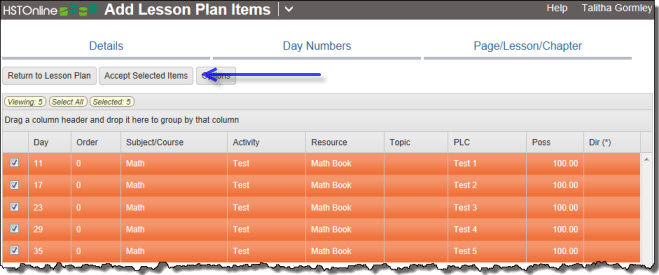 Add Lesson Plan Items - Select/Accept Items - Test Items
- Click or touch Accept Selected Items to add the highlighted items to your Lesson Plan. And move on to creating the rest of your items.
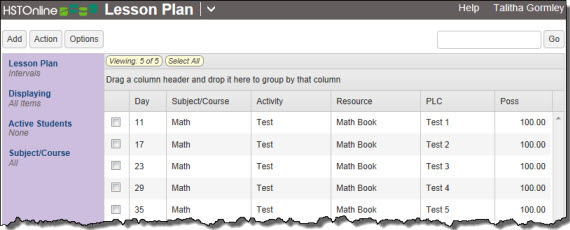 Lesson Plan - showing Test entries
Creating the 'Daily' Items (like Lessons)
Once you have all of your interval items entered on the correct Day Numbers, you are ready to create the rest of your items that will fit in and around the existing intervals.
- On the Lesson Plan window, click the Add button and choose Add - Multiple to open the Add Lesson Plan Items page.
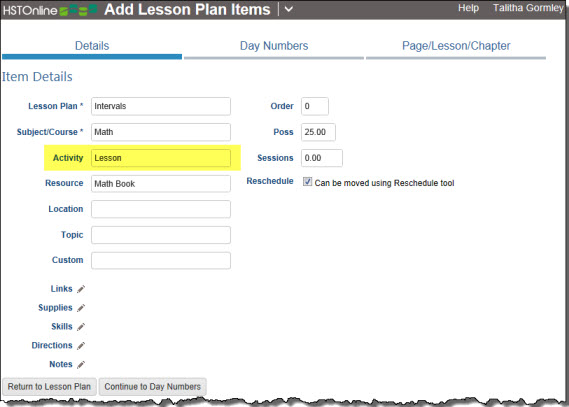 Add Lesson Plan Items - Details - Test Items
- Details Section:
- Lesson Plan: This field will be auto-completed with the name of the Lesson Plan you are viewing.
- Subject/Course: Select an entry to meet your needs. The Subject/Course field is a Smart Entry Field.
- Activity: For our example, we will enter 'Lesson' as the Activity. The Activity field is a Smart Entry Field.
- Fill in any other fields as needed that will be the same for all of your Lesson entries in this Lesson Plan.
- Click or touch Continue to Day Numbers or click or touch the Day Numbers tab to move to the next section.
 Add Lesson Plan Items - Day Numbers - Test Items
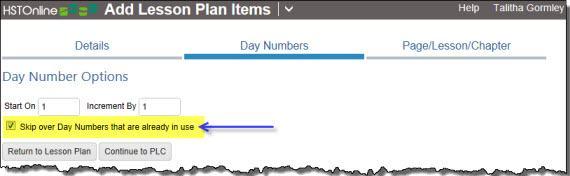
- Day Numbers Section:
- Start On: Our Lessons will start on the first day, so enter a 1 here
- Increment By: We want a Lesson on each day, so the increment is 1
- Skip over Day Numbers that are already in use: If, as in our example, you want a Lesson on every day except on
those days that already have a Test, you must check this box. In this example, with the box checked, the Lessons will be created on Day 1
through Day 10, then skip over Day 11 where the first Test is located, and pick up again on Day 12. If you do want to have Lessons and Tests on the same days, then you would not check
this box.
- Click or touch Continue to PLC or click or touch the Page/Lesson/Chapter tab to move to the next section.
 Add Lesson Plan Items - Page/Lesson/Chapter - Test Items
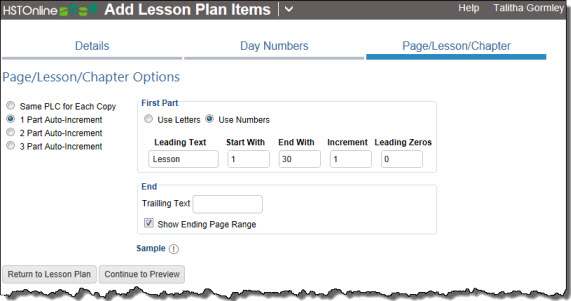
- Page/Lesson/Chapter Section:
- For this example, we will use a 1 Part Auto-Increment.
- You could use the 'Same Page/Lesson/Chapter' option if you prefer and just use the Number of Copies field to indicate the total number of lesson entries that need to be created.
- Click or touch 1 Part Auto-Increment
- Leading Text: Enter Lesson
- Start With: Enter 1
- End With: In our example, there are 30 lessons tests, so enter 30 here
- Increment: Enter 1 - which will give us Lesson 1, Lesson 2, Lesson 3, etc.
- Leading Zeros: When you are using Numbers in your Start With and End With fields, you can enter the number of Leading Zeros you want, from 0 to 3. The default entry
is zero.
- The purpose of this option is to allow you to sort an assignment list by the Page/Lesson/Chapter field and keep your items in order.
- Click here to see an example of sorting with and without leading zeros.
- Click or touch Continue to Preview to view the items that will be created
 Add Lesson Plan Items - Preview - Lesson Items
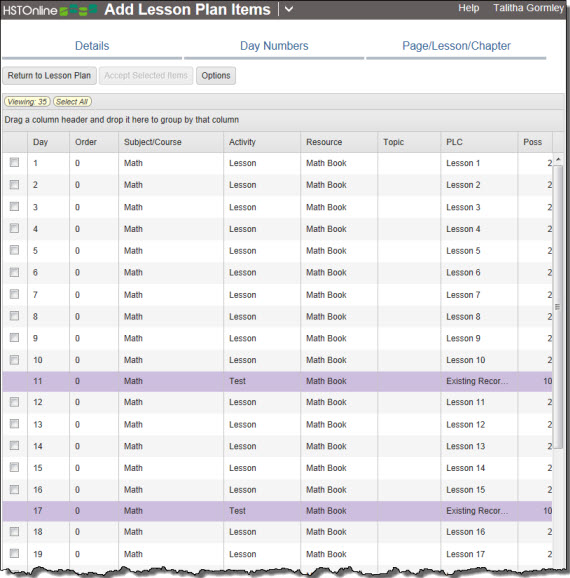
- The Preview will show you the Test items already created (in lavender) as well as all the Lesson items. This helps you insure that you have set the patterns exactly as needed.
- Review the items to make sure you have the pattern you want. If you need to adjust, click or touch the Details, Day Numbers, or
Page/Lesson/Chapter tab to make changes and then click or touch Return to Preview to see the new items.
- When you are satisfied with the results, you can select the items you want to add to your Agenda. Click or touch the Select All badge to select all
the items in the list. Alternatively,
- you can click or touch the checkbox for each item you want to accept.
- you can use your mouse to click and drag over contiguous entries in the list to select those items.
- on a touch device, you can touch and drag your finger over contiguous entries in the list to select those items.
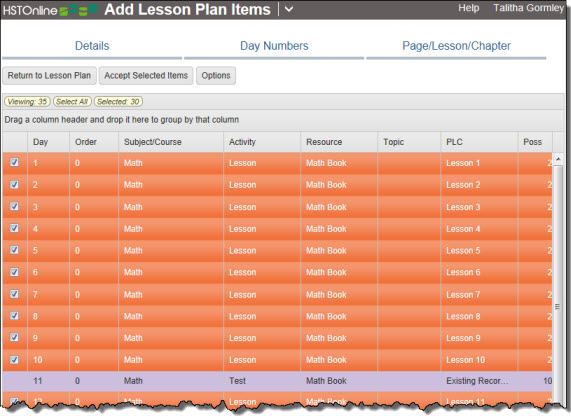 Add Lesson Plan Items - Select/Accept Items - Lesson Items
- Click or touch Accept Selected Items to add the highlighted items to your Lesson Plan.
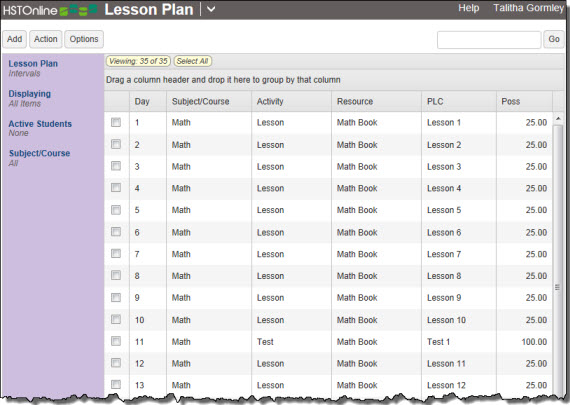 Lesson Plan - showing Lesson and Test entries