Lesson Plan Item 'Used' Status
Skip to
Related Lesson Plan Topics
Related Topics
Introduction
A Lesson Plan is a list of related tasks that will be assigned to your Student. Assignments are created from the
Lesson Plan using the Scheduler tool, either from the Lesson Plan area or from the
Student: Lesson Plans and Presets area. Once a Lesson Plan item has been used to create an Assignment, HSTOnline will automatically mark each
Lesson Plan item as 'used' for that Student. This helps you keep track of where you left off in the Lesson Plan. While you may reassign the same Lesson Plan item to the same Student more than once if
needed, the 'Used' state helps you avoid doing that accidentally. Different Students may be at different levels of completion in the same Lesson Plan.
- When using Scheduler from the Lesson Plan area, you can either have the Lesson Plan pick up where each Student left off, or you can select
specific Lesson Plan items to assign, even if that LP item is marked as 'Used' for the Student.
- When using Scheduler from the Student: Lesson Plans and Presets area, the Lesson Plan will
automatically pick up where you last left off for the Selected Student, beginning with the first un-used item.
|
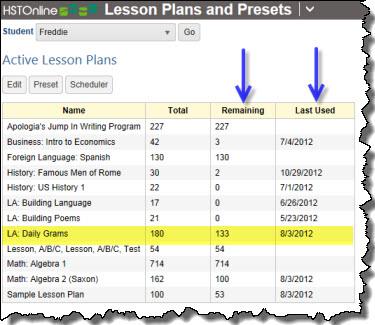
In the Student: Lesson Plans and Presets area, the Student's list of Active Lesson Plans will show the number of unused items remaining for each Lesson Plan and the last
date on which an Assignment was created from each Lesson Plan.
 Active Lesson Plan List
In the Lesson Plan view, use the 'Displaying' and 'Status' filters to see which items are 'used' and/or 'un-used' for a selected Student.
 Lesson Plan Status Filter
Check the 'Show Status For' box and select a Student name from the drop down list. Click the Apply Filter button. HSTOnline will display the Used and Used Date fields to show you the status of all Lesson
Plan items for that Student. You can only view status for one student at a time.
This Help Page covers changing the Used Status of Lesson Plan items. You can also preform the following actions on Lesson Plans:
|
- Change Day Numbers for selected Lesson Plan items.
- Copy a Lesson Pan item to create more Lesson Plan items with repeating or incremented Page/Lesson/Chapter text.
- Copy Lesson Plan items into a new or existing Lesson Plan
- Create a Lesson Plan with a repeating pattern
- Create Assignments from Lesson Plan items using the Scheduler tool
- Delete one or more Lesson Plan items
- Edit one or more Lesson Plan items
- Export Lesson Plan items to a .CSV file
- Import a Lesson Plan that has been shared by another HSTOnline user
- Share all or part of a Lesson Plan with other HSTOnline users
- Generate a list of Topics from a Lesson Plan using the Scope & Sequence - Lesson Plan Report
- Generate a list of Supplies from a Lesson Plan using the Supplies Report
|
The Lesson Plan Displaying/Status Filter
When viewing a Lesson Plan, you can choose how the items are displayed. You can simply display all items in the Lesson Plan, or you can view those items based on the 'Used' status for a particular Student.
- On the HSTOnline menu, click or touch 'Lesson Plan' under the 'Schedules and Planning' section.
- On the Lesson Plan page, choose a Lesson Plan to view by clicking or touching 'Lesson Plan' in the filter panel.
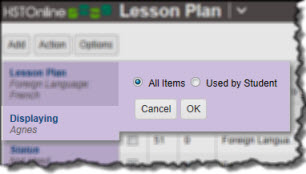
- The very first time you view a Lesson Plan, the Displaying filter will be set to All. On subsequent visits to any Lesson Plan, the Displaying filter will show whatever your last setting was.
 Displaying: All
|
 Displaying: Used by Student
|
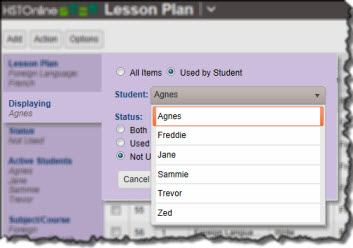 Select Student
- To view items for a particular Student:
- click or touch 'Displaying' on the filter panel
- click or touch the 'Used by Student' radio button
- select a Student from the drop down list
- choose a status - Both, Used or Not Used
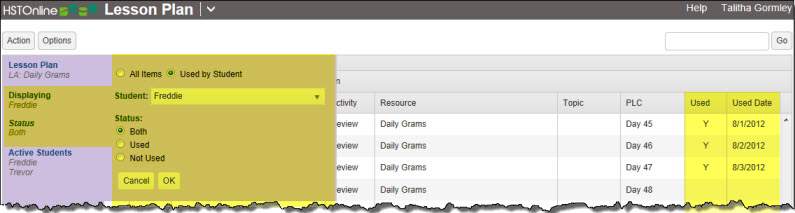
- When you choose to display items based on the 'Used by Student' option:
- two additional columns will be added to your Lesson Plan display: Used and Used Date. They will always be added to the far right of the display and you may need to
scroll right to view them, depending on the number of columns you have chosen to display and the size of your screen.
- the 'Displaying' filter will show the name of the Student whose Used status you are viewing
- a new label - Status - will appear, showing whether you're viewing Both, Used or Not Used items.
- Both: When displaying 'Both', you have elected to show items which have been used to create Assignments for the selected Student as well as those which are as yet un-used.
- The Used column will show a Y for those items which have already been used to create Assignments, and the Used Date column will display the date on which the Assignment was created in the
Agenda
- The Used and Used Date columns will be blank for those items which have not yet been used to create Assignments for the selected Student
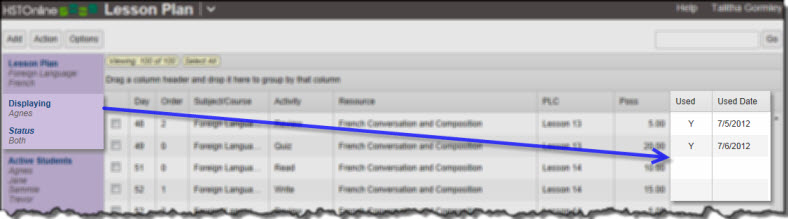 Displaying Used by Student: Both
- Used: When displaying 'Used', only those items which are marked as Used for the Student will be displayed.
- The Used column will show a Y for each item and the Used Date column will display the date on which the Assignment was created in the Agenda
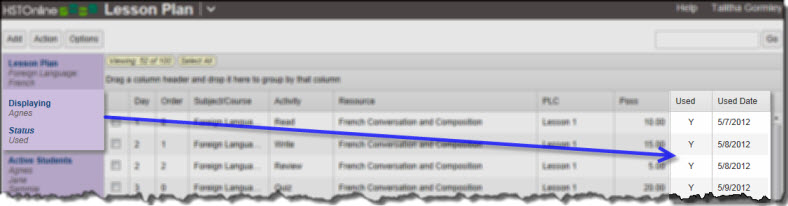 Displaying Used by Student: Used
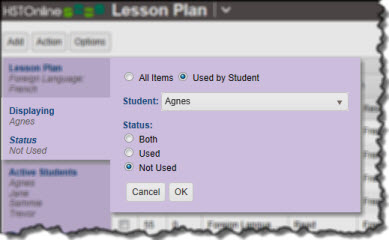
- Not Used: When displaying 'Not Used', only those items which have not yet been Used to create Assignments for the Student will be displayed.
- The Used and Used Date columns will be blank for all items in the display
- The first item in the list may not start with Day 1. Your Lesson Plan items have not been lost, they are simply being hidden from view based upon the Status option you selected.
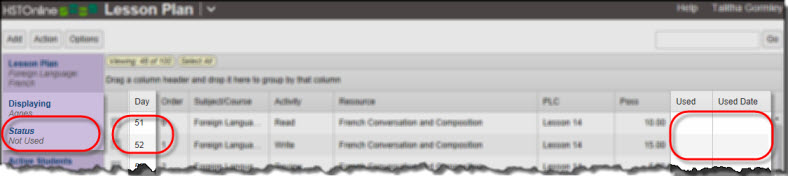 Displaying Used by Student: Not Used
Changing LP Item 'Used' Status
HSTOnline automatically marks a Lesson Plan item as 'Used' when the Scheduler tool creates an Assignment from that item. You can manually change the
status of a Lesson Plan item from 'Not Used' to 'Used' or vice versa at any time.
- Mark one or more Lesson Plan items as 'Used' if you will be skipping some of the Lesson Plan items for a given Student in a School Year.
- Remove the 'Used' status from one or more Lesson Plan items so that you can repeat work for a Student as needed.
|
Manually Setting 'Used' Status for one or more Lesson Plan Items
 Action: Set Used Status Menu
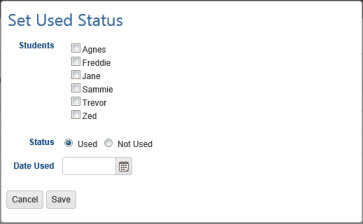 Set Used Status window
- On the HSTOnline menu, click or touch 'Lesson Plan' under the 'Schedules and Planning' section.
- On the Lesson Plan page, choose a Lesson Plan to view by clicking or touching 'Lesson Plan' in the filter panel.
- Choose the Lesson Plan items you want to work with.
- Click the checkbox for each LP item you want to change.
- You can use your mouse to click and drag over contiguous LP items in the list to select those items.
- On a touch device, you can touch and drag your finger over contiguous LP items in the list to select those items.
- Click the Action button and choose 'Set Used Status'.
- Students: Choose the Students for whom you want to change the selected Lesson Plan items 'Used' status.
- Status: Click or touch the 'Used' radio button to mark the selected items as Used; click or touch the 'Not Used' radio button to mark the selected items as not used.
- Date Used: This box will only appear when you have selected 'Used' in the Status field above. When marking Lesson Plan items as 'Used' you will need to select a date for
this field. Type in a date using the mm/dd/yyyy format, or click the Calendar icon to select a date.
- Click or touch:
- Cancel to abandon this process.
- Save to update the selected LP items.
- If marking items as Used, HSTOnline will add a 'Y' to the Used column and the date you selected in the Used Date column for each Student indicated.
- If marking items as Not Used, HSTOnline will remove any 'Y' from the Used column and any date from the Used Date column for each Student indicated.