Scheduler
The Scheduler Tool
After you create your Lesson Plans you will use the Scheduler tool to create the actual Assignments for your Students. You can access the Scheduler from the
Student: Lesson Plan and Presets area or from the Lesson Plan page.
Scheduler from the Student: Lesson Plans and Presets area: Choose to create Assignments from one or more of the Student's
Active Lesson Plans. HSTOnline will pick up where you last left off in that plan for the Student and create the Assignments needed to fill your
selected date range, or until all un-used Lesson Plan items have been utilized.
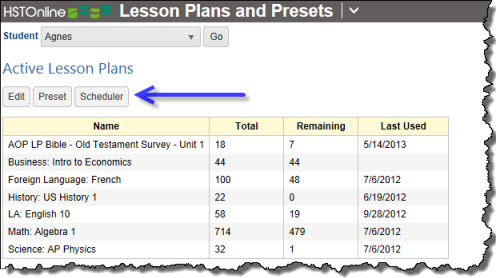 Scheduler Button in Student: Lesson Plans and Presets
Scheduler from the Lesson Plan area: Choose to create Assignments for one or more Students from the same Lesson Plan. HSTOnline will pick up where you last left off with
each Student in the Lesson Plan, or you can select specific items from the Lesson Plan to use with Scheduler. Items will be created to fill your selected date range, or until all the un-used Lesson Plan
items have been utilized for each Student you have selected.
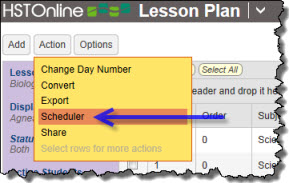 Scheduler Button in Lesson Plan area
Using Scheduler from the Student: Lesson Plans and Presets Area
From the Student: Lesson Plans and Presets area you can use the Scheduler tool to create Assignments from multiple Lesson Plans at the same time for one Student. You can set a Daily, Weekly, Monthly or
Spread Evenly pattern for HSTOnline to follow, or choose to use the Presets you created for the Student.
Creating an Active Lesson Plan List
If you are using the Lesson Plan feature, creating an Active Lesson Plan list for your Student will help you keep track of how far they have progressed
through each plan. You can add or remove plans from this list at any time. HSTOnline will remember the 'used' status for each Student in each plan whether the plan is listed here or not. Resetting
the Used Status of Lesson Plan items for a Student will update this list accordingly.
- On the HSTOnline Menu, click or touch 'Lesson Plans and Presets' under the 'Students' section.
- On the Lesson Plans and Presets page, select a Student from the drop down list and click or touch the Go button.
- Click or touch the Edit button to see the list of all your active Lesson Plans in your database. For each Lesson Plan on the list, you will see the total number of items
in the Lesson Plan, the number of items remaining to be used to create Assignments for the selected Student, and the date on which the last Assignment was created from this plan using the Scheduler
tool.
- Click or touch the Active checkbox to add a checkmark to any Lesson Plan to add it to the Student's list.
- Click or touch:
- Active Plans to return to the Active Lesson Plan list for this Student.
- Preset to add, edit or delete preset entries for this Student.
- Scheduler to use the Scheduler tool to create Assignments for this Student using one or more of his Active Lesson
Plans.
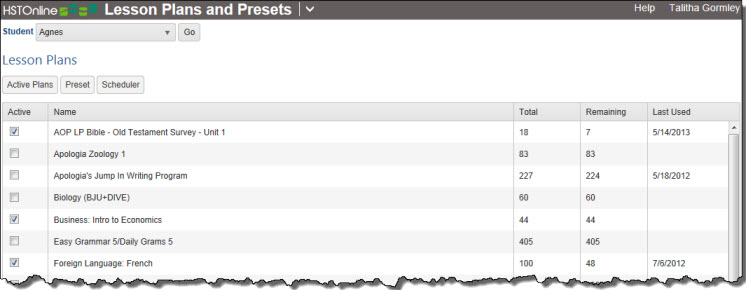 Choosing Active Lesson Plans
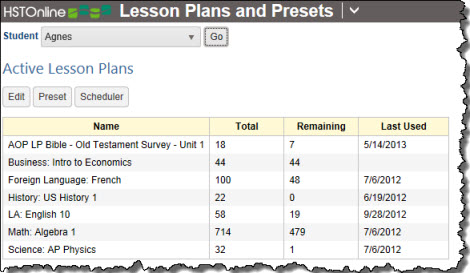 Active Lesson Plan List
Creating Assignments with Scheduler
When using Scheduler from the Student Dashboard, you can create Assignments for your Student using some or all of their Active Lesson Plans. You can
choose to create Assignments for a specific date range, or to create Assignments from all the remaining un-used items in the Lesson Plans for that Student.
- On the HSTOnline Menu, click or touch 'Lesson Plans and Presets' under the 'Students' section.
- On the Lesson Plans and Presets page, select a Student from the drop down list and click or touch the Go button.
- Click or touch the Scheduler button.
 Scheduler Button
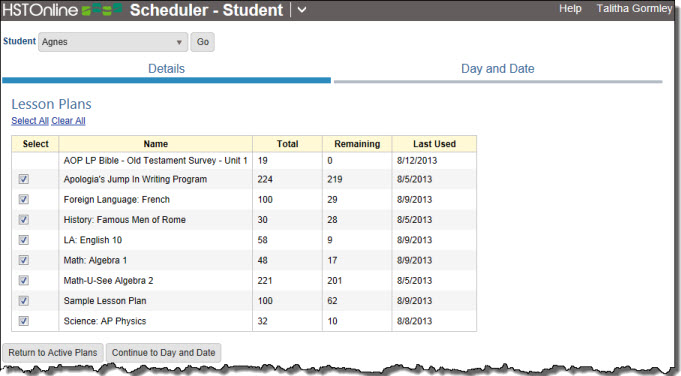 Scheduler - Student: Details
- The Scheduler - Student form is a tabbed area with two sections: Details and Day and Date. The active area is indicated by a dark blue
line under the tab name.
- Details:
- Lesson Plans: HSTOnline will show you the Student's Active Lesson Plans
- A Checkmark will be displayed in the 'Select' checkbox for each Lesson Plan that has at least one remaining Lesson Plan item for that Student; the checkbox is hidden for Lesson Plans with
zero remaining Lesson Plan items for the Student. To reassign work from a Lesson Plan with no remaining items you can do one of the following:
- Use Scheduler from the Lesson Plan side and pre-select the items needed
- Go to the Leeson Plan in question and reset the Used Status for the items needed. This will update the Active Lesson Plans list and you can
then use Scheduler from either the Student or Lesson Pland side.
- Click or touch any checkbox to remove the checkmark to exclude that Lesson Plan from this Scheduler session.
- You can click or touch the 'Select All' or 'Clear All' links to quickly add or remove all checkmarks.
- Click or touch:
- Return to Active Plans button to abandon this process and return to the Student's Lesson Plans and Presets page.
- Continue to Day and Date or the Day and Date tab to move to the next set of options.
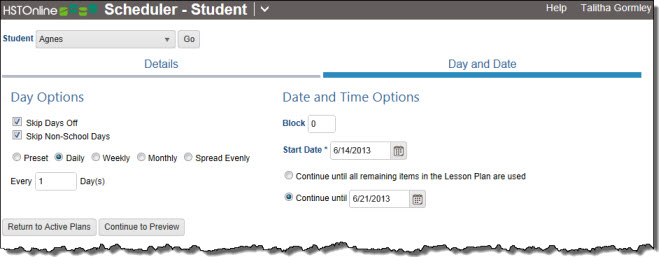 Scheduler - Student: Day and Date Options
- Day and Date:
- Day Options: Set the pattern of days you want HSTOnline to follow when creating the copies.
- Check the boxes to Skip Days off and/or Skip Non-School Days.
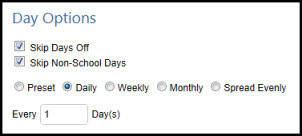 Day Options
- Both boxes are checked by default. HSTOnline will remember your settings when you return to this area.
- Skip Days off will cause HSTOnline to skip over any days that have already been noted as a Day Off within your school
year.
- Non-School Days are those days of the week that are unchecked in your School Profile.
- Click or touch the radio button for Preset, Daily, Weekly, Monthly or Spread Evenly. See the
Day Options Help Page for step-by-step instructions on completing this section. Below is a brief description of each option:
- Preset: HSTOnline will follow the days and times for the designated Subject or Subject/Course that you
have set in the Lesson Plans and Presets area for the Student. This option allows you to create the same type of
Assignment for multiple Students at the same time, but set personalized days and times based on their Preset entries.
- Daily: HSTOnline will gather a list of all dates that fall within your selected date range, remove the
dates that violate your 'Skip' settings, and then place an Assignment on each date in the date range according to your 'Every_Day' entry.
- Weekly: HSTOnline will gather a list of all dates that fall within your selected date range, cull the
list to only those dates which match the days of the week you have selected for your Weekly options, and then remove from the remaining dates any that violate your
'Skip' settings. Finally, HSTOnline will place an Assignment on each remaining date in the range according to your
'Every _ Weeks' entry.
- Monthly: HSTOnline will gather a list of all dates that fall within your selected date range, cull the
list to only those dates which match the date of the month or # day of the month you have selected (First Tuesday, Third Monday, etc.) and then remove from the
remaining dates any that violate your 'Skip' settings. Finally, HSTOnline will place an Assignment on each remaining date in the date range.
- Spread Evenly: Choose this option when you want to force all the created items to fit between a start/end date
that you specify. If you have more items than there are valid dates in your range, you will get multiple items on some or all dates; if you have fewer items than
there are valid dates in your range, you will have one or more days between Assignments.
|
- Date Options: Set the Time/Block and Start Date and choose a 'Continue' option.
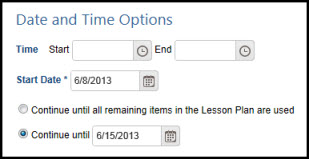 Date Options
- Enter the Time/Block to be used for the created items.
- Time or Block will appear depending on your Program Options settings.
- If you have selected the Preset option, this field will be hidden as Time/Block information will come directly
from your Preset entries. If there is no matching Preset entry, HSTOnline will follow the guidelines of the Daily option and set all Assignments to the
'all day' area.
- Enter a Start Date: Type in a date using the mm/dd/yyyy format or click or touch the Calendar icon
to select a date.
- Choose a Continue option:
- Continue until all remaining in Lesson Plan items are used: HSTOnline will begin with your Start Date and project Assignments as far into the future as
necessary to use all the remaining, un-used items in each selected Lesson Plan for the Student.
- Continue until [Date]: HSTOnline will create Assignments using the selected Lesson Plans but stop when it reaches the date you enter no matter how many
items remain in each Lesson Plan for the Student. If you choose the Spread Evenly option, 'Continue until [Date]' is the only option
available because the definition of 'Spread Evenly' requires a defined date range. Type in a date using the mm/dd/yyyy format or click or touch the
Calendar icon to select a date.
|
- Click or touch:
- Return to Active Plans to cancel this process and return to the Active Lesson Plans list for the Student.
- Continue to Preview to see the list of Assignments that will be created based on the options you have set.
- If you choose Continue to Preview, HSTOnline will show you the Assignments that will be created based upon your option settings. Use this opportunity to review the items before accepting them
to be added to your database.
- The Preview will show you all items, sorted by date. You can group or sort the Preview list in any way you like and HSTOnline will remember
those settings each time you return to the Preview list. When using Scheduler, you may find it easier to group the preview by Lesson Plan so that you can see what's what.
- If the results are not what you expected, you can click or touch the Details or Day and Date tab to reset your options and then click or touch the
'Return to Preview' button to see the new results.
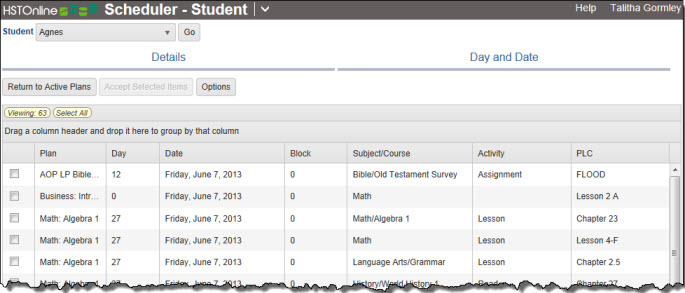 Scheduler - Student Preview
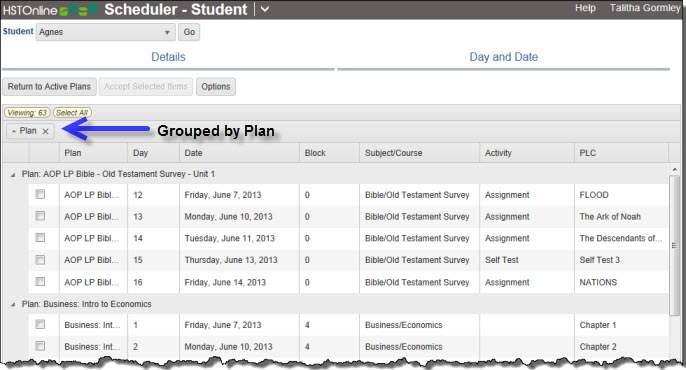 Scheduler - Student Preview - Grouped by Lesson Plan Name
- Once you are satisfied with the items displayed in the Preview, you can select the items you want to add to your Agenda. Click or touch the 'Select All' badge to select all the Assignments in the list.
Alternatively,
- you can click or touch the checkbox for each Assignment you want to accept.
- you can use your mouse to click and drag over contiguous entries in the list to select those items.
- on a touch device, you can touch and drag your finger over contiguous entries in the list to select those items.
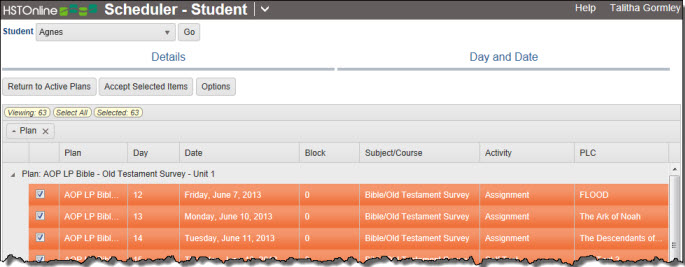 Select Items
- Click or touch:
- Return to Active Plans to cancel this process and return to the Active Lesson Plans list for the Student.
- Accept Selected Items to add the highlighted Assignments to your Agenda. The Active Plans list for your Student will be updated accordingly, resetting the
Remaining value and the Last Used date as appropriate.
Using Scheduler from a Lesson Plan
When using Scheduler from the Lesson Plan area, you can create Assignments for one or more Students from the same Lesson Plan. HSTOnline will pick up where you last left off with each Student in the
Lesson Plan, or you can select specific items from the Lesson Plan to use with Scheduler. Items will be created to fill your selected date range, or until all the un-used Lesson Plan items have been utilized
for each Student you have selected.
 Scheduler Button in Lesson Plan area
- On the HSTOnline menu, click or touch 'Lesson Plan' under the 'Schedules and Planning' section.
- Set the Lesson Plan selector to view the Lesson Plan you want to work with.
- If desired, you can pre-select the Lesson Plan items you want to use for this Scheduler session. Since HSTOnline will automatically begin creating Assignments with the first un-used Lesson Plan
item for each student, you need only pre-select items when you want to re-use specific Lesson Plan items. Alternatively, you could choose to first
change the 'Used' status for one or more Lesson Plan items for one or more Students, and then proceed with the Scheduler process. If you want to pre-select
which Lesson Plan items will be used in this process:
- Click the checkbox for each Lesson Plan item you want to use.
- You can use your mouse to click and drag over contiguous Lesson Plan items in the list to select those items.
- On a touch device, you can touch and drag your finger over contiguous Lesson Plan items in the list to select those items.
- Click or touch the Action button and select 'Scheduler'.
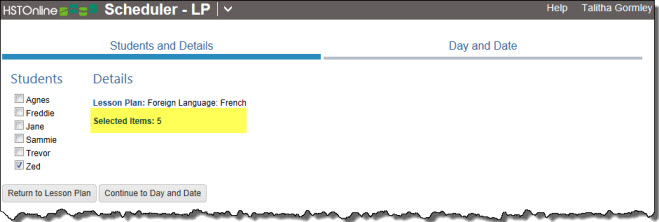 Scheduler - LP with 5 items pre-selected
 Scheduler - LP with no items pre-selected
- The Scheduler - LP form is a tabbed area with two sections: Students and Details and Day and Date. The active area is indicated by a
dark blue line under the tab name.
- Students and Details:
- Student: By default, all Active Students for this Lesson Plan will be pre-selected. You may choose any
Students you wish for this process.
- Details: HSTOnline will remind you the name of the Lesson Plan you are working with, and show the number of selected items or display 'all remaining items'.
- Click or touch:
- Return to Lesson Plan to abandon this process and return to the Lesson Plan you were viewing.
- Continue to Day and Date or touch the Day and Date tab to set those options.
- Day and Date:
- Set the pattern of days you want HSTOnline to follow when creating the Assignments.
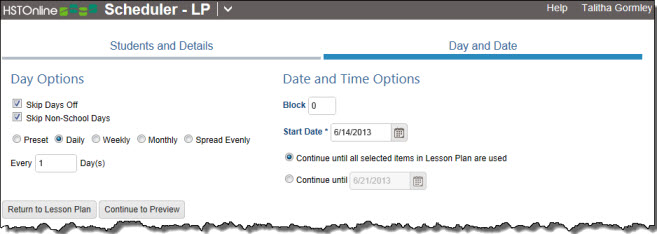 Schedule Day and Date Options
- Day Options:
 Day Options
- Check the boxes to Skip Days off and/or Skip Non-School Days.
- Skip Days off will cause HSTOnline to skip over any days that have already been noted as a Day Off within your school year.
- Non-School Days are those days of the week that are unchecked in your School Profile.
- Choose to use the Preset, Daily, Weekly, Monthly or Spread Evenly option.
- Preset: HSTOnline will follow the days and times for the designated Subject or Subject/Course that you
have set in the Lesson Plans and Presets area for the Student. If there is no matching Preset entry for the
Subject or Subject/Course, HSTOnline will use the Daily option in creating those Assignments.
- Daily: HSTOnline will gather a list of all dates that fall within your selected date range, remove the
dates that violate your 'Skip' settings, and then place an Assignment on each date in the date range according to your 'Every_Day' entry.
- Weekly: HSTOnline will gather a list of all dates that fall within your selected date range, cull the
list to only those dates which match the days of the week you have selected for your Weekly options, and then remove from the remaining dates any that violate your
'Skip' settings. Finally, HSTOnline will place an Assignment entry on each remaining date in the range according to your
'Every _ Weeks' entry.
- Monthly: HSTOnline will gather a list of all dates that fall within your selected date range, cull the
list to only those dates which match the date of the month or # day of the month you have selected (First Tuesday, Third Monday, etc.) and then remove from the
remaining dates any that violate your 'Skip' settings. Finally, HSTOnline will place an Assignment entry on each remaining date in the date range.
- Spread Evenly: Choose this option when you want to force all the created items to fit between a start/end date
that you specify. If you have more items than there are valid dates in your range, you will get multiple items on some or all dates; if you have fewer items than
there are valid dates in your range, you will have one or more days between Assignments.
- Date Options:
 Date Options
- Enter the Time/Block to be used for the created items.
- Time or Block will appear depending on your Program Options settings.
- If you have selected the Preset option, this field will be hidden as Time/Block information will come directly
from your Preset entries. If there is no matching Preset entry, HSTOnline will follow the guidelines of the Daily option and set all Assignments to the
'all day' area.
- Enter a Start Date: Type in a date using the mm/dd/yyyy format or click or touch the Calendar icon
to select a date.
- Choose a Continue option:
- Continue until all remaining in Lesson Plan items are used: HSTOnline will begin with your Start Date and project Assignments as far into the future as
necessary to use all the remaining, un-used items in each selected Lesson Plan for the Student.
- Continue until [Date]: HSTOnline will create Assignments using the selected Lesson Plans but stop when it reaches the date you enter no matter how many
items remain in each Lesson Plan for the Student. If you choose the Spread Evenly option, 'Continue until [Date]' is the only option
available because the definition of 'Spread Evenly' requires a defined date range. Type in a date using the mm/dd/yyyy format or click or touch the .
Calendar icon to select a date.
- Click or touch:
- Return to Active Plans to cancel this process and return to the Active Lesson Plans list for the Student.
- Continue to Preview to see the list of Assignments that will be created based on the options you have set.
- If you choose Continue to Preview, HSTOnline will show you the Assignments that will be created based upon your option settings. Use this opportunity to review the items before accepting them
to be added to your database.
- The Preview will show you all items, sorted by date. You can group or sort the Preview list in any way you like and HSTOnline will remember
those settings each time you return to the Preview list.
- If the results are not what you expected, you can click or touch the Details or Day and Date tab to reset your options and then click or touch the
'Return to Preview' button to see the new results.
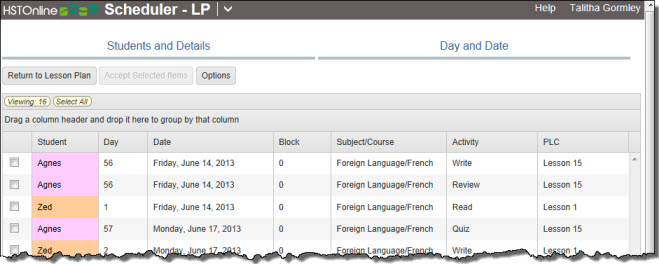 Scheduler - LP Preview
- In the example above, we scheduled 'all remaining items' for Agnes and Zed. You'll see that Agnes' items start with Lesson 15 while Zed's entries start with Lesson 1. That is because the Lesson
Plan items for Lessons 1-14 were already marked as 'Used' for Agnes. Again, when using Scheduler without pre-selecting items, HSTOnline will create Assignments for each selected Student
based on the 'Used' status of each Lesson Plan item.
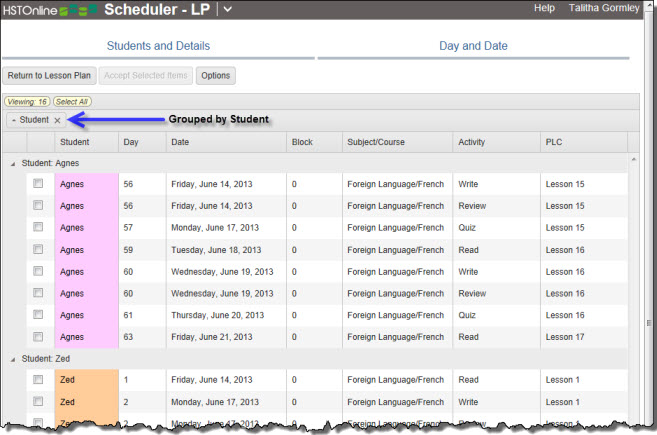 Scheduler - LP Preview - Grouped by Student
- Once you are satisfied with the items displayed in the Preview, you can select the items you want to add to your Agenda. Click or touch the 'Select All' badge to select all the Assignments in the list.
Alternatively,
- you can click or touch the checkbox for each Assignment you want to accept.
- you can use your mouse to click and drag over contiguous entries in the list to select those items.
- on a touch device, you can touch and drag your finger over contiguous entries in the list to select those items.
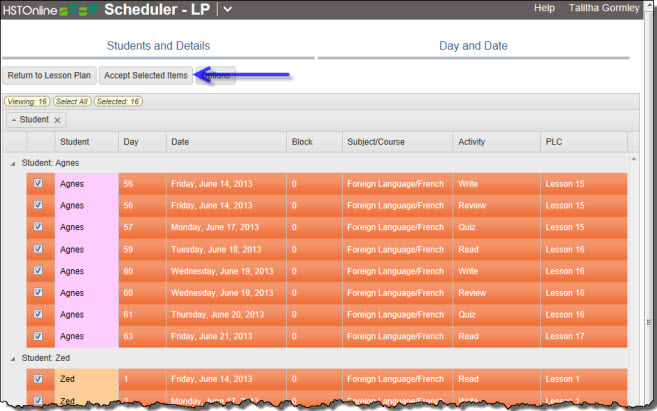 Select Items
- Click or touch:
- Return to Active Plans to cancel this process and return to the Active Lesson Plans list for the Student.
- Accept Selected Items to add the highlighted Assignments to your Agenda. The Active Plans list for your Student will be updated accordingly, resetting the
Remaining value and the Last Used date as appropriate.