Smart-Entry Fields
Introduction
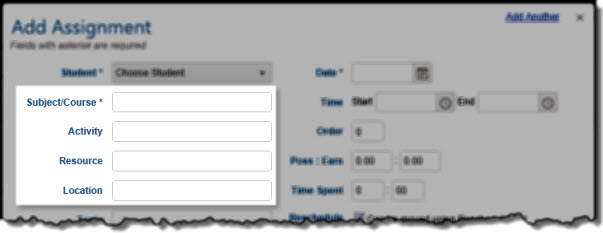
HSTOnline has a number of smart-entry fields which allow you to pick from an existing list of items for that field, or create a new entry on the fly. In any Smart-Entry field, you can bring up a list of
auto-fill options by pressing the space bar in the field, or refine the list by entering one or more letters in the field. You can even create a new entry on they fly by simply typing in the name of the new
item. HSTOnline will save the new entry to the appropriate Manage List when you click or touch Save.
Activity Field
You will find a smart-entry Activity field in the Add, Edit and Multi-Edit windows for Assignments and Lesson Plan Items. The Activity field appears as a drop
down list in the Weighted Grading section of the Course add/edit window.
| Smart Entry |
Drop Down |
|
Assignment:
|
Course:
|
| Lesson Plan:
|
|
 Activity - Fig. 1
In the Assignment or Lesson Plan Item Add, Edit or Multi-Edit windows:
Option 1:
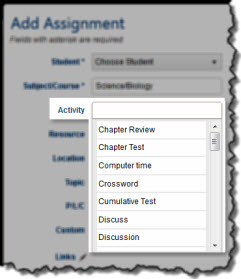
- Click or touch into the Activity field
- Press the space bar. The entire list of Activities will appear. (Activity - Fig. 1)
- Use your mouse or down arrow key to scroll to the Activity you want to use.
- When the correct Activity is highlighted, press the Tab key on your keyboard, or click or touch the entry to fill the Activity field with that selection.
- You also have the option to simply type the name of a new Activity. When you click the Save button, the new Activity will be added to your Activities list.
 Activity - Fig. 2
Option 2:
- Begin typing into the Activity field
- The Activities that start with the letters you have typed will appear.
(Activity - Fig. 2)
- Use your mouse or down arrow to find the Activity you want to use.
- When the correct Activity is highlighted, press the Tab key on your keyboard, or click or touch the entry to fill the Activity field with that selection.
- You also have the option to simply type the name of a new Activity. When you click the Save button, the new Activity will be added to your Activities list.
 Activity - Fig. 3
When a Weighted Course is selected in the Subject/Course field:
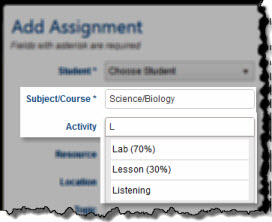
When the Subject/Course field of the form you are working with shows a Course which has Weighted Grading, Activities which are weighted in that Course will
appear in the Activity list with their assigned weight in parentheses following the name. (Activity - Fig. 3).
In the example in Figure 3, below, the selected Subject/Course is Science/Biology. In the Activity field, you can see that for this Course (Biology) the Lab Activity has a weight of 70% and the Lesson
Activity has a weight of 30%.
While you may choose any Activity you like, the appearance of the weighting means you don't have to remember a) which courses are weighted and b) which Activities are weighted in each Course.
In the Weighted Grading section of the Course Add or Edit windows:
 Activity - Fig. 4
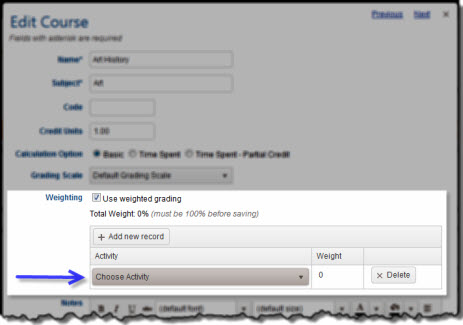
When setting up Weighted Grading for a Course you must select an existing Activity from the drop down list.
- While in the Course Add or Edit window, check the 'Use weighted grading' box. (Activity - Fig 4.)
- Click or touch the 'Add new record' button. A new line will be added to the Weighting table.
- Choose an Activity from the drop down list. Scroll through the list and click or touch the Activity you want to use. You can also type the first letter of an Activity to limit the displayed
options.
- Tab into, click or touch the Weight field and enter a weight for that activity, anything from 1 to 100.
- Repeat the above steps until all weighted activities have been added and the total weighting equals 100%.
Assignment Location Field
Every Assignment Location field is a Smart-Entry field. You can set an Assignment Location in the Add, Edit and Multi-Edit windows for Assignments and
Lesson Plan Items.
| Smart Entry |
Drop Down |
|
Assignment:
|
None |
| Lesson Plan:
|
|
 Assignment Location - Fig. 1
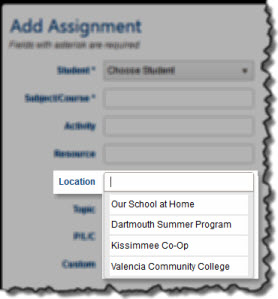
In the Assignment or Lesson Plan Item Add, Edit or Multi-Edit windows:
Option 1:
- Click or touch into the Location field
- Press the space bar. The entire list of Assignment Locations will appear.
(Assignment Location - Fig. 1)
- Use your mouse or down arrow key to scroll to the Assignment Location you want to use.
- When the correct Assignment Location is highlighted, press the Tab key on your keyboard, or click or touch the entry to fill the Assignment Location field with that selection.
- You also have the option to simply type the name of a new Assignment Location. When you click the Save button, the new Assignment Location will be added to your Assignment Locations list with a Status
of 'Away'. You can edit the new item in the Assignment Locations list to change the status, if needed.
 Assignment Location - Fig. 2
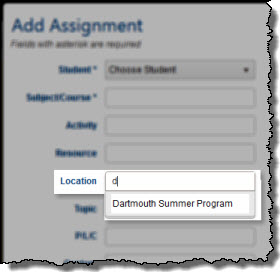
Option 2:
- Begin typing into the Assignment Location field
- The Assignment Locations that start with the letters you have typed will appear.
(Assignment Location - Fig. 2)
- Use your mouse or down arrow to find the Assignment Location you want to use.
- When the correct Assignment Location is highlighted, press the Tab key on your keyboard, or click or touch the entry to fill the Assignment Location field with that selection.
- You also have the option to simply type the name of a new Assignment Location. When you click the Save button, the new Assignment Location will be added to your Assignment Locations list with a
Status of 'Away'. You can edit the new item in the Assignment Locations list to change the status, if needed.
Chore Name Field
When assigning a Chore to a Student, the Chore field is a Smart-Entry field. You can set a Chore when using the Add, Edit and Multi-Edit windows for Chores in
the Agenda - List View and Agenda - Calendar View areas.
| Smart Entry |
Drop Down |
|
Assigning Chores:
|
Assigning Chores:
|
 Chore - Fig. 1
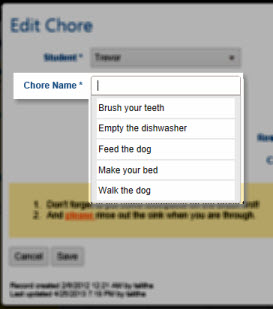
In the Chore Add, Edit or Multi-Edit windows:
Option 1:
- Click or touch into the Chore Name field
- Press the space bar. The entire list of Chores will appear. (Chore - Fig. 1)
- Use your mouse or down arrow key to scroll to the Chore you want to use.
- When the correct Chore is highlighted, press the Tab key on your keyboard, or click or touch the entry to fill the Chore Name field with that selection.
- You also have the option to simply type the name of a new Chore. When you click the Save button, the new Chore will be added to your Chore Names list. You can
edit the new item in the Chore Names list to add instructions, if needed.
 Chore - Fig. 2
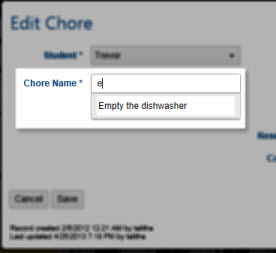
Option 2:
- Begin typing into the Chore Name field
- The Chores that start with the letters you have typed will appear.(Chore - Fig. 2)
- Use your mouse or down arrow to find the Chore you want to use.
- When the correct Chore is highlighted, press the Tab key on your keyboard, or click or touch the entry to fill the Chore Name field with that selection.
- You also have the option to simply type the name of a new Chore. When you click the Save button, the new Chore will be added to your Chore Names list. You can
edit the new item in the Chore Names list to add instructions, if needed.
 Chore - Fig. 3
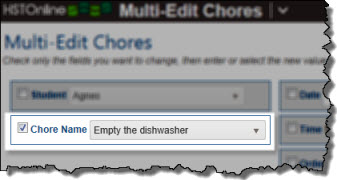
In the Multi-Edit Chores:
When in Multi-Edit mode for assigned Chores, you can only select from the list of existing Chores.
- In the Multi-Edit Chore windows, put a check next to the Chore Name field to enable selection (Chore - Fig 5).
- Make a selection from the drop down list of existing Chore Names.
- Make whatever other changes are necessary to other fields for the selected items.
- Click Save to keep your changes.
Lesson Plan Name Field
The Lesson Plan Name field is a Smart-Entry field in the Lesson Plan Add/Edit forms, and in the Choose Lesson Plan Name field in the Lesson Plan filter.
The Lesson Plan Name field appears as a drop down list in the Multi-Edit LP Items window.
| Smart Entry |
Drop Down |
|
Lesson Plan:
|
Lesson Plan:
|
Lesson Plan Filter:
- Choose Lesson Plan filter
|
 Lesson Plan Name - Fig. 1
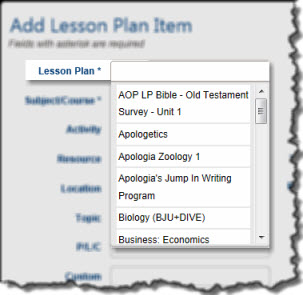
In the Lesson Plan Item Add/Edit windows and the Lesson Plan filter:
Option 1:
- Click or touch into the Lesson Plan field
- Press the space bar. The entire list of Lesson Plan Name will appear. (Lesson Plan Name - Fig. 1)
- Use your mouse or down arrow key to scroll to the Lesson Plan Name you want to use.
- When the correct Lesson Plan Name is highlighted, press the Tab key on your keyboard, or click or touch the entry to fill the Lesson Plan field with that selection.
- You also have the option to simply type the name of a new Lesson Plan Name. When you click the Save button, the new Lesson Plan Name will be added to your Lesson Plan Name list. You can go to the
Lesson Plan Names list to edit the new item to add Objectives.
 Lesson Plan Name - Fig. 2
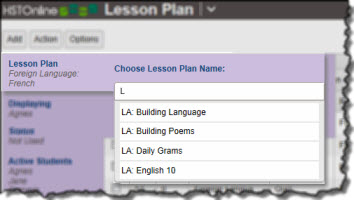
Option 2:
- Begin typing into the Lesson Plan Name field
- The Lesson Plan Name that start with the letters you have typed will appear.
(Lesson Plan Name - Fig. 2)
- Use your mouse or down arrow to find the Lesson Plan Name you want to use.
- When the correct Lesson Plan Name is highlighted, press the Tab key on your keyboard, or click or touch the entry to fill the Lesson Plan Name field with that selection.
- You also have the option to simply type the name of a new Lesson Plan Name. When you click the Save button, the new Lesson Plan Name will be added to your Lesson Plan Name list. You can go to the
Lesson Plan Names list to edit the new item to add Objectives.
 Chore - Fig. 3
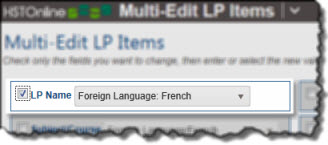
In the Multi-Edit LP Items:
When in Multi-Edit mode for Lesson Plan items, you can only select from the list of existing Lesson Plan Names.
- In the Multi-Edit Lesson Plan item windows, put a check next to the Lesson Plan Name field to enable selection (Chore - Fig 5).
- Make a selection from the drop down list of existing Lesson Plan Names.
- Make whatever other changes are necessary to other fields for the selected items.
- Click Save to keep your changes.
Resource Field
Every Resource field is a Smart-Entry field. You can select a Resource in the Add, Edit and Multi-Edit windows for Assignments and Lesson Plan Items.
| Smart Entry |
Drop Down |
|
Assignment:
|
None |
| Lesson Plan:
|
|
 Resource - Fig. 1
In the Assignment or Lesson Plan Item Add, Edit or Multi-Edit windows:
Option 1:
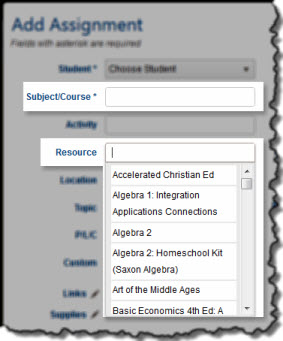
- Click or touch into the Resource field
- Press the space bar. The entire list of Resources will appear. (Resource - Fig. 1)
- Use your mouse or down arrow key to scroll to the Resource you want to use.
- When the correct Resource is highlighted, press the Tab key on your keyboard, or click or touch the entry to fill the Resource field with that selection.
- You also have the option to simply type the name of a new Resource. When you click the Save button, the new Resource will be added to your Library list, marked as a Resource, and will be tied to the
'All Subjects' option. You can go to the Library to edit the new Resource to select a different Subject/Course designation and/or to add additional
information to the item such as ISBN, Author, etc.
 Resource - Fig. 2
Option 2:
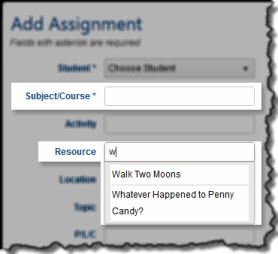
- Begin typing into the Resource field
- The Resources that start with the letters you have typed will appear.
(Resource - Fig. 2)
- Use your mouse or down arrow to find the Resource you want to use.
- When the correct Resource is highlighted, press the Tab key on your keyboard, or click or touch the entry to fill the Resource field with that selection.
- You also have the option to simply type the name of a new Resource. When you click the Save button, the new Resource will be added to your Library list, marked as a Resource, and will be tied to
the 'All Subjects' option. You can go to the Library to edit the new Resource to select a different Subject/Course designation and/or to add
additional information to the item such as ISBN, Author, etc.
 Resource - Fig. 3
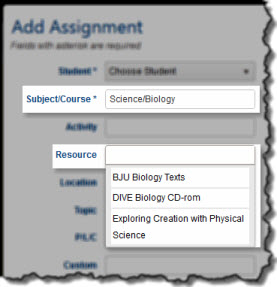
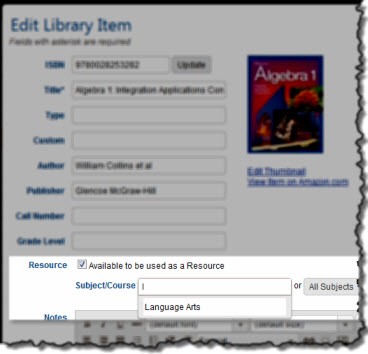
When a Subject/Course has been selected in the add/edit/multi-edit form:
When the Subject/Course field has a Subject or Subject/Course selection, the Resources listed when you press the spacebar or type letters into the Resource field will only be those which match one of the
following conditions: (Resource - Fig. 3)
- a Resource tied to the selected Subject
- a Resource tied to the selected Subject/Course
- a Resource tied to the 'All Subjects' option
In the example to the right, Science/Biology has been selected in the Subject/Course field. So the Resource field shows only those items belonging to Science, Science/Biology, or All Subjects. Judicious
use of the Subject/Course affiliation in the Library Item Resource field will help you keep the choice list to a reasonable length.
Subject Field
If you have disabled the Course field in Program Options, the Subject/Course field will take just a Subject entry. You will find a
smart-entry Subject field in the Add and Edit windows for Assignments, Lesson Plan Items, and Library Resource designations. When Courses are enabled, the Subject field in the Course Add/Edit form is
always a smart-entry field. The Subject field appears as a drop down list in the Multi-Edit windows for Assignments, Lesson Plan Items, Courses, and Library Items.
| Smart Entry |
Drop Down |
|
Assignment:
|
Assignment:
|
| Lesson Plan:
|
Lesson Plan:
|
|
Course:
|
Course:
|
Library:
- Add/Edit Resource designation
|
Library:
- Multi-Edit Resource designation
|
 Subject - Fig. 1
In the Assignment, Lesson Plan Item, Course and Library Resource designation Add/Edit windows:
Option 1:
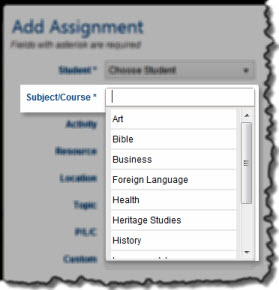
- Click or touch into the Subject field
- Press the space bar. The entire list of Subjects will appear. (Subject - Fig. 1)
- Use your mouse or down arrow key to scroll to the Subject you want to use.
- When the correct Subject is highlighted, press the Tab key on your keyboard, or click or touch the entry to fill the Subject field with that selection.
- You also have the option to simply type the name of a new Subject. When you click the Save button, the new Subject will be added to your Subjects list with a status of 'Core'. You can
edit the new item in the Subjects list to change the status, if needed.
 Subject - Fig. 2
Option 2:
- Begin typing into the Subject field
- The Subjects that start with the letters you have typed will appear.
(Subject - Fig. 2)
- Use your mouse or down arrow to find the Subject you want to use.
- When the correct Subject is highlighted, press the Tab key on your keyboard, or click or touch the entry to fill the Subject field with that selection.
- You also have the option to simply type the name of a new Subject. When you click the Save button, the new Subject will be added to your Subjects list with a status of 'Core'. You can
edit the new item in the Subjects list to change the status, if needed.
 Subject - Fig. 3
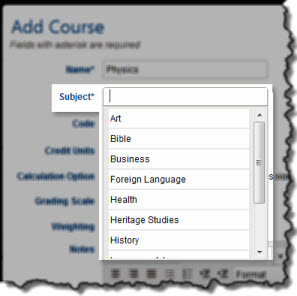
In the Course Add/Edit window:
Option 1:
- Click or touch into the Subject field
- Press the space bar. The entire list of Subjects will appear. (Subject - Fig. 3)
- Use your mouse or down arrow key to scroll to the Subject you want to use.
- When the correct Subject is highlighted, press the Tab key on your keyboard, or click or touch the entry to fill the Subject field with that selection.
- You also have the option to simply type the name of a new Subject. When you click the Save button, the new Subject will be added to your Subjects list with a status of 'Core'. You can
edit the new item in the Subjects list to change the status, if needed.
 Subject - Fig. 4
Option 2:
- Begin typing into the Subject field
- The Subjects that start with the letters you have typed will appear.
(Subject - Fig. 4)
- Use your mouse or down arrow to find the Subject you want to use.
- When the correct Subject is highlighted, press the Tab key on your keyboard, or click or touch the entry to fill the Subject field with that selection.
- You also have the option to simply type the name of a new Subject. When you click the Save button, the new Subject will be added to your Subjects list with a status of 'Core'. You can
edit the new item in the Subjects list to change the status, if needed.
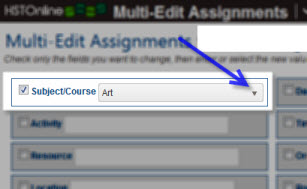
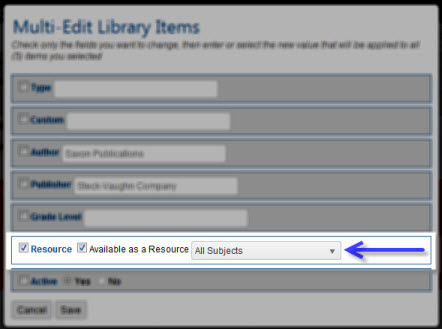
In the Multi-Edit window of Assignments, Lesson Plan Items, Courses and Library Resource designations:
Subject - Fig. 5a
When in Multi-Eidt mode for Assignments, Lesson Plans, Courses or Library Items marked as a Resource, you can only select from the list of existing Subjects.
- In the Multi-Edit Assignment, Course or Lesson Plan windows, put a check next to the Subject/Course field to enable selection (Subject - Fig 5). In the Library Multi-Edit window, put a check next to
the Resource field to enable selection. (Subject - Fig 5a.)
- Make a selection from the drop down list of existing Subjects.
- Make whatever other changes are necessary to other fields for the selected items.
- Click Save to keep your changes.
 Subject - Fig. 5a
Subject/Course Field
You will find a smart-entry Subject/Course field in the Add and Edit windows for Assignments, Lesson Plan Items and Library Resource designation. The Subject/Course field appears as a drop down list in the
Multi-Edit windows for these items.
| Smart Entry |
Drop Down |
|
Assignment:
|
Assignment:
|
| Lesson Plan:
|
Lesson Plan:
|
Library:
- Add/Edit Resource designation
|
Library:
- Multi-Edit Resource designation
|
 Subject/Course - Fig. 1
In the Assignment or Lesson Plan Item Add, Edit or Multi-Edit windows:
Option 1:
- Click or touch into the Subject/Course field
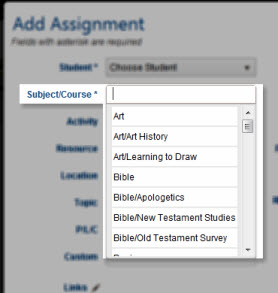
- Press the space bar. The entire list of Subjects and Courses will appear. (Subject/Course - Fig. 1)
- The list will be alphabetical by Subject and then by Subject/Course.
- In the example to the right (Subject/Course - Fig. 1), you can see the list shows the Subject of Art, and then the Course within Art following alphabetically: Art/Art History and Art/Learning
to Draw.
- Use your mouse or down arrow key to scroll to the Subject or Subject/Course you want to use.
- When the correct item is highlighted, press the Tab key on your keyboard, or click or touch the entry to fill the Subject/Course field with that selection.
- You also have the option to simply type the name of a new Subject or Course. When you click the Save button, the Subject/Course Confirmation window will appear. See below
for additional information.
Subject/Course - Fig. 2a
Subject/Course - Fig. 2b
 Subject/Course - Fig. 2c
Option 2:
- Begin typing into the Subject/Course field
- The Subject/Course that start with the letters you have typed will appear. The Smart-Entry field looks for any Subject and any Course that starts with the letter(s) you type in.
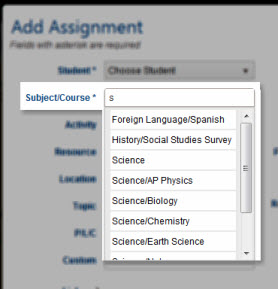
- In the first example to the right (Subject/Course - Fig. 2a), an 's' has been entered into the Subject/Course field
- The resulting list shows Foreign Language/Spanish and History/Social Studies Survey because the Courses of Spanish and Social Studies Survey each begin with 's', even though they
are tied to Subjects that do not start with 's'.
- In addition, you can see that the Science subject, as well as the Courses within Science appear. Since those Courses are tied to a Subject that begins with 's', all those Courses
appear as options as well.
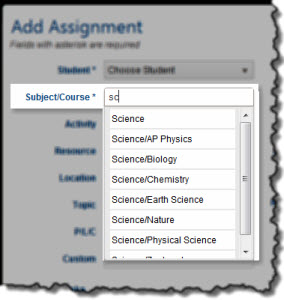
- In the second example to the right (Subject/Course - Fig. 2b), 'sc' has been entered into the Subject/Course field
- With the addition of the 'c' in the entry field, the list of items to choose from now excludes the Spanish and Social Studies Survey options as they no longer match the criteria
that has been entered.
- Again, the subject of Science is an option, along with all the Courses that belong to the Science subject.
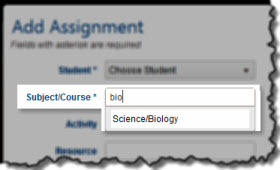
- Finally, in the example third example to the right (Subject/Course - Fig 2c), 'bio' has been entered into the Subject/Course field
- Since the only match in my particular list of Subjects and Courses is the Course of Biology under the Subject of Science, that is the only option that is available.
- Use your mouse or down arrow to find the Subject or Subject/Course you want to use.
- When the correct item is highlighted, press the Tab key on your keyboard, or click or touch the entry to fill the Subject/Course field with that selection.
- You also have the option to simply type the name of a new Subject or Course. When you click the Save button, the Subject/Course Confirmation window will appear. See
below for additional information.
Subject/Course Confirmation:
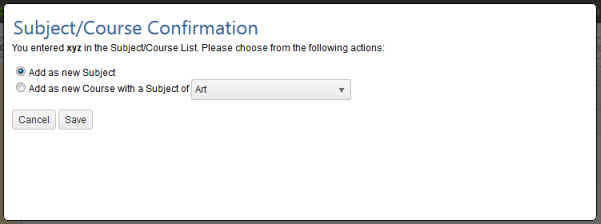
When you enter text into the Subject/Course field which HSTOnline cannot match to your existing Subjects or Courses, upon saving the item you will be given the option to set the new entry as a Subject
or as a Course under the Subject of your choice using the Subject/Course Confirmation window shown below (Subject/Course - Fig 3.)
 Subject/Course - Fig. 3
The confirmation window will tell you what text you have entered - in the example, the text is xyz - and give you a choice:
- Add as new Subject: the new entry will be added to your Subjects list with a status of 'Core'. You can edit the item in
your Subjects list to change the status as needed.
- Add as new Course with a Subject of: Select a Subject from the drop down list. The Course will be attached to that Subject and created with the following settings:
- Credit Hours - 0.00
- Calculation Option - Basic
- Grading Scale - Default Grading Scale
- Weighting - Off
You can edit the item in your Courses list to change the parameters as needed.
- Click or touch:
- Cancel to be returned to the Add Library Item window to make a new selection in the Subject/Course field.
- Save to keep the new Subject or Course and add the Library item to your list.
In the Multi-Edit window of Assignments, Lesson Plan Items, Courses and Library Resource designations:
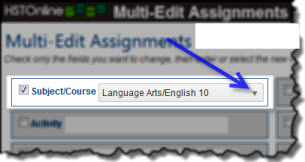 Subject/Course - Fig. 4
When in Multi-Eidt mode for Assignments, Lesson Plans, or Library Items marked as a Resource, you can only select from the list of existing Subjects/Courses.
- In the Multi-Edit Assignment or Lesson Plan windows, put a check next to the Subject/Course field to enable selection (Subject/Course - Fig 4). In the Libarary Multi-Edit window, put a check next to
the Resource field to enable selection.
- Make a selection from the drop down list of to choose an existing Subject or Subject/Course.
- Make whatever other changes are necessary to other fields for the selected items.
- Click Save to keep your changes.