Resources
What is a Resource?
A Resource is any book, text, DVD, CD, etc. that is used by a student to complete an assignment. In HSTOnline, the Resource field is optional.
Resources are created from Library items by checking the Resource box in the Library add/edit form. You can classify your Resource in one of three ways:
- All Subjects
- Specific Subject
- Specific Subject/Course
|
By selecting a specific Subject or Subject/Course combination, you can generate a Courses or Resources
report which lists titles by Subject or Subject/Course for your records.
You can create your Resource while entering a new Library item. The directions below show how to create a Resource from existing Library entries.
The Resource field in Assignment and Lesson Plan add, edit and multi-edit windows is a Smart-Entry field.
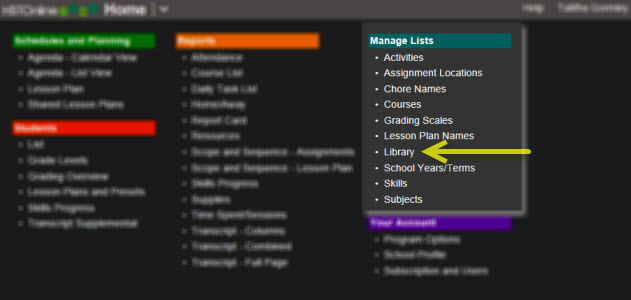
To review your Resources, click or touch Library under the 'Manage Lists' section of the HSTOnline menu.
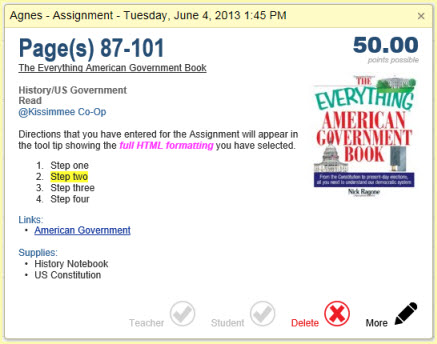
In the Agenda - Calendar View the Assignment tool tip, will display the thumbnail of the Resource if one exists.
 Assignment Tool Tip
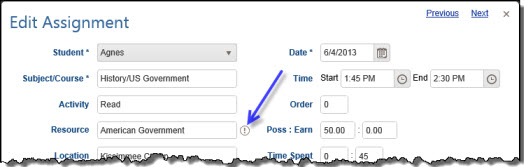
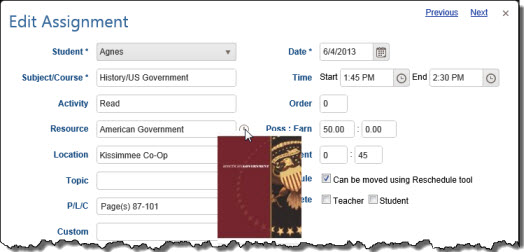
In the Add or Edit Assignment window you can click or touch the icon next to the Resource field to bring up the Resource thumbnail if one exists.
 Edit Assignment Resource icon
 Edit Assignment showing Resource thumbnail
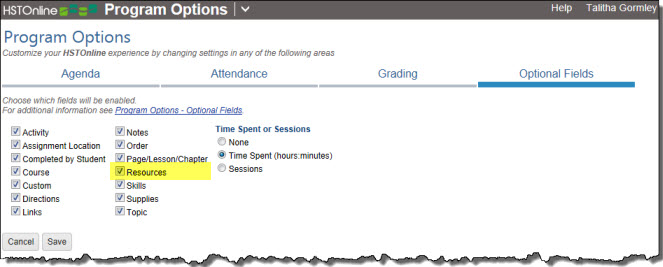
Enabling the Resource Field
The Resource field is optional and can be enabled and disabled via Program Options in the HSTOnline menu. Library add/edit windows will always
show the Resource field. By default, the Resource field is enabled.
 Enable Resource Field
Disabling this field will:
- Remove the Resource field from the Assignment and Lesson Plan add/edit windows
- Remove the Resource column from the Agenda - List View and Lesson Plan lists
- Disable the Resources Report.
- On the HSTOnline menu, click or touch Program Options.
- On the Program Options page, click or touch Optional Fields.
- Click or touch the box next to Resource to add a checkmark to enable the field; or to remove a checkmark to disable the field.
- Click or touch Save to keep your changes.
- Click or touch 'Ok' on the 'Changes Saved' window.
Creating a Resource from an Existing Library Item
Creating a Single Resource
 Resource Checkbox
- On the HSTOnline menu, click or touch Library under the 'Manage Lists' section.
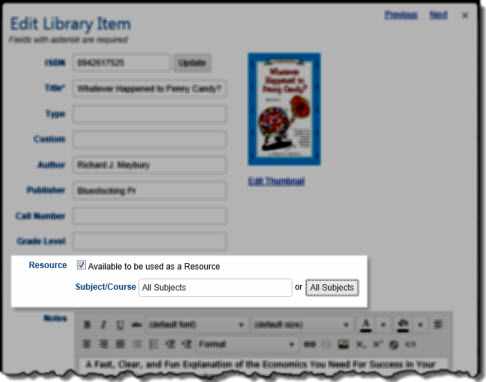
- On the Library page, double-click on the item you want to designate as a Resource to open the Edit Library Item window.
- Alternatively, you can click once on the item you want to designate as a Resource and then click the Action button and choose Edit to open the Edit Library Item window.
- On a touch device, touch the item you wish to designate as a Resource and then touch the Action button and touch Edit to open the Edit Library Item window.
- At the bottom of the edit view, you will see when and by whom the item was created as well as when and by whom it was last updated.
- To make this item available as a Resource, check the Resource box. Tie this item to Subject, Subject/Course, or All Subjects. 'All Subjects' is the default selection.
- To change from the All Subjects setting, begin typing the name of a Subject or Course or press the spacebar.
- HSTOnline will display a list of Subjects and Courses that match your selection.
- Click or touch on the entry you want to attach to this Library item or continue typing to create a new Subject or Course. Your new entry will be confirmed when you save this item.
- While in Edit mode, you can make any other changes needed to this Library item.
- Click or touch:
- Cancel to abandon the changes and close the Edit Library Item window.
- Save to commit the changes to your Subject and close the Edit Library Item window.
- Click or touch the Previous or Next hyperlink in the top right corner to save your changes to this Library Item and move to the
previous or next Library Item in the list. You can click or touch Previous or Next until you have made all the changes you want to your Library Items and then click the Save button to end
the Edit process. If you reach the beginning or end of the list when clicking or touching Previous or Next, the Edit window will close and you will be returned to the list view.
- If you have created a new Subject or Course in the Resource area, HSTOnline will ask for clarification when you click or touch the Save button or the 'Previous' or 'Next' links.
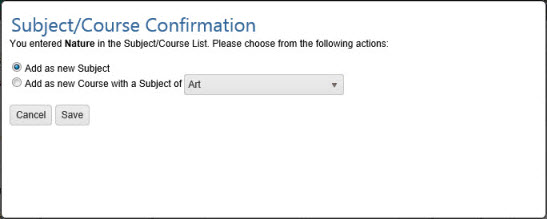 New Subject/Course Confirmation
- Choose whether to create your new entry as a new Subject or a new Course.
- Add as new Subject: the new entry will be added to your Subjects list with a status of 'Core'. You can edit
the item in your Subjects list to change the status as needed.
- Add as new Course with a Subject of: Select a Subject from the drop down list. The Course will be attached to that Subject and created with the following
settings:
- Credit Hours - 0.00
- Calculation Option - Basic
- Grading Scale - Default Grading Scale
- Weighting - Off
You can edit the item in your Courses list to change the parameters as needed.
- Click or touch:
- Cancel to be returned to the Edit Library Item window to make a new selection in the Subject/Course field.
- Save to keep the new Subject or Course and update the Library item.
Creating Multiple Resources
 Multi-Editing Library Items
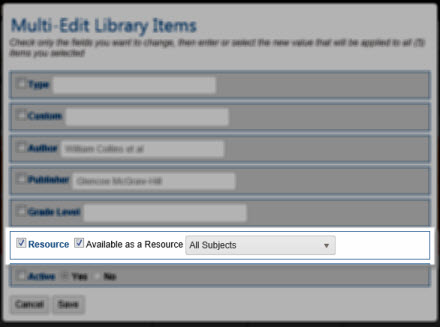
- On the HSTOnline menu, click or touch Library under the 'Manage Lists' section.
- On the Library page, select the items you to which you want to add the same Resource designation.
- Use your mouse to click and drag over contiguous Library Items in the list to select those items.
- On a touch device, you can touch and drag your finger over contiguous Library Items in the list to select those items.
- Click or touch the 'Select All' badge to select all the Library Items in the list.
- Click or touch the Action button and choose Multi-Edit to open the Multi-Edit Library Items window.
- HSTOnline will show you how many items have been selected for editing.
- Click or touch the box to the left of Resource. Click or touch the 'Available as a Resource' box and set the desired Subject/Course from the drop down list. You must select from an existing
Subject or Subject/Course when in multi-edit mode.
- Make any other changes needed for the selected Library items.
- Click or touch:
- Cancel to abandon the changes and close the Multi-Edit Library Items window.
- Save" to commit the changes and close the Multi-Edit Assignment Library Items window.
Selecting a Resource
When creating Lesson Plan items or Assignments, you can choose to specify a Resource. The Resource field in Assignment and Lesson Plan add, edit and multi-edit windows is a
Smart-Entry field. When the Subject/Course field has a Subject or Subject/Course selection, the Resources listed as options will only be those which
match one of the following conditions:
- a Resource tied to the selected Subject
- a Resource tied to the selected Subject/Course
- a Resource tied to the 'All Subjects' option
Selecting a Resource for a Single Lesson Plan item or Assignment
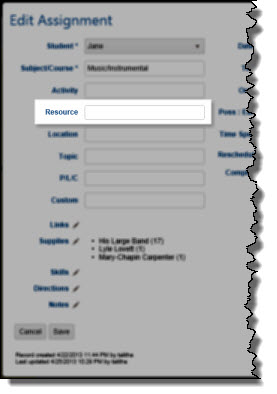 Assignment Edit Window
Open an Add or Edit window for an Assignment or Lesson Plan item.
- Click or touch into the Resource field
- Press the space bar to get a list of all matching Resources, or type a few letters to limit the list to items whose titles start with the letters you have entered.
- Use your mouse or down arrow key to scroll to the Resource you want to use.
- When the correct Resource is highlighted, press the Tab key on your keyboard, or click or touch the entry to fill the Resource field with that selection.
- You also have the option to simply type the name of a new Resource. When you click the Save button, the new Resource will be added to your Library list, marked as a Resource, and will be tied
to the 'All Subjects' option. You can go to the Library to edit the new Resource to select a different Subject/Course designation and/or to add
additional information to the item such as ISBN, Author, etc.
Selecting a Resource Using Multi-Edit for Assignments or Lesson Plan items
Open the Multi-Edit window for selected Assignments or Lesson Plan items.
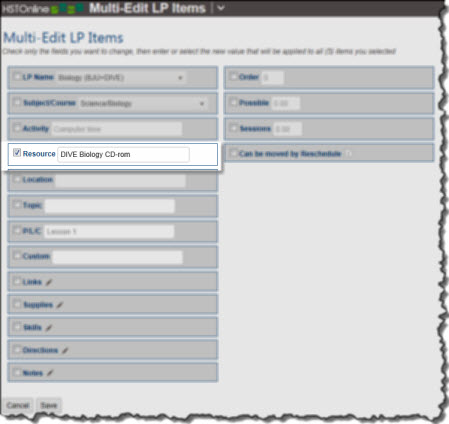 Lesson Plan Multi-Edit Window
- Click or touch into the Resource field
- Press the space bar to get a list of all matching Resources, or type a few letters to limit the list to items whose titles start with the letters you have entered.
- Use your mouse or down arrow key to scroll to the Resource you want to use.
- When the correct Resource is highlighted, press the Tab key on your keyboard, or click or touch the entry to fill the Resource field with that selection.
- You also have the option to simply type the name of a new Resource. When you click the Save button, the new Resource will be added to your Library list, marked as a Resource, and will be tied to
the 'All Subjects' option. You can go to the Library to edit the new Resource to select a different Subject/Course designation and/or to add
additional information to the item such as ISBN, Author, etc.
Deleting a Resource
If you want to permanently remove a Resource that has not been used, you will need to delete the Library item itself. However, you may find it best simply
to Edit the Library item to remove the Resource designation.
Archiving a Resource
When a Resource will no longer be used for future Assignments or Lesson Plan items, you can edit the associated Library listing to remove it from the Choose Resource list. There are two ways to do this: