Student - Lesson Plans and Presets
Skip to
Related Student Topics
Related Topics
Introduction
Lesson Plans can be a very useful part of using HSTOnline. They allow you to do all your planning in advance, without getting tied down to specific dates too far in advance. The
Scheduler tool is used to assign Lesson Plan items to one or more Students at the same time.
From the Student side, you can set your Active Lesson Plans for that Student, create a Preset schedule of days and times/blocks when your Student works on various
Subjects/Courses and use the Scheduler to create Assignments for the Student for one or more Lesson Plans at the same time. Setting a list of 'Active Lesson Plans' for your Student also helps you track your
Student's progress in the Lesson Plan. The Student: Lesson Plan and Presets area will let you know how many un-used items are left in each Lesson Plan for the Student and the date on which the last Assignment
was created from each plan.
Whether using Lesson Plans or not, you can set up Preset entries for your Student to develop a schedule of days and times/blocks when each Subject/Course is studied. These entries can
then be utilized when creating multiple Assignments with the Add-Multiple or Copy Over Date Range functions,
or when using Scheduler with one or more Lesson Plans. By creating these patterns ahead of time, you don't have to remember which student has which class at which
time. In multiple student homeschools you can, for instance, schedule math at different times for each Student to insure you are available to work individually with each Student as necessary. By utilizing the
Preset option, you can set that pattern once and then let HSTOnline do the rest.
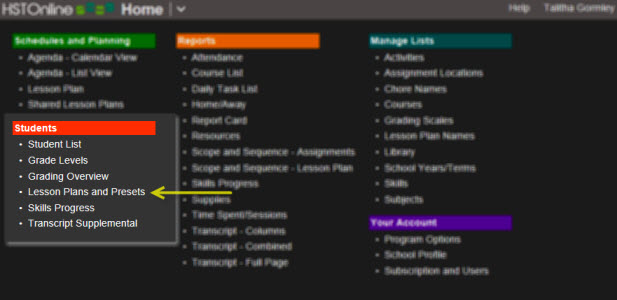 HSTOnline Menu - Student Section
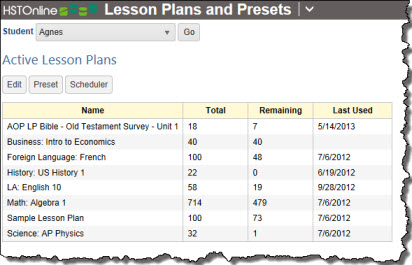
Active Lesson Plans
 Active Lesson Plans Example
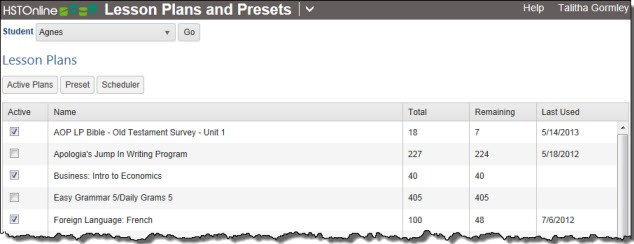
Use this area to keep track of the Lesson Plans you are using for the Student in the current School Year. You can add or remove plans from the list at any time. The Active Lesson Plan table will show you
the name of the Lesson Plan, the number of items in the Lesson Plan that have yet to be assigned for that student, and the last date used for an Assignment created from the Lesson Plan.
Each Student has his own list of Active Plans. The list will display the Lesson Plan Name, the total number of items in the Lesson Plan, the number of items remaining in the Lesson Plan to be assigned for
that Student, and the date on which the last Assignment was created from the Lesson Plan for this Student, using the Scheduler tool. If you have deleted or
otherwise edited those Assignments, those changes are not reflected here.
Selecting a Student
- On the HSTOnline Menu, click or touch 'Lesson Plans and Presets' under the 'Students' section.
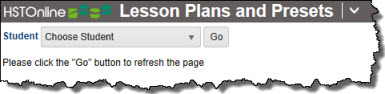 Initial Lesson Plans and Presets Screen
- On the Lesson Plans and Presets page, select a Student from the drop down list and click or touch the Go button.
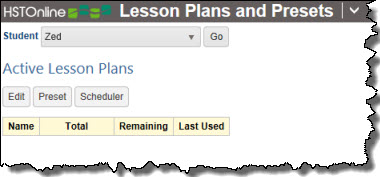 Active Lesson Plans Empty
- If you have set up active plans for the Student using the Lesson Plan filter, those plan names will appear here.
- You can edit the list of Active Lesson Plans for a student at any time.
Creating an Active Lesson Plan List
If you are using the Lesson Plan feature, creating an Active Lesson Plan list for your Student will help you keep track of how far they have progressed through each plan. You can add or remove plans from
this list at any time. HSTOnline will remember the 'used' status for each Student in each plan whether the plan is listed here or not. Resetting the Used Status
of Lesson Plan items for a Student will update this list accordingly.
Adding a Lesson Plan to the Student's Active Lesson Plans List
- On the HSTOnline Menu, click or touch 'Lesson Plans and Presets' under the 'Students' section.
- On the Lesson Plans and Presets page, select a Student from the drop down list and click or touch the Go button.
- Click or touch the Edit button to see the list of all your active Lesson Plans in your database. For each Lesson Plan on the list, you will see the total number of items
in the Lesson Plan, the number of items remaining to be used to create Assignments for the selected Student, and the date on which the last Assignment was created from this plan using the
Scheduler tool.
- Click or touch the Active checkbox to add a checkmark to any Lesson Plan to add it to the Student's list.
- Click or touch:
- Active Plans to return to the Active Lesson Plan list for this Student.
- Preset to add, edit or delete preset entries for this Student.
- Scheduler to use the Scheduler tool to create Assignments for this Student using one or more of his Active Lesson
Plans.
 Edit Active Lesson Plans
Removing a Lesson Plan from the Student's Active Lesson Plans List
- On the HSTOnline Menu, click or touch 'Lesson Plans and Presets' under the 'Students' section.
- On the Lesson Plans and Presets page, select a Student from the drop down list and click or touch the Go button.
- Click or touch the Edit button to the list of all your active Lesson Plans in your database. For each Lesson Plan on the list, you will see the total number of items
in the Lesson Plan, the number of items remaining to be used to create Assignments for the selected Student, and the date on which the last Assignment was created from this plan using the
Scheduler tool.
- Click or touch the Active checkbox to remove an existing checkmark and remove it from the Student's list.
- Click or touch:
- Active Plans to return to the Active Lesson Plan list for this Student.
- Preset to add, edit or delete preset entries for this Student.
- Scheduler to use the Scheduler tool to create Assignments for this Student using one or more of his Active Lesson
Plans.
Student Presets
Why Create Student Presets?
Each time you create Assignments from Lesson Plan items, copy Assignments over a Date Range, or create multiple Assignment entries, you need to tell HSTOnline how to distribute those items over dates,
days of the week, and time or block of day. Using the Preset feature, you can set that information in advance - setting specific days of the week and times/blocks on those days for each of your Student's
Subjects and Courses.
Each entry can have a Subject or Subject/Course designation. When creating your Assignments using the Preset option, HSTOnline will first look for
an exact match for the Subject/Course of the Assignments. If no exact match for both Subject and Course is found, then HSTOnline will look for a match of just the Subject. If no match of any kind
is found, then the Daily pattern will be followed.
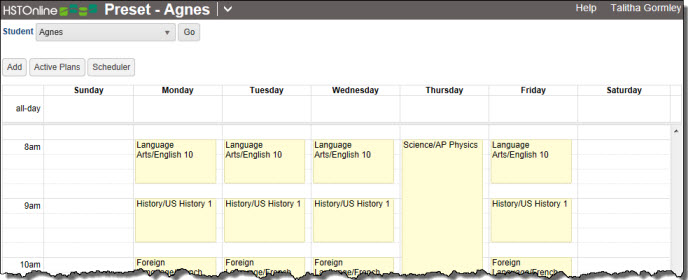
You can use the Preset area in the Student: Lesson Plans and Presets area to create a pattern of days and times for HSTOnline to follow when creating Assignments:
 Preset Window
Adding an Entry
You can create entries for a Subject/Course on a single day, or on multiple days. You can set a specific time/block, or leave those fields blank to have the Subject/Course appear in the 'all day'
section. Each Subject/Course may have just one entry per day of the week. There are two options for making an entry:
- Standard: Use this option to set the same time/block option for each day of the entry - for instance: Math/Algebra at 9am-10am Mon-Fri
- Custom: The Custom option allows you to set different times or blocks for different days for the same Subject/Course - for instance: Science/Biology at 10am-11am on
MWF and 1pm-3pm on T/TH
 Standard/Custom Examples
Adding entries to your Preset schedule will not affect any existing Assignments in your database. It will only change how Assignments are created in the future when using the
Preset option.
- On the HSTOnline Menu, click or touch 'Lesson Plans and Presets' under the 'Students' section.
- On the Lesson Plans and Presets page, select a Student from the drop down list and click or touch the Go button.
- Click or touch the Preset button.
- Click the Subject/Course hyperlink and choose a Subject or Subject/Course from the list.
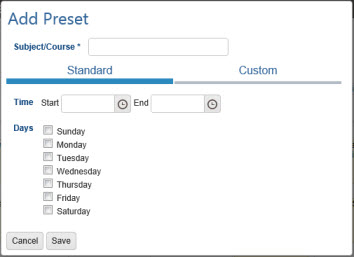
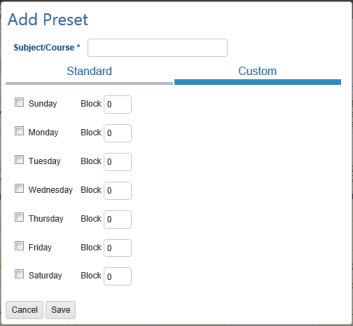
- Click or touch the Add button to create a new entry. The Add form is a tabbed area. The default selection is 'Standard'.
 Add Preset Form - Standard, using Time
|
 Add Preset Form - Custom, using Blocks
|
- The Subject/Course field is a Smart-Entry field.
- Begin typing the name of a Subject or Course or press the spacebar to view the list of active Subjects/Courses.
- HSTOnline will display a list of Subjects and Courses that match your selection.
- Click or touch on the entry you want to attach to this Preset item or continue typing to create a new Subject or Course. Your new entry will be confirmed when you save this item.
- Use the Standard option to set the same start/end times or blocks for each day the Subject/Course will be scheduled.
- When using the Standard option, enter the Start/End times or Block for this item, or leave the fields blank to add this entry to the 'all day' area.
- Check off the days of the week where you want to add this item
- Skip to step 9.
- To set different start/end times or blocks for the same Subject/Course on different days, click or touch the Custom tab.
- Check off each day of the week where you want to add this item
- Set the block or times for each day as needed
- Click or touch:
- Cancel to abandon this item and return to the Preset page.
- Save to add this item to your Preset schedule.
- If you have created a new Subject or Course in the Resource area, HSTOnline will ask for clarification when you click or touch the Save button.
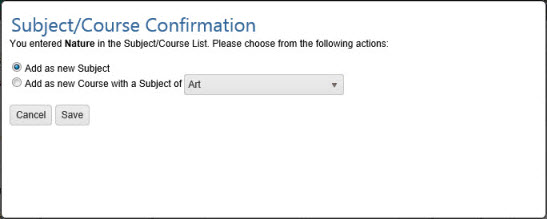 New Subject/Course Confirmation
- Choose whether to create your new entry as a new Subject or a new Course.
- Add as new Subject: the new entry will be added to your Subjects list with a status of 'Core'. You can
edit the item in your Subjects list to change the status as needed.
- Add as new Course with a Subject of: Select a Subject from the drop down list. The Course will be attached to that Subject and created
with the following settings:
- Credit Hours - 0.00
- Calculation Option - Basic
- Grading Scale - Default Grading Scale
- Weighting - Off
You can edit the item in your Courses list to change the parameters as needed.
- Click or touch:
- Cancel to be returned to the Edit Library Item window to make a new selection in the Subject/Course field.
- Save to keep the new Subject or Course and update the Library item.
Editing an Entry
Use the Edit form to make changes to an entry, or remove a checkmark for one or more days to delete those entries from your Preset schedule.
Changing the time or block settings in your Preset schedule will not affect any existing Assignments in those time/block slots. It will only change how Assignments are created in the future when using
the Preset option.
- On the HSTOnline Menu, click or touch 'Lesson Plans and Presets' under the 'Students' section.
- On the Lesson Plans and Presets page, select a Student from the drop down list and click or touch the Go button.
- Click or touch the Preset button.
- Click on any entry in the Preset grid. The information for all the linked entries will be displayed in the Edit Preset window.
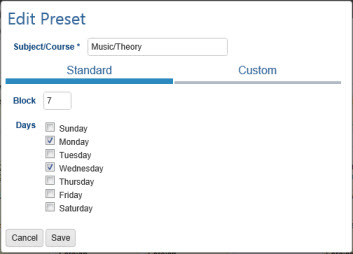 Edit Preset Form - Standard, using Blocks
|
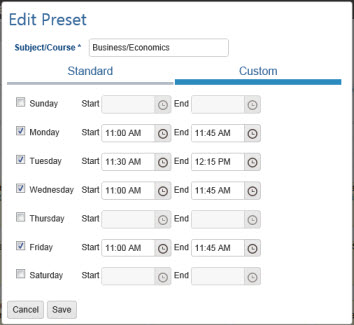 Edit Preset Form - Custom, using Time
|
- Make any changes that are needed.
- Click or touch:
- Cancel to abandon your changes and return to the Preset page.
- Save to save these changes to your Preset schedule.
Deleting an Entry
To delete one or more entries from your Preset schedule, use the edit instructions above to open the Edit form for a Subject/Course. Remove the checkmark for any day of the week
where you want to remove the entry for that Subject/Course. Click or touch Save to keep your changes.
Deleting entries from your Preset schedule will not affect any existing Assignments in those time/block slots. It will only change how Assignments are created in the future when using the Preset option.
Using the Preset Option
You can select the Preset option when creating Assignments:
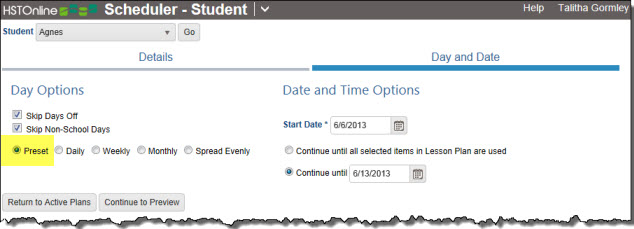 Preset Day Option
When you select the Preset option, Assignments will be created following the date and time/block settings you have created. If there is no matching entry for the Subject/Course being created, then
HSTOnline will use the Daily option to create the Assignments. Please see the Day Options Help Page
for more information.