Courses
Introduction to Courses
A Course is a specific area of study within a Subject. For a Subject of Language Arts your Courses might be Composition or Literature, for a Subject of Science your Courses might be Biology, Chemistry,
Physics, etc.
To access the Courses list, click or touch Courses under the 'Manage Lists' section of the HSTOnline menu.
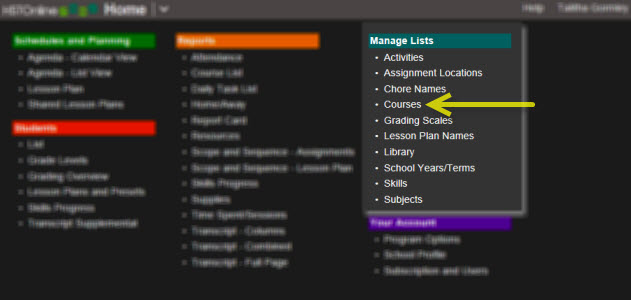 HSTOnline Menu - Courses
While Courses are an optional feature in HSTOnline, they are required:
You can add Courses gradually over time as you need them. Depending on your curriculum and how you organize your homeschool, not every student will take every Course. You may use some courses one year
and then choose to archive them until a younger child is ready for them. For example, one year your student's Course under the Math Subject might be Algebra, and another year her Course under the Math Subject
might be Pre-Calculus. You also might choose not to use Courses at all until your Students are at a junior or senior high level. It is entirely up to you.
For each of your Courses, you can assign Credit Units; enter a course description; assign Weighted Grading; and select a Grading Scale.
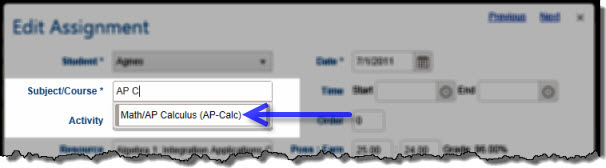
The Subject/Course field in Assignment and Lesson Plan add and edit windows is a Smart-Entry field.
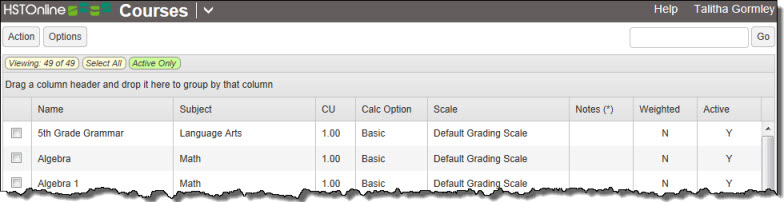
The Courses list is sorted alphabetically by the Name field. You can group or sort by any column. The Active column shows a 'Y' if the Course is active and an 'N' if the
Course is archived.
| Food for Thought |
While your Subjects list should not exceed 10 entries, you may find that you have 40 or even 50 Courses as you proceed through your homeschooling career.
However, if you find yourself with more than 200 Courses, your list will start to become unwieldy and you might want to reconsider how you are defining your Student's studies.
For instance, you should not be creating a Course for every book or Resource used. Likewise, if you are studying Presidents in your History class, you should not create a Course for every
single President. The Topic field would be a better solution for documenting that level of detail. You might create one Course called 'Presidents' or you might choose to include that work in
a more over-reaching Course called American History. Keep in mind your high schooler's Transcript and the best presentation of the areas studied. How you set your Courses is, however, entirely at
your discretion.
The same Course can be used for more than one Student and more than one School Year. The reasons to create multiple Courses for the same area of study are:
- if you must have one version with and one version without weighted grading
- if you need to have different grading scales for different students doing the same work
- if you need to have different credit hours (however this can often be handled by choosing a different credit hour calculation method).
|
Courses List Columns
| Column Name |
Notes |
Default Visibility |
| Name |
List is sorted by Name |
Visible |
| Subject |
Displays the Subject the Course belongs to |
Visible |
| Code |
Shows the (optional) code for the Course |
Hidden |
| CU |
Displays the Credit Units assigned to the Course |
Visible |
| Calc Option |
Displays the Calculation Option selected for the Course: Basic, Time Spent, Time Spent - Partial Credit, Sessions, or Sessions - Partial Credit |
Visible |
| Scale |
Displays the name of the selected Grading Scale for the Course |
Visible |
| Notes (*) |
Shows '*' if Notes have been entered for the Course |
Visible |
| Notes (Preview) |
Displays, in plain text, the first 150 characters of the Course Notes |
Hidden |
| Weighted |
Shows 'Y' if the Course is set up for Weighted Grading and 'N' if the Course does not have Weighted Grading |
Visible |
| Active |
Shows 'Y' if the Course is active and 'N' if the Course is archived |
Visible |
 Courses List
Courses List Controls
- Action Button:
- Add": Add one or more items to the Courses list. This action is always available.
- Copy: Copy the details of an existing Course to aid in the creation of a new Course. This action is available when one Course is selected.
- Edit: With one Course selected, this action becomes available. Choose edit to change the elements of the Course.
- Multi-Edit: With two or more Courses selected, this action becomes available. Choose this option to edit all the selected items in the same way.
- Delete: With one or more Courses selected, this option becomes available. Choose this option to permanently delete the selected items
from your database.
- Options Button:
- Choose Columns: Click or touch this option to select which fields will be displayed in the Courses list. You must select at least one column.
- Filter: Click or touch this option to select which types of Courses will be displayed.
 Assignment Locations Filter
You can choose Both, Yes (Active only), or No (Archived only). The default selection shows Active Courses. When anything other than Both is selected, the Filter Settings
badges show which types of items are being displayed.
Assignment Locations Filter
You can choose Both, Yes (Active only), or No (Archived only). The default selection shows Active Courses. When anything other than Both is selected, the Filter Settings
badges show which types of items are being displayed.
- Expand All: When the list is Grouped, click or touch this option to expand (open) all groupings.
- Collapse All: When the list is Grouped, click or touch this option to collapse (close) all groupings.
- Search Box and Go Button: Use the Search box to enter text and click the Go button to find Courses matching your entry. HSTOnline will do an exact search for whatever text you enter,
searching the Name, Subject and Notes (Preview) fields, even if those columns have been hidden. Only the text visible in the Notes (preview) field will be searched. Leave the search box blank
and click Go or click or touch the Search text badge to return to the full list of Courses.
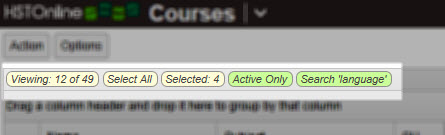
Courses List Badges
- Viewing: Indicates the number of Courses being displayed out of the total based on the current settings.
- Select All: Click or touch this badge to quickly select all the Courses in the list.
- Selected: When one or more Courses are highlighted, this badge will appear to show the number items selected. Click or touch this badge to deselect all Courses.
- Filter Settings: If you have limited the types of Courses to be displayed, the filter badge will appear showing the types of items being displayed - either Active Only or
Archived Only.
- Search text: Shows the text entered into the Search box which is limiting which Courses are displayed. Click or touch this badge to clear the text from the search box and remove
that limitation.
 Courses List Badges
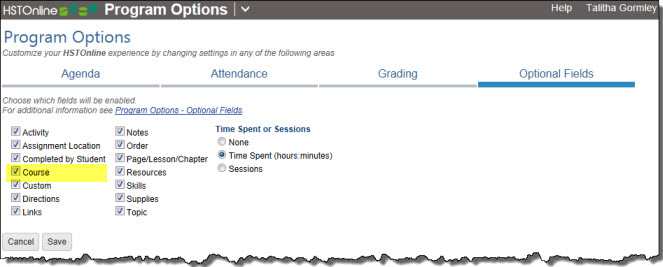
Enabling the Course Field
The Course field is optional and can be enabled and disabled via Program Options in the HSTOnline menu. By default, the Course field is enabled.
 Enable Course Field
Disabling this field will:
- Remove the Course option from the Assignment and Lesson Plan add/edit windows
- Disable the Weighted Grading option
- Disable the use of all but the Default Grading Scale
- Disable Credit Hours and GPA/Credit Summary options on the Transcript
- On the HSTOnline menu, click or touch Program Options.
- On the Program Options page, click or touch Optional Fields.
- Click or touch the box next to Course to add a checkmark to enable the field; or to remove a checkmark to disable the field.
- Click or touch Save to keep your changes.
Adding Courses
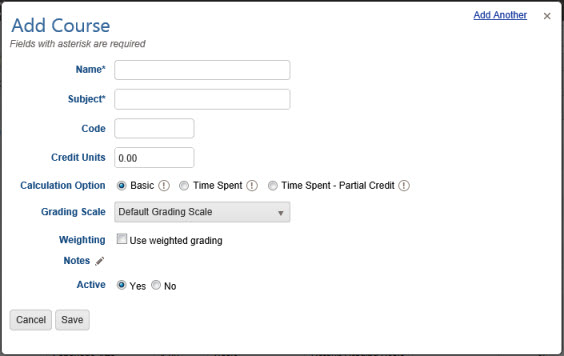
Only the Course Name and selecting a Subject are required for creating a new Course. All other fields are optional.
- On the HSTOnline menu, click or touch Courses under the 'Manage Lists' section.
- On the Courses page, click or touch the Action button and choose Add to open the Add Course window.
 Add Course
- Name: Enter a name for your Course, up to 150 characters.
- Subject: Enter a Subject for this Course. The Subject field is a Smart-Entry field. As you begin typing, HSTOnline
will show you a list of matching Subjects. Pick one from the list or keep typing to create a new Subject name.
- Code: This is an optional field. It is only necessary to create a Course code if you choose to have two Courses with the exact same name tied to the same
subject. If you create a Course Code, the code will be displayed in parentheses after the Course name in any Course selection list. If needed, enter a code, or abbreviation, for the Course, up to 10 characters.
- For most users, 3-5 characters will be plenty.
- For a Course of Algebra, your code might be ALG; for a Course of Spanish, your code might be SPAN; etc.
- If you choose to add a Code, each Code must be unique.
 Course Code in drop down list
- Credit Units: Enter the Credit Units to be awarded on the Transcript for a passing grade for the year in this Course.
- This field is optional and can be left blank for non-high school level classes.
- In traditional schools, 1 credit unit is awarded for each core Course while 0.5 credit units are awarded for 1/2 year or elective Courses. Again, this is entirely left to your discretion.
- Whatever credit units you assign will be awarded based on the Calculation Option you select and whether the student has attained a passing grade for the year for that Course.
- Calculation Option: If you have entered Credit Units greater than zero, choose how Credit Units will be awarded. The Time Spent or Sessions options will appear
depending on which of those fields you have elected to display in Program Options. If neither field is enabled, only the Basic option will be
available here.
- Basic: Full credit is awarded if the student has a passing grade in the course. No partial credit is allowed. This is the default option.
- Time Spent: Full credit is awarded if the student has a passing grade for the course AND the student has met the minimum Time Spent noted. No partial credit is
allowed.
- Time Spent-Partial Credit: Full credit is awarded if the student has a passing grade for the course AND the student has met the minimum Time Spent noted. Partial
credit is awarded for Time Spent less than the amount noted below.
- Sessions: Full credit is awarded if the student has a passing grade for the course AND the student has met the minimum Sessions noted. No partial credit is
allowed.
- Sessions-Partial Credit: Full credit is awarded if the student has a passing grade for the course AND the student has met the minimum Sessions noted. Partial
credit is awarded for Sessions less than the amount noted below.
- You might want to use one of the partial credit options if the Student will be completing the Course over more than one school year. On the Transcript the Student will receive partial
credit for the Course in each year it was studied.
- When you select a Time Spent or Sessions Calculation Option you will need to enter the minimum limits required. This is the minimum number of hours/minutes for Time Spent or the minimum number
of Sessions that the student will need to log in order to receive full credit hours with a passing grade in this Course. Please refer to the
Time Spent or Sessions Help Pages for more information.
- Grading Scale: Select a Grading Scale from the drop down list. The Default Grading Scale is selected when you first create the Course. You may change it to any scale you
wish.
- Weighting: HSTOnline offers the option of weighting grades. This means determining which Activities within a Course will bear a greater percentage of the
overall grade for the Term. Most users will not need this feature. The Weighted Grading option will not appear unless the Activity field is enabled in the
Optional Fields section of the Program Options menu. Please refer to the Weighted Grading Help Page
to understand how this feature affects your student's grade and to decide if it is the right tool for your homeschool.
 Weighted Grading
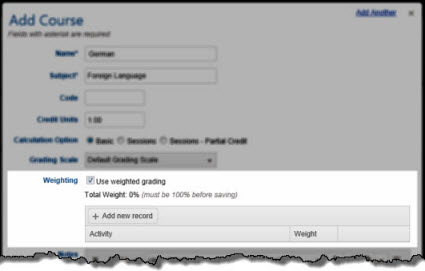
- To use weighted grading for this course, check the 'Use weighted grading' box.
- The Activity/Weight box will appear along with a tally of the weighting that has been applied for this Course.
- You cannot save this Course until the total weight for all selected activities is equal to 100%.
- Click or touch the 'Add new record' button. A new line will be added to the Weighting table.
- Choose an Activity from the drop down list. Scroll through the list and click or touch the Activity you want to use. You can also type the first letter of an Activity to limit the displayed
options.
- Tab into, click or touch the Weight field and enter a weight for that activity, anything from 1 to 100.
- Repeat the above steps until all weighted activities have been added and the total weighting equals 100%.
- To change an entry you have already made, click or touch the Activity to select a different Activity from the list; click or touch the weight to change that value.
- To remove an entry you have already made, click or touch the Delete button for that line entry.
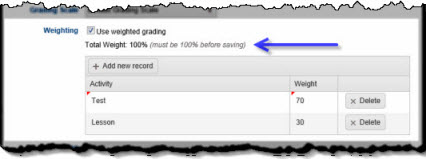 Weighting equals 100%
- Notes: Click or touch the Notes field name or the pencil icon to enter further details about the Course. In the Course list view, you can choose to view the Notes (*)
column - which simply shows an asterisk when notes have been entered for that Course - and/or you can choose to view the Notes (Preview) column - which will display, in plain text, the first 150
characters of whatever notes have been entered for the Course.
- Click or touch:
- Cancel to abandon the new item without adding to your list.
- Save to add this item to your list of Courses.
- The 'Add Another' hyperlink in the top right corner to save this item and add another Course. You can click 'Add Another' each time until you have entered the last
new Course and then click the Save button to end the Add process.
- Click or touch the green Added Items notification or refresh the page to see your updated Courses list.
 Added Items Notification
Copying a Course
You can make a copy of any Course to use it as the basis for creating a new Course under the 'Manage Lists' section.
Scenario: When you initially created your Course for Student A, you set the grading scale and other options to meet the needs of that student. When Student B takes that Course,
you may find it necessary to tweak those choices to meet different needs. When this is the case, and you want to have the same Course name, you should copy the original Course and make your changes. This
will allow you to preserve the records for Student A but still have the flexibility to adjust details of the Course for Student B.
- On the HSTOnline menu, click or touch Courses.
- On the Courses page, click or touch once on the item you want to copy and then click or touch the Action button and choose Copy to open the Copy Course window.
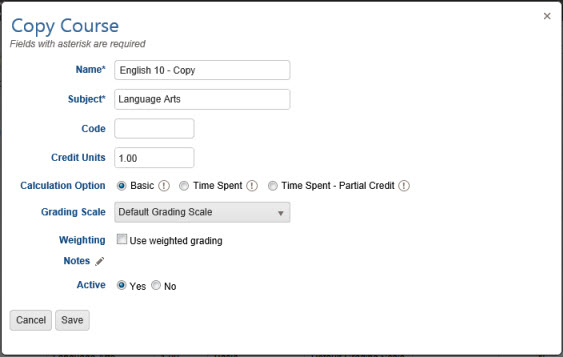 Copy Course
- HSTOnline will present you with the duplicate Course. All attributes of the original Course will be the same, with two exceptions:
- The name will have '-Copy' appended to it. If the original Course name is greater than 145 characters, the last characters will be lopped off to make room for -Copy.
- If the original Course has a Course Code, '-C' will be appended to it. If the original Course code is greater than 8 characters, the last characters will be lopped off to make room for -C.
- Make any changes needed to create the new Course.
- Click or touch:
- Cancel to abandon the new item without adding to your list.
- Save to add this item to your list of Courses.
- Click or touch the green Added Items notification or refresh the page to see your updated Courses list.
Added Items Notification
Editing Courses
You can edit many elements of your Course. Caution must be exercised, however, when that Course has been used in prior school years or terms. Changes you make to a Course will affect all Assignments
and Lesson Plan items that have been tied to that Course. Changing the grading scale or credit units, for example, will change those values for all records - past, present and future. Instead, you
might choose to duplicate the Course using the Copy feature and setting your new options.
Editing a Single Course
You can edit any field for a single Course. Keep in mind that any changes you make to an existing Course will affect all assignments and grading reports to which this course is attached throughout your
database. If you want to change the details of a Course but still keep your old records intact, consider copying the Course instead and then making whatever adjustments are necessary.
- On the HSTOnline menu, click or touch Courses under the 'Manage Lists' section.
- On the Courses page, double-click on the item you want to change to open the Edit Course window.
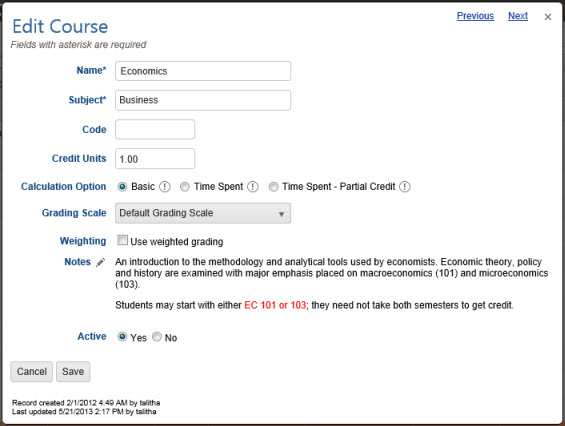 Edit Course
- Alternatively, you can click once on the item you want to change and then click the Action button and choose Edit to open the Edit Course window.
- On a touch device, touch the item you wish to edit and then touch the Action button and touch Edit to open the Edit Course window.
- At the bottom of the edit view, you will see when and by whom the item was created as well as when and by whom it was last updated.
- Make whatever changes are needed.
- When choosing to edit the Subject, please note that all records tied to the selected Course will also have their Subject changed accordingly.
- If you change the Weighting setting from enabled to disabled, all effects of weighting will be turned off for the Course. If you later change the Weighting back to enabled, your previous
weightings will be revealed.
- To change the Active status this Course, click or touch the Yes radio button to make the Course Active; click or touch the No radio button to Archive the Course.
- Click or touch:
- Cancel to abandon the changes and close the Edit Course window.
- Save to commit the changes to your Subject and close the Edit Course window.
- Click or touch the Previous or Next hyperlink in the top right corner to save your changes to this Course and move to the previous or
next Course in the list. You can click or touch Previous or Next until you have made all the changes you want to your Courses and then click the Save button to end the Edit process. If you
reach the beginning or end of the list when clicking or touching Previous or Next, the Edit window will close and you will be returned to the list view.
Editing Multiple Courses
The multi-edit feature allows you to make the same change to the Subject, Credit Units, Calculation Option, Grading Scale, and/or Active status for two or more Courses at the same time. When you
select a field in the Multi-Edit window by putting a checkmark to the left of the field name and make your changes and click the Save button, whatever information or blank space that is in a
checked field will be transferred to the selected items, replacing whatever data was previously in those fields.
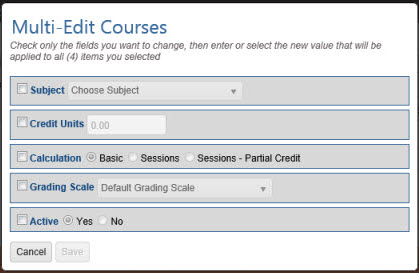 Multi-Edit Courses
- On the HSTOnline menu, click or touch Courses under the 'Manage Lists' section.
- On the Courses page, select the items you want to change. You can use the Grouping and Sorting, Filter and
Search features to isolate the items you want to change.
- Click the checkbox for each item you want to change.
- You can use your mouse to click and drag over contiguous Courses in the list to select those items.
- On a touch device, you can touch and drag your finger over contiguous Courses in the list to select those items.
- Click or touch the 'Select All' badge to select all the Courses in the list.
- Click or touch the Action button and click or touch Multi-Edit to open the Multi-Edit Courses window.
- HSTOnline will show you how many items have been selected for editing.
- To enable the form, click or touch the box to the left of each field you want to change for all selected Courses. Make your selection for each of those fields.
- To change the Active status of the selected items, click or touch the box to the left of Active.
- To make all the selected items Active, click or touch the ‘Yes’ radio button.
- To Archive all the selected items, click or touch the ‘No’ radio button.
- Click or touch:
- Cancel to abandon the changes and close the Multi-Edit Courses window.
- Save to commit the changes and close the Multi-Edit Assignment Courses window.
Deleting Courses
You can delete any Course or any group of selected Courses which have not been attached to any Assignment or Lesson Plan item. Courses which have been attached to any of these items can be removed from the
active list using the Archive feature. Deleted items cannot be retrieved.
Deleting a Single Course
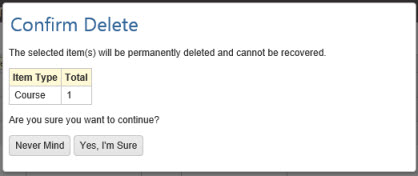 Confirm Delete
- On the HSTOnline menu, click or touch Courses under the 'Manage Lists' section.
- On the Courses page, click or touch the item you want to remove and then click the Action button and choose Delete to open the Confirm Delete window.
- Click or touch:
- 'Never Mind' to cancel the delete process.
- 'Yes, I'm Sure' to complete the deletion process.
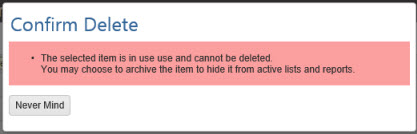
- If the Course is being used in your database in Assignments or Lesson Plan items you will see a message that the selected item cannot be deleted.
Click or touch the 'Never Mind' button to return to the Courses List. From there you can choose to archive the Course to
hide it from your list.
 Delete Warning
Deleting Multiple Courses
 Delete Multiple Courses
- On the HSTOnline menu, click or touch Courses under the 'Manage Lists' section.
- On the Courses page, select the items you want to remove. You can use the Grouping and Sorting, Filter and
Search features to isolate the items you want to remove.
- Click the checkbox for each Course you want to remove.
- You can use your mouse to click and drag over contiguous Courses in the list to select those items.
- On a touch device, you can touch and drag your finger over contiguous Courses in the list to select those items.
- Click or touch the 'Select All' badge to select all the Courses in the list.
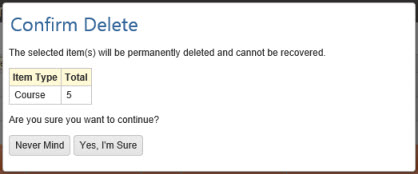
- Click or touch the Action button and click or touch Delete to open the Confirm Delete window.
- HSTOnline will show you how many items have been selected for deletion.
- Click or touch:
- 'Never Mind' to cancel the delete process.
- 'Yes, I'm Sure' to complete the deletion process. HSTOnline will delete any of the selected Courses which are not being used in your database in
Assignments or Lesson Plan items. Items that are in use will not be deleted.
Archiving Courses
Archiving allows you to de-clutter your Courses list of items from previous years or terms that will not be used in the current year while preserving records from previous years. When you archive a Course
it can still be included in a Transcript but will no longer be available for selection for Assignments, Lesson Plans items or Library items. Use the Edit or
Mutli-Edit directions above to change the Active status of your Courses.