Lesson Plan Display and Filters
Introduction
Use the filters in the Lesson Plan panel to select a Lesson Plan to work with and affect the display of those Lesson Plan items:
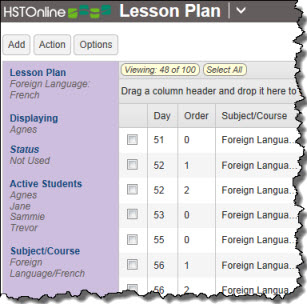 Lesson Plan Filter Panel
- Lesson Plan: Choose which Lesson Plan to view.
- Displaying/Status: Within the selected Lesson Plan, you can choose which items in the Lesson Plan you want to view: All items, or select a specific Student to view their used
items, not used items, or both.
- Active Students: Designate which Lesson Plans are being used by a Student. You can do this from the Student area, but you can also a Lesson Plan as 'Active' for multiple
students at a time using this filter. Choosing a Student here will cause the Lesson Plan to be displayed in their Active Lesson Plans list. Removing a Student here will remove the Lesson Plan
from the Student's Active LP list. Likewise, adding an LP to a Student's Active Plan list will add the Student to this list; removing the LP from the Student's Active Plan list will remove
their name from this list.
- Subject/Course: Provides a further way of filtering the displayed options. While you can Group by Subject/Course to split
the view in that manner, there may be times when, in a multi-discipline Lesson Plan, you only want to look at one subject/course at a time.
|
In addition to these filters, you can group or sort the Lesson Plan in any way that you like. HSTOnline will automatically memorize your grouping and sorting
settings. Use the Options: Choose Columns menu to select which columns are displayed for the Lesson Plan. The available columns will depend on your field settings in
Program Options: Optional Fields.
To optimize performance, the Lesson Plan displays no more than 500 items at a time. When there are more than 500 items to be displayed, the list will be divided into additional pages of no more
than 500 items each. Searching or filtering a list will search the entire list, not just the items currently in view. For more information on paging, please see:
Customizing the Data Display: Automated Paging.
Lesson Plan List Controls
|
- Add Button:
- Add - Single: Select this option to add a single item to your Lesson Plan.
- Add - Multiple: Select this option to add two or more items to your Lesson Plan.
- Action Button:
- Change Day Number: This option is always available. Use this function to Change the Day Numbers for one or
more items in the Lesson Plan
- Convert: This option is always available and is used to convert Lesson Plans previously utilized in HSTPlus.
- Copy: With one Lesson Plan item selected, this action becomes available. Choose this option to copy the selected
item as a basis for creating additional LP items.
- Copy to Another Lesson Plan: Select one or more Lesson Plan items and use this action to copy them into a different
Lesson Plan.
- Delete: With one or more Lesson Plan items selected, this option becomes available. Choose this option to permanently
delete the selected items from your Lesson Plan.
- Edit: With one Lesson Plan item selected, this action becomes available. Choose edit to change any field of
the selected item.
- Multi-Edit: With two or more Activities selected, this action becomes available. Choose this option to edit
two or more Lesson Plan items at the same time.
- Export: This option is always available. Use this function to Export the displayed items to a .CSV file.
- Scheduler: This option is always available. Use the Scheduler to create Assignments for one or more Students
from the items in this Lesson Plan.
- Set Used Status: Use this option to set the Used Status for one or more Students on the selected Lesson Plan
item(s).
- Share: This option is always available. Use this funciton to share Lesson Plans you have created with other
HSTOnline users.
- Options Button:
- Choose Columns: Click or touch this option to select which fields will be displayed for the Lesson Plan. You must select at least one column.
- Expand All: When the Lesson Plan is Grouped, click or touch this option to expand (open) all groupings.
- Collapse All: When the Lesson Plan is Grouped, click or touch this option to collapse (close) all
groupings.
- Search Box and Go Button: Use the Search box to enter text and click the Go button to find Lesson Plan items matching your entry. HSTOnline will do an exact search of the Subject/Course,
Activity, Resource, Topic, Custom, Directions (Preview) and Notes (Preview) fields for whatever text you enter. Leave the search box blank and click Go or click or touch the
Search text badge to remove that limitation on the display.
|
Lesson Plan Badges
|
- Viewing: Indicates the number of Lesson Plan items being displayed on the current page out of the total number of Lesson Plan items, based on the current settings.
- Select All: Click or touch this badge to quickly select all of the Lesson Plan items in the current page.
- Selected: When one or more Lesson Plan items are highlighted, this badge will appear to show the number items selected. Click or touch this badge to deselect all
Lesson Plan items.
- Search text: Shows the text entered into the Search box which is limiting which Lesson Plan items are being displayed. Click or touch this badge to
clear the text from the search box and remove that limitation.
|
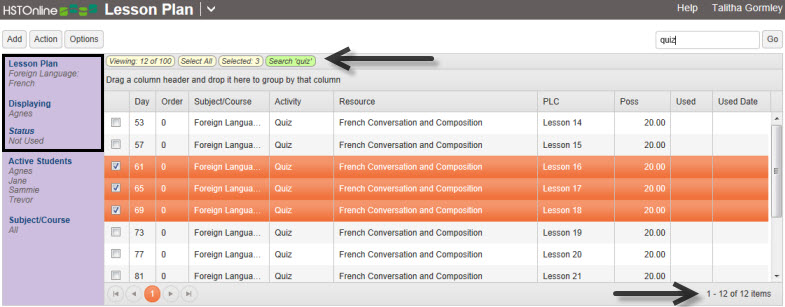 Lesson Plan Badges and Paging
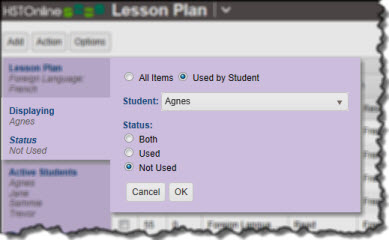
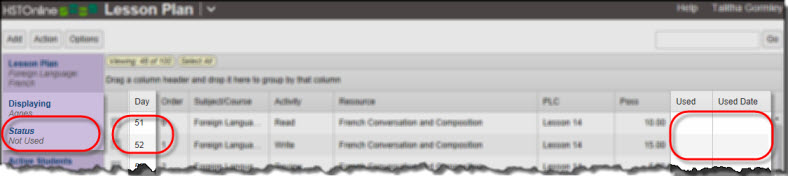
In the above screen shot, we are looking at the Lesson Plan named: Foreign Language/French, displaying only those items which are 'Not Used' for Student Agnes.
- Viewing: 12 of 100: tells us that there are 12 items that meet all of the filter and search settings, out of the 100 total items in this Lesson Plan
- Selected: 3: shows that three items are currently highlighted in this list
- Search 'quiz': shows that the display is being limited to only those which meet the Search text of 'quiz'
- 1-12 of 12: this notation in the bottom right corner tells us that the paging is set up to show items 1-12 of a total of 12 items. The automated paging feature of
HSTOnline will limit any view to no more than 500 items at a time and let you know the total number of possible items to view based on the current filters.
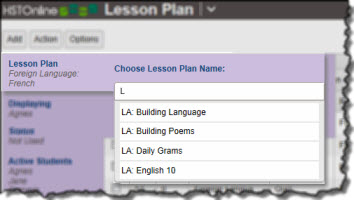
Lesson Plan Selector
Use the Lesson Plan selector to choose an existing Lesson Plan Name, or to create a new one using the Smart-Entry properties of this field.
 Search leaving field blank
- On the HSTOnline menu, click or touch 'Lesson Plan' under the 'Schedules and Planning' section.
- On the Lesson Plan page, choose a Lesson Plan to view by clicking or touching 'Lesson Plan' in the filter panel.
- Choose a Lesson Plan to view. The Lesson Plan Name field is a Smart-Entry Field so you can:
- press the space bar to see all the active Lesson Plans in your list
- type a few letters into the field to see all active Lesson Plans
- type in a new Lesson Plan Name that you want to create. The new plan name will be added to your Lesson Plan Names list as an active plan.
- The Display/Status filter will be set to whatever you had it set to previously so you may need to adjust that filter to choose the items you want to view for the newly selected
Lesson Plan.
- The Active Students filter display will change to reflect the correct active students for the newly selected Lesson Plan.
 Search by entering letters
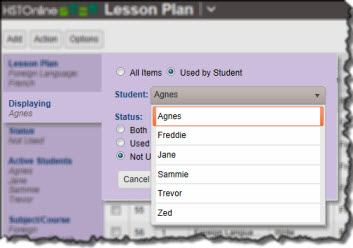
Displaying/Status Filter
When viewing a Lesson Plan, you can choose how the items are displayed. You can display all items in the Lesson Plan, or you can view those items based on the 'Used' status for a particular Student. The
Displaying/Status filter settings will remain the same when you switch Lesson Plans. To change the settings, click or touch the Displaying label and make a new selection.
- On the HSTOnline menu, click or touch 'Lesson Plan' under the 'Schedules and Planning' section.
- On the Lesson Plan page, choose a Lesson Plan to view by clicking or touching 'Lesson Plan' in the filter panel.
- The very first time you view a Lesson Plan, the Displaying filter will be set to All. On subsequent visits to any Lesson Plan, the Displaying filter will show whatever your last setting was.
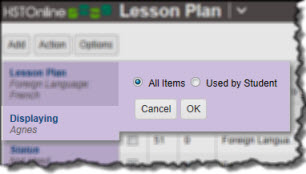 Displaying: All
|
 Displaying: Used by Student
|
 Select Student
- To view items for a particular Student:
- click or touch 'Displaying' on the filter panel
- click or touch the 'Used by Student' radio button
- select a Student from the drop down list
- choose a status - Both, Used or Not Used
- When you choose to display items based on the 'Used by Student' option:
- two additional columns will be added to your Lesson Plan display: Used and Used Date. They will always be added to the far right of the display and you may need to
scroll right to view them, depending on the number of columns you have chosen to display and the size of your screen.
- the 'Displaying' filter will show the name of the Student whose Used status you are viewing
- a new label - Status - will appear, showing whether you're viewing Both, Used or Not Used items.
- Both: When displaying 'Both', you have elected to show items which have been used to create Assignments for the selected Student as well as those which are as yet un-used.
- The Used column will show a Y for those items which have already been used to create Assignments, and the Used Date column will display the date on which the Assignment was created in the
Agenda
- The Used and Used Date columns will be blank for those items which have not yet been used to create Assignments for the selected Student
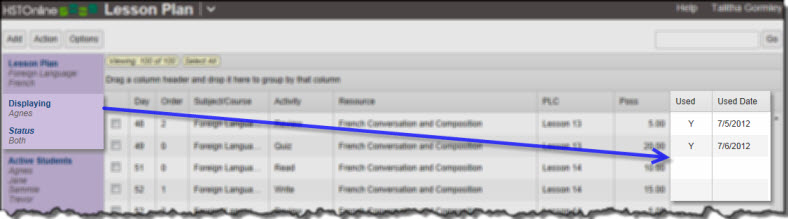 Displaying Used by Student: Both
- Used: When displaying 'Used', only those items which are marked as Used for the Student will be displayed.
- The Used column will show a Y for each item and the Used Date column will display the date on which the Assignment was created in the Agenda
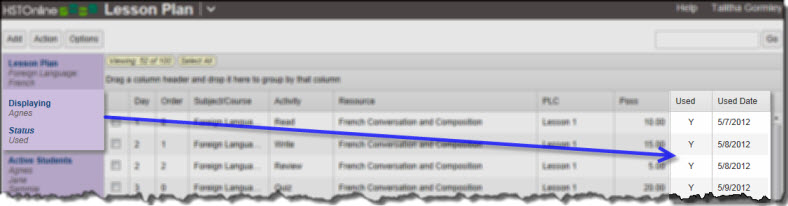 Displaying Used by Student: Used
- Not Used: When displaying 'Not Used', only those items which have not yet been Used to create Assignments for the Student will be displayed.
- The Used and Used Date columns will be blank for all items in the display
- The first item in the list may not start with Day 1. Your Lesson Plan items have not been lost, they are simply being hidden from view based upon the Status option you selected.
 Displaying Used by Student: Not Used
Active Students
In order to assist using the Scheduler tool from the Student's Lesson Plans and Preset area, you will want
to designate which Lesson Plans are being used by that Student. You can do this from the Student area, but you can also a Lesson Plan as 'Active' for multiple students at a time using this filter.
Choosing a Student here will cause the Lesson Plan to be displayed in their Active Lesson Plans list. Removing a Student here will remove the Lesson Plan from the Student's Active LP list. Likewise, adding
an LP to a Student's Active Plan list will add the Student to this list; removing the LP from the Student's Active Plan list will remove their name from this list.
Making these changes does not affect the Used/Not Used status of the individual items in the plan. If you want to change the Used status of Lesson Plan items for one or more Students, use the
Action: Set Used Status function.
When using the Scheduler tool from the Lesson Plan area, you can choose to create Assignments for any Student regardless of whether that LP is listed as 'Active' for a Student or not.
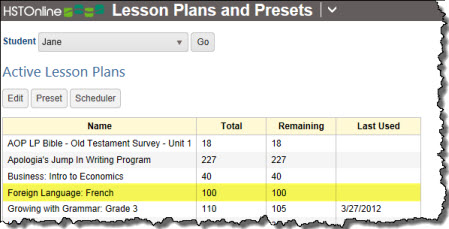
 Active Students Filter (Fig. 1)
 Active Students Filter - Remaining/Dates (Fig. 2)
- On the HSTOnline menu, click or touch 'Lesson Plan' under the 'Schedules and Planning' section.
- On the Lesson Plan page, choose a Lesson Plan to view by clicking or touching 'Lesson Plan' in the filter panel.
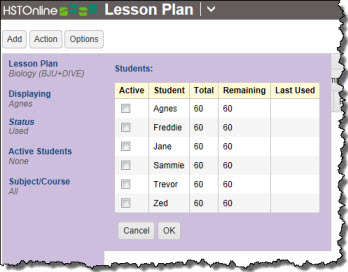
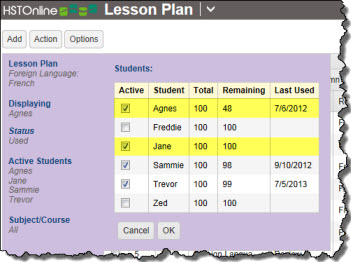
- Click or touch the Active Students filter name on the left panel to open the Active Students selection window (Fig 1). The columns:
- Active: the checkboxes that indicate whether a Lesson Plan is active for the student (checked) or not (unchecked)
- Student: shows the names of each active Student
- Total: the value will be the same for all Students. This represents the number of items in the Lesson Plan.
- Remaining: shows the number of items in the Lesson Plan which are marked as 'Not Used' for the Student. When using the
Scheduler tool, these are the items that will be used to create the next batch of Assignments. (Fig. 2)
- Last Used: When one or more items in the Lesson Plan is marked as 'Used' for a Student, this column will show the date on which the last Assignment was created
using Scheduler. (Fig. 2)
- Click or touch the Active checkbox for any Student to add or remove a checkmark. Changing the Active status of a Lesson Plan does not change the used/not used status of the individual Lesson Plan items
for that Student. See: LP Items 'Used' Status for directions on changing 'Used' settings.
- Adding a checkmark adds the Student name to the 'Active Students' list in the Lesson Plan filter panel and adds the Lesson Plan to the Student's
Active Lesson Plan list. (Fig. 3)
- Removing a checkmark removes the Student name from the 'Active Students list in the Lesson Plan filter panel and removes the Lesson Plan from the Student's
Active Lesson Plan list . When the Lesson Plan is not 'active' for a Student, you can only create Assignments for that Student by using
the Scheduler tool from the Lesson Plan side.
- You cannot change any other column directly. Values are derived from your database. Each time you use the Scheduler, the values in this filter table and in the Students Lesson Plans and Presets area
will be updated automatically.
- Click or touch:
- Cancel to close the filter without making any changes to the current settings.
- Ok to update your filter with your new settings.
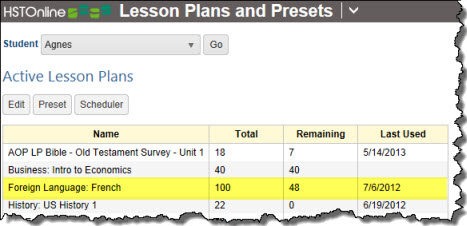
 Active Lesson Plan - Student side - These values match the ones in Fig. 2 for each student (Fig. 3)
The Subject/Course Filter
Use the Subject/Course filter to determine which Lesson Plan items will be displayed for the Displaying/Status filters you have set.
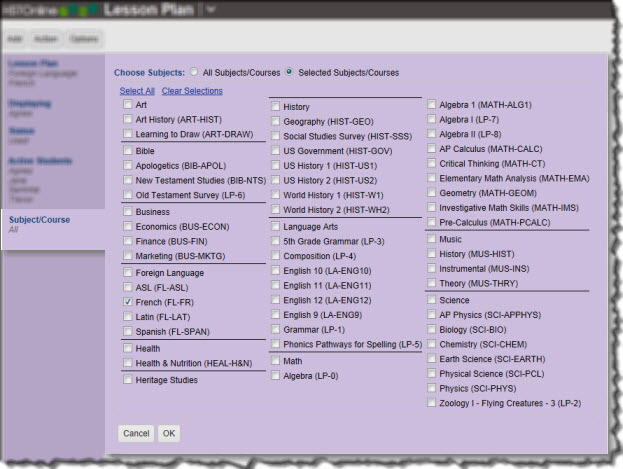 Lesson Plan Subject/Course Filter
- On the HSTOnline menu, click or touch 'Lesson Plan' under the 'Schedules and Planning' section.
- On the Lesson Plan page, click or touch Subject/Course in the filter panel. The filter will display the current settings you are viewing.
- The first time you visit the Lesson Plan area, the Subject/Course Filter will be set to the 'All Subjects/Courses' option.
- Subsequent visits will remember your prior settings for the filter.
- Click or touch one of the radio buttons.
- All Subjects/Courses:
- Any Lesson Plan item which meet your Displaying/Status filters will be displayed for all Subjects/Courses in your database.
- Selected Subjects/Courses:
- A list of all your active Subjects and Courses will appear, with sections between Subjects divided by a black line.
- The first entry in each section will show the name of a Subject (listed in alphabetical order) followed by any active Courses within that Subject.
- When you click or touch the checkbox next to a Subject name to add a checkmark, a check will automatically be entered for each of the Courses belonging to that Subject as well.
- Clicking or touching to remove a checkmark next to a Subject will only remove that single checkmark, excluding any Lesson Plan item that has that Subject attached but no related Course.
- Click or touch the 'Clear Selections' link in the top left of the Subject/Course filter to remove all checkmarks at once and start again.
- In the example pictured above, only the Courses of French (under Foreign Language) is checked. That means that the only Lesson Plan items that will be included in the display are those
which are attached to Subject/Course: Foreign Language/French.
- Click or touch:
- Cancel to return to the prior Subject/Course selection.
- Ok to update the Subject/Course filter your new selections.