Converting an HSTPlus Lesson Plan to HSTOnline
Introduction
|
If you have previously used the Homeschool Tracker Plus desktop program, you can use this utility to convert Plus Lesson Plans into the HSTOnline Lesson Plan format. All fields will be
converted for import except for Attachments (called Links in HSTOnline), Goals (called Skills in HSTOnline), and Supplies.
|
|
If you prefer, you can have your entire Plus database imported into your HSTOnline database. When you import the full database, your URL Attachments and Supplies will be imported as well.
Please see the Importing Your Plus Database User Guide Page for more information.
|
|
On the Homeschool Tracker Plus side of the conversion process, the original LP file will be formed into a compressed (.zip) file format. You can save this file to any location you choose, although we
recommend placing it on your computer desktop for easiest access.
|
|
When you bring the file into HSTOnline you will have the opportunity to choose whether to keep the original Subject, Course, Activity and Resource field entries or to edit them to make a new
selection.
|
Preparing Your Plus Lesson Plan
Importing the Converted File
Once you have converted the Plus LP into a .zip file using the Tools: Convert menu, you can login to HSTOnline to complete the process.
- Login to your HSTOnline account.
- On the HSTOnline menu, click or touch 'Lesson Plan' in the 'Schedules and Planning' section.
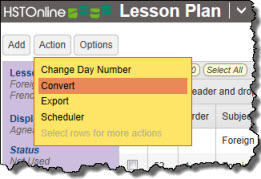
- On the Lesson Plan page, click or touch the Action button and choose 'Convert' to open the Convert Lesson Plan page.
 More Button Menu
 Convert Lesson Plan
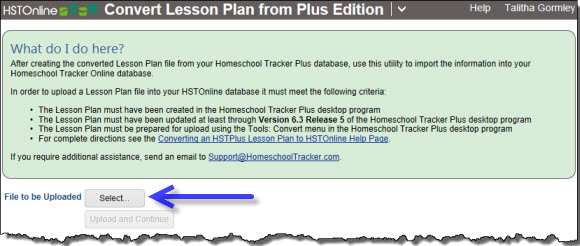
- Click the Select button to choose the Lesson Plan .zip file that you want to upload into HSTOnline.
- Double-click on the file name or click on it and then click the Open button.
- The name of the selected file will appear below the Select button box.
 Upload and Continue Button
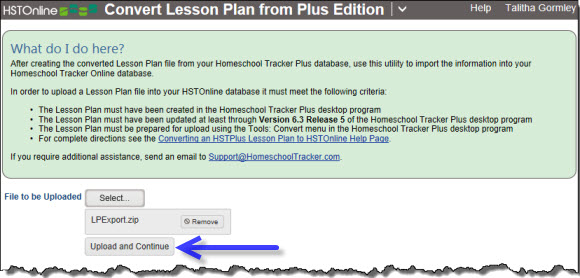
- Click the 'Upload and Continue' button.
- The .zip file will be unzipped and loaded into the Lesson Plan import window.
- This may take a minute or two depending on the size of the file and complexity of the Lesson Plan being loaded. Please be patient.
- Once the file transfer is complete, HSTOnline will show you the converted Lesson Plan in the Import Lesson Plan window.
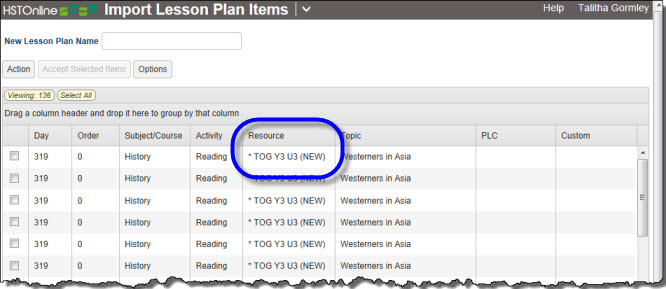
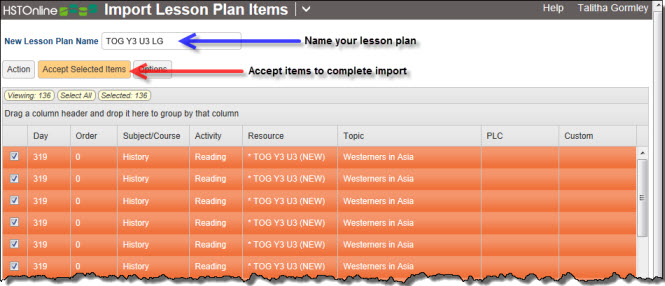
- Subject, Courses, Activities and Resources which could not be matched with entries in your HSTOnline database will show with an asterisk
preceding the name and (NEW) following the name.
 Import Window
- Enter a name for your Lesson Plan.
- You can accept the items as they are and HSTOnline will create new entries as needed for the Subject, Course, Activity and Resource fields, or you can use the edit feature to
adjust the items before completing the import process.
- To accept items with their current Subject, Course, Activity and Resource entries, click or touch the checkbox for each item you want, or click or touch the Select All badge to select all the items in
the Lesson Plan.
- Click or touch the 'Accept Selected Items' button to copy these items into your HSTOnline database.
 Named LP ready for import
- HSTOnline will take you to the Lesson Plan page with your newly imported Lesson Plan in view.
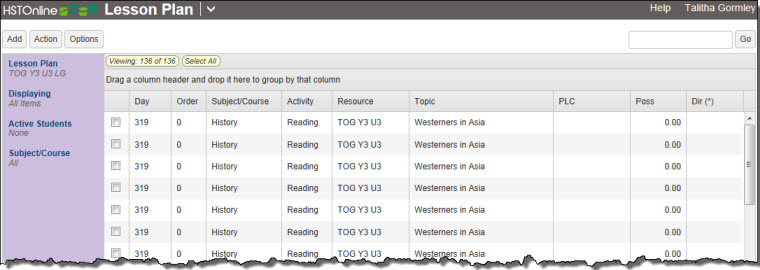 Lesson Plan page showing newly imported LP
Editing LP Items Prior to Import
Use this feature to make the same change to any one or more Lesson Plan items at the same time.
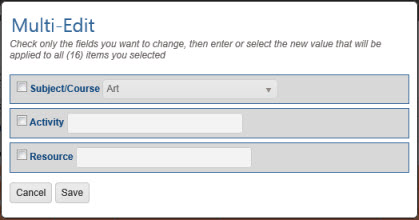 Multi-Edit LP Items form
- Choose the Lesson Plan items you want to multi-edit.
- Click the checkbox for each item you want to change.
- You can use your mouse to click and drag over contiguous items in the list to select those items.
- On a touch device, you can touch and drag your finger over contiguous items in the list to select those items.
- Click or touch the 'Select All' badge to select all items on the current page.
- Click or touch the Action button and click or touch Multi-Edit to open the Multi-Edit LP Items window.
- HSTOnline will show you how many items have been selected for editing.
- The fields in the Multi-Edit window will show the settings for the first Lesson Plan item in your selection.
- To enable the form, click or touch the box to the left of each field you want to change for all selected Lesson Plan items. Make your selection for each of those fields.
- Click or touch:
- Cancel to abandon this process.
- Save to keep your changes and update the Lesson Plan.