Student - Transcript Supplemental
Skip to
Related Student Topics
Related Topics
Introduction
In creating a Transcript for your Student, you have the option to include additional information about her schooling career. These areas are each optional and you can choose to use them as needed for each
of your Students. For each entry created in any one of these areas, you can choose whether or not those details will be included on the Transcript.
 HSTOnline Menu - Student: Transcript Supplemental
- Activities & Achievements: track organizations your Student is involved with. This can include any type of items you like: volunteer work, awards, part-time jobs, etc.
- Schools Attended: enter information about schools your Student attended prior to, or in conjunction with, your homeschool
- Standardized Tests: enter information for standardized tests your student has taken. While you may enter anything you like, the primary intent of this area is to provide an area to
record results of college entrance exams such as SAT, ACT, AP, CLEP, and the like.
|
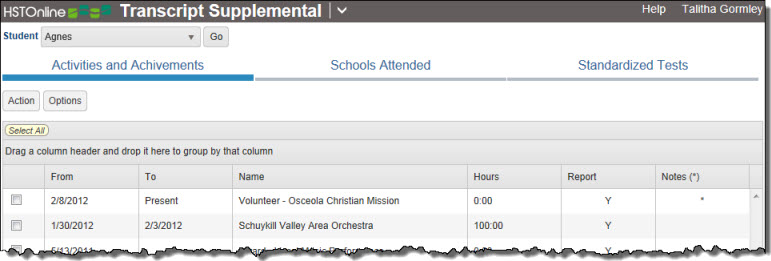
The first time you visit this area, you will see just the Student drop down and Go button. Select a Student from the list to get started and then click Go.
 Transcript Supplemental Page: First Visit
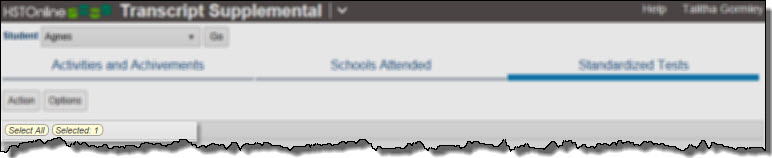
Once you have selected a Student, the tabbed areas for this feature will appear. Click on the tab corresponding to the area you want to work with: Activities and Achievements,
Schools Attended, or Standardized Tests. Each time you return to this area, HSTOnline will show you the information for the last Student and tab selected.
 Transcript Supplemental: Tab Sections
Activities & Achievements
Use this area to track organizations your Student is involved with. This can include any type of item you like: volunteer work, awards, part-time jobs, etc. You can choose which items are included
in a Transcript and change that designation at any time.
The Activities & Achievements list is sorted chronologically, from newest to oldest, by the 'From' date field. You can group or sort by any column.
| Column Name |
Notes |
Default Visibility |
| From |
Starting date for the entry, the default sort is by this column - newest to oldest |
Visible |
| To |
This field can show an ending date, blank for no ending date, or Present if the entry is ongoing |
Visible |
| Name |
Name or brief description of the Activity or Achievement |
Visible |
| Hours |
Displays the number of hours spent on this Activity |
Visible |
| Report |
Displays 'Y' if item is to be included in the Transcript, displays 'N' if item is to be excluded |
Visible |
| Notes |
Shows '*' if there are Notes for the item |
Visible |
| Notes (Preview) |
Displays, in plain text, the first 150 characters of the Notes for the item |
Hidden |
 Activities & Achievements
Activities & Achievements Controls
|
- Action Button:
- Add: Add one or more items to the list. This action is always available.
- Edit: With one item selected, this action becomes available. Choose edit to change the details of the selected item.
- Delete: With one or more items selected, this option becomes available. Choose this option to permanently delete the selected
items from your database.
- Options Button:
- Choose Columns: Click or touch this option to select which fields will be displayed in the Activities & Achievements list. You must select at least one
column.
- Expand All: When the list is Grouped, click or touch this option to expand (open) all groupings.
- Collapse All: When the list is Grouped, click or touch this option to collapse (close) all groupings.
|
Activities & Achievements Badges
|
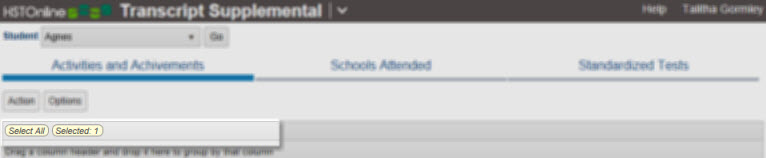
- Select All: Click or touch this badge to quickly select all the items in the list.
- Selected: When one or more items are highlighted, this badge will appear to show the number items selected. Click or touch this badge to deselect all entries.
|
 Activities and Achievements Badges
Adding an Activities & Achievement Item
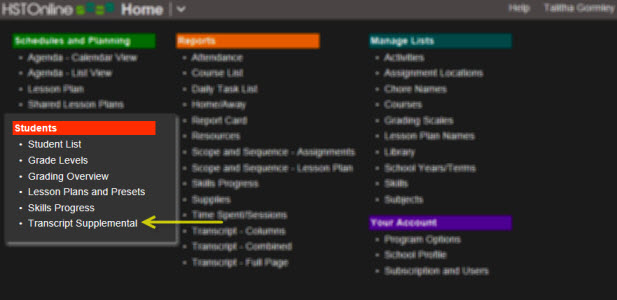
- On the HSTOnline menu, click or touch 'Transcript Supplemental' under the Students section.
- On the Transcript Supplemental page, select a Student in the drop down box and click the Go button.
- Click or touch the 'Activities and Achievements' tab.
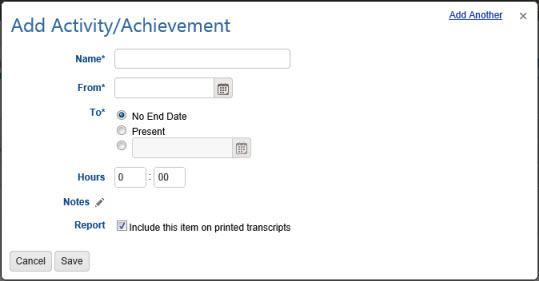
- Click or touch the Action button and select Add to open the Add Activity/Achievement window.
 Add Activity/Achievement
- Name: Enter a name for this item, up to 150 characters.
- From: Enter a starting date by typing into the field using the mm/dd/yyyy format, or select a date using the Calendar icon.
- To: Choose an option for this date field:
- No End Date: the 'To' field will be left blank
- Present: The word 'Present' will appear in the 'To' field. Use this option if the Activity is ongoing.
- Date: Enter a date by typing into the field using the mm/dd/yyyy format, or select a date using the Calendar icon.
- Hours: The Hours field is optional. Use it to enter the total amount of dedicated to the Activity.
- Notes: Click or touch the word 'Notes' or the pencil icon to add notes for this item. If notes are attached, an asterisk will appear in the Notes (*) column and the
first 150 characters of Notes (in plain text) will appear in the Notes (preview) column in the Activities and Achievements list.
- Report: Check the box to include this item in the Transcript. You can change this setting at any time.
- Click or touch:
- Cancel to abandon the new item without adding to your list
- Save to add this item to your list
- The 'Add Another' hyperlink in the top right corner to save this item and add another. You can click 'Add Another' each time until you have entered the last
new item and then click the Save button to end the Add process.
Editing an an Activities & Achievement Item
- On the HSTOnline menu, click or touch 'Transcript Supplemental' under the Students section.
- On the Transcript Supplemental page, select a Student in the drop down box and click the Go button.
- Click or touch the 'Activities and Achievements' tab.
- Double-click on the item you want to change to open the Edit Activity/Achievement window.
- Alternatively, you can click once on the item you want to change and then click the Action button and choose Edit to open the Edit Activity window.
- On a touch device, touch the item you wish to edit and then touch the Action button and touch Edit to open the Edit Activity window.
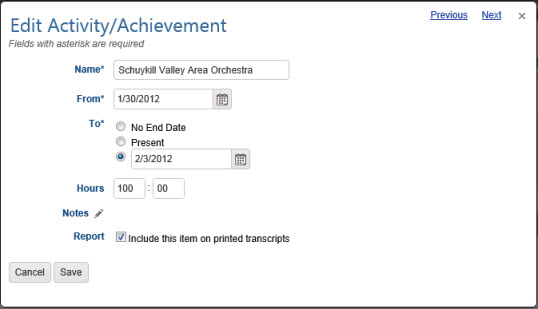 Edit Activity/Achievement
- Make changes as needed.
- Click or touch:
- Cancel to abandon the changes
- Save to keep the changes and update your list
- The Previous or Next hyperlink in the top right corner to save your changes to this item and move to the previous or next item
in the list. You can click or touch Previous or Next until you have made all the changes you want and then click or touch the Save button to end the Edit process. If you reach the
beginning or end of the list when clicking or touching Previous or Next, the Edit window will close and you will be returned to the list view.
Deleting Activities & Achievement Items
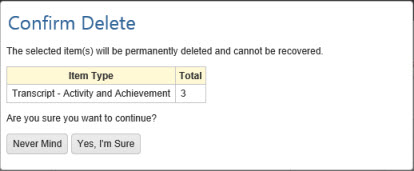 Confirm Delete
- On the HSTOnline menu, click or touch 'Transcript Supplemental' under the Students section.
- On the Transcript Supplemental page, select a Student in the drop down box and click the Go button.
- Click or touch the 'Activities and Achievements' tab.
- Select one or more entries that you want to remove.
- Click or touch the Action button and select Delete to open the Confirm Delete window.
- In the Confirmation window choose 'Yes, I'm Sure' to delete the selected items or click 'Never Mind' to cancel the process.
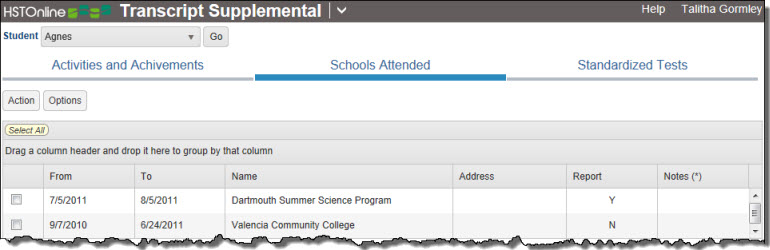
Schools Attended
Use this optional area of HSTOnline to enter information about schools your Student attended prior to or in conjunction with your homeschool. You can choose which items are included
in a Transcript and change that designation at any time.
The Schools Attended list is sorted chronologically, from newest to oldest, by the 'From' date field. You can group or sort by any column.
| Column Name |
Notes |
Default Visibility |
| From |
Starting date for the entry, the default sort is by this column - newest to oldest |
Visible |
| To |
This field can show an ending date, blank for no ending date, or Present if the entry is ongoing |
Visible |
| Name |
Name of the School |
Visible |
| Address |
School Address |
Visible |
| Report |
Displays 'Y' if item is to be included in the Transcript, displays 'N' if item is to be excluded |
Visible |
| Notes |
Shows '*' if there are Notes for the item |
Visible |
| Notes (Preview) |
Displays, in plain text, the first 150 characters of the Notes for the item |
Hidden |
 Schools Attended
Schools Attended Controls
|
- Action Button:
- Add: Add one or more items to the list. This action is always available.
- Edit: With one item selected, this action becomes available. Choose edit to change the details of the selected item.
- Delete: With one or more items selected, this option becomes available. Choose this option to permanently delete the selected
items from your database.
- Options Button:
- Choose Columns: Click or touch this option to select which fields will be displayed in the Schools Attended list. You must select at least one column.
- Expand All: When the list is Grouped, click or touch this option to expand (open) all groupings.
- Collapse All: When the list is Grouped, click or touch this option to collapse (close) all groupings.
|
Schools Attended Badges
|
- Select All: Click or touch this badge to quickly select all the Schools in the list.
- Selected: When one or more Schools are highlighted, this badge will appear to show the number items selected. Click or touch this badge to deselect all entries.
|
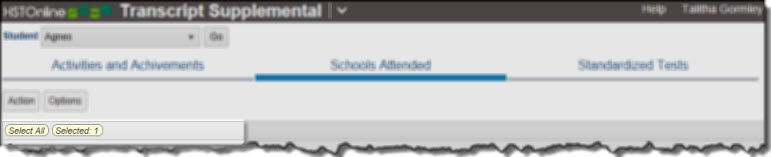 Schools Attended Badges
Adding a Schools Attended Entry
- On the HSTOnline menu, click or touch 'Transcript Supplemental' under the Students section.
- On the Transcript Supplemental page, select a Student in the drop down box and click the Go button.
- Click or touch the 'Schools Attended' tab.
- Click or touch the Action button and select Add to open the Add School Attended window.
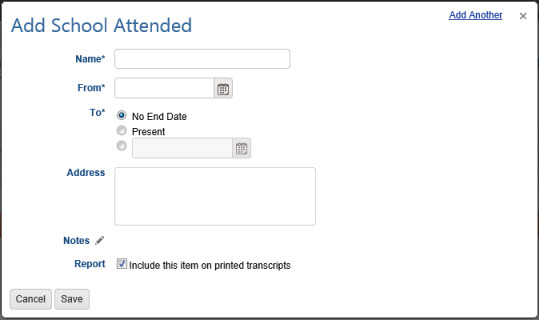 Add Schools Attended
- Name: Enter a name for this entry, up to 150 characters.
- From: Enter a starting date by typing into the field using the mm/dd/yyyy format, or select a date using the Calendar icon.
- To: Choose an option:
- No End Date: the 'To' field will be left blank
- Present: The word 'Present' will appear in the 'To' field. Use this if the Student is still in attendance at this school.
- Date: Enter a date by typing into the field using the mm/dd/yyyy format, or select a date using the Calendar icon.
- Address: The Address field is optional. Enter as much or as little of the Schools address as you wish, up to 150 characters.
- Notes: Click or touch the word 'Notes' or the pencil icon to add notes for this item. If notes are attached, an asterisk will appear in the Notes (*) column and the
first 150 characters of Notes (in plain text) will appear in the Notes (preview) column in the Activities and Achievements list.
- Report: Check the box to include this item in the Transcript. You can change this setting at any time.
- Click or touch:
- Cancel to abandon the new item without adding to your list
- Save to add this item to your list
- The 'Add Another' hyperlink in the top right corner to save this item and add another. You can click 'Add Another' each time until you have entered the last new
item and then click the Save button to end the Add process.
Editing a Schools Attended Entry
- On the HSTOnline menu, click or touch 'Transcript Supplemental' under the Students section.
- On the Transcript Supplemental page, select a Student in the drop down box and click the Go button.
- Click or touch the 'Schools Attended' tab.
- Double-click on the item you want to change to open the Edit Activity/Achievement window.
- Alternatively, you can click once on the item you want to change and then click the Action button and choose Edit to open the Edit Activity window.
- On a touch device, touch the item you wish to edit and then touch the Action button and touch Edit to open the Edit Activity window.
 Edit Schools Attended
- Make changes as needed.
- Click or touch:
- Cancel to abandon the changes
- Save to keep the changes and update your list
- The Previous or Next hyperlink in the top right corner to save your changes to this item and move to the previous or next item in the list. You can click or
touch Previous or Next until you have made all the changes you want and then click or touch the Save button to end the Edit process. If you reach the
beginning or end of the list when clicking or touching Previous or Next, the Edit window will close and you will be returned to the list view.
Deleting a Schools Attended Entry
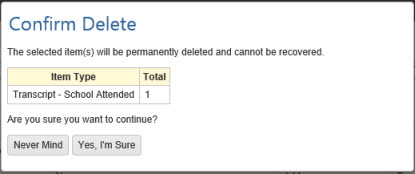 Confirm Delete
- On the HSTOnline menu, click or touch 'Transcript Supplemental' under the Students section.
- On the Transcript Supplemental page, select a Student in the drop down box and click the Go button.
- Click or touch the 'Schools Attended' tab.
- Select one or more entries that you want to remove.
- Click or touch the Action button and choose Delete.
- In the Confirmation window choose 'Yes, I'm Sure' to delete the selected items or click 'Never Mind' to cancel the process.
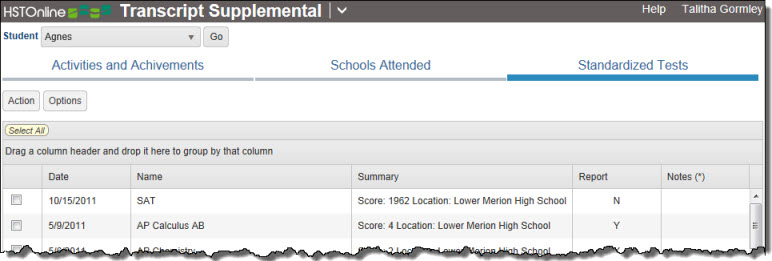
Standardized Tests
Use this area to enter optional information for standardized tests your student has taken. While you may enter anything you like, the primary intent of this area is to provide an area to record results of
college entrance exams such as SAT, ACT, AP, CLEP, and the like. You can choose which items are included in a Transcript and change that designation at
any time.
The Standardized Tests list is sorted chronologically, from newest to oldest, by the 'From' date field. You can group or sort by any column.
| Column Name |
Notes |
Default Visibility |
| Date |
Date on which the test is taken, the default sort is by this column - newest to oldest |
Visible |
| Name |
Name or brief description of the test |
Visible |
| Summary |
Use this 150 character field to provide a quick overview of test results |
Visible |
| Report |
Displays 'Y' if item is to be included in the Transcript, displays 'N' if item is to be excluded |
Visible |
| Notes |
Shows '*' if there are Notes for the item |
Visible |
| Notes (Preview) |
Displays, in plain text, the first 150 characters of the Notes for the item |
Hidden |
 Standardized Tests
Standardized Tests Controls
|
- Action Button:
- Add: Add one or more items to the list. This action is always available.
- Edit: With one item selected, this action becomes available. Choose edit to change the details of the selected item.
- Delete: With one or more items selected, this option becomes available. Choose this option to permanently delete the selected
items from your database.
- Options Button:
- Choose Columns: Click or touch this option to select which fields will be displayed in the Standardized Tests list. You must select at least one column.
- Expand All: When the list is Grouped, click or touch this option to expand (open) all groupings.
- Collapse All: When the list is Grouped, click or touch this option to collapse (close) all groupings.
|
Standardized Tests Badges
|
- Select All: Click or touch this badge to quickly select all the Standardized Test entries in the list.
- Selected: When one or more Standardized Test entries are highlighted, this badge will appear to show the number items selected. Click or touch this badge to
deselect all items.
|
 Standardized Tests Badges
Adding a Standardized Tests Entry
- On the HSTOnline menu, click or touch 'Transcript Supplemental' under the Students section.
- On the Transcript Supplemental page, select a Student in the drop down box and click the Go button.
- Click or touch the 'Standardized Tests' tab.
- Click or touch the Action button and select Add to open the Add Test window.
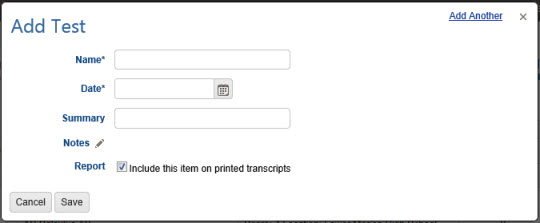 Add Standardized Tests
- Name: Enter a name for the test, up to 150 characters.
- Date: Enter the date the test was taken by typing into the field using the mm/dd/yyyy format, or select a date using the Calendar icon.
- Summary: Enter details of the test results: scores, percentiles, whatever you like, up to 150 characters.
- Notes: Click or touch the word 'Notes' or the pencil icon to add notes for this item. If notes are attached, an asterisk will appear in the Notes (*) column and the
first 150 characters of Notes (in plain text) will appear in the Notes (preview) column in the Activities and Achievements list.
- Report: Check the box to include this item in the Transcript. You can change this setting at any time.
- Click or touch:
- Cancel to abandon the new item without adding to your list
- Save to add this item to your list
- The 'Add Another' hyperlink in the top right corner to save this item and add another. You can click 'Add Another' each time until you have entered the last new
item and then click the Save button to end the Add process.
Editing a Standardized Tests Entry
- On the HSTOnline menu, click or touch 'Transcript Supplemental' under the Students section.
- On the Transcript Supplemental page, select a Student in the drop down box and click the Go button.
- Click or touch the 'Standardized Tests' tab.
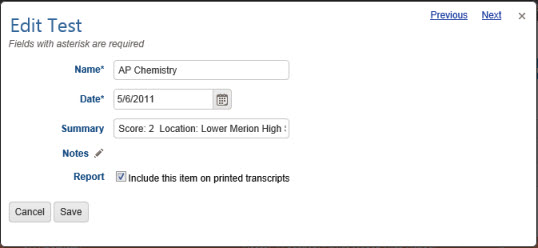
- Double-click on the item you want to change to open the Edit Activity/Achievement window.
- Alternatively, you can click once on the item you want to change and then click the Action button and choose Edit to open the Edit Activity window.
- On a touch device, touch the item you wish to edit and then touch the Action button and touch Edit to open the Edit Activity window.
 Edit Standardized Tests
- Make changes as needed.
- Click or touch:
- Cancel to abandon the changes
- Save to keep the changes and update your list
- The Previous or Next hyperlink in the top right corner to save your changes to this item and move to the previous or next item in the
list. You can click or touch Previous or Next until you have made all the changes you want and then click or touch the Save button to end the Edit process. If you reach the beginning or end of
the list when clicking or touching Previous or Next, the Edit window will close and you will be returned to the list view.
Deleting a Standardized Test Entries
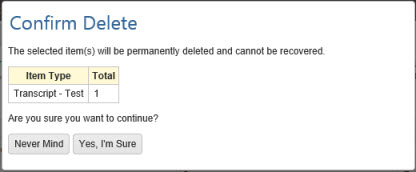 Confirm Delete
- On the HSTOnline menu, click or touch 'Transcript Supplemental' under the Students section.
- On the Transcript Supplemental page, select a Student in the drop down box and click the Go button.
- Click or touch the 'Standardized Tests' tab.
- Select one or more entries that you want to remove.
- Click or touch the Action button and choose Delete.
- In the Confirmation window choose 'Yes, I'm Sure' to delete the selected items or click 'Never Mind' to cancel the process.