Students
Skip to
Related Student Topics
Related Topics
Introduction
All schools needs Students and homeschool is no exception. You will create an entry for each Student in your homeschool. The number of student records permitted is determined by your HSTOnline
subscription level. The Subscription and Users page will tell you how many records are permitted. In a standard subscription, you can enter up to 20
Students.
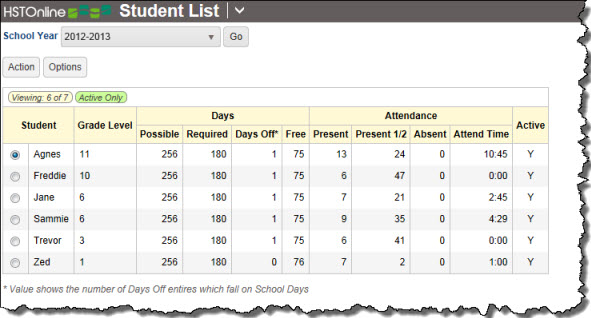
The Student List displays the Grade Level, School Days and Attendance records for each student for the School Year selected. You will also use this area to enter and update personal contact information for the
Student which can be included on the Report Card and Transcript.
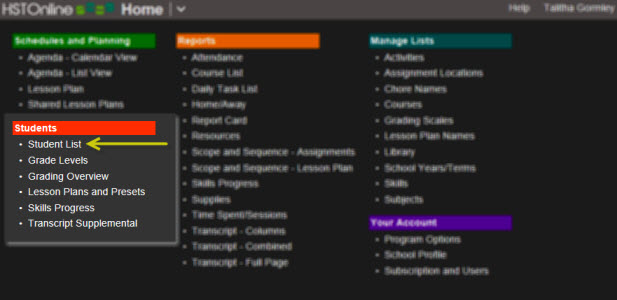 HSTOnline Menu - Students
Listed below are other areas of the program where you can enter or update additional information about each Student:
- Agenda - Calendar View: Use this area to add, edit and view Appointments, Assignments, Attendance, Chores and Days Off for your Student
in a Calendar format. Access this area by clicking or touching 'Agenda - Calendar View' in the 'Schedules and Planning' section of the HSTOnline menu.
- Agenda - List View: Use this area to add, edit and view Appointments, Assignments, Attendance, Chores and Days Off for your Student in a List
format. Access this area by clicking or touching 'Agenda - Calendar View' in the 'Schedules and Planning' section of the HSTOnline menu.
- Grade Level: Use this area to set the Grade Level for each School Year for the selected Student. You can also enter Progress Notes for your Student for the
School Year/Grade Level. Both the Grade Level and Progress Notes can be included on a Report Card. Access this area by clicking or touching 'Grade Level' in the Student section of the
HSTOnline menu.
- Grading Overview: Select this option to view the Grading Overview and Calculation for the selected Student. Access this area by clicking or touching 'Grading Overview'
in the Student section of the HSTOnline menu.
- Lesson Plans and Presets: Select this option to view the Active Lesson Plans and Presets for the selected Student. Access this area by clicking or touching 'Lesson Plans
and Presets' in the Student section of the HSTOnline menu.
|
- Skills Progress: Select this option to view the Skills Progress page for the selected Student. Access this area by clicking or touching 'Skills Progress' in the Student
section of the HSTOnline menu.
- Transcript Supplemental: Select this option to add supplemental information for the Transcript of the selected Student: Activities and
Achievements, Schools Attended and/or Standardized Test information. Access this area by clicking or touching 'Transcript Supplemental' in the Student section of the HSTOnline menu.
- Activities & Achievements: You might use this area to list any clubs, organizations, sports teams or part time jobs or internships the student participated in during his homeschool career.
- Schools Attended: Use this are if the student attended other schools prior to or along with his homeschooling, especially in the high school years.
- Standardized Tests: If desired, enter summary information about the Standardized Tests taken.
- Reports: Use the Reports section of the HSTOnline menu to create to-do lists for your Students with the Daily Task List and to generate supporting
documentation for your homeschool: Attendance reports, Report Cards, Transcripts, etc.
- Student User Accounts: As the Administrator, you can activate a Student account for any of your Students, and set permissions to determine
their access to the program.
|
The Student List
| Column Name |
Notes |
Default Visibility |
| Student |
Shows the Student's 'Display Name'; List is sorted by Name |
Visible |
| Grade Level |
Shows the grade level you have designated for the Student for the selected School Year |
Visible |
Days -
- Possible
- Required
- Days Off
- Free
|
Shows number of -
- Possible days for the selected School Year based on the start/end dates and which days are school days
- Required school days for the selected School Year as entered when the School Year was created
- Days Off booked on potential school days for the Student and School Year selected
- Free days that can be set as Days Off for the Student and still make the required minimum number of days for the year.
|
Visible |
Attendance - - Present
- Present 1/2
- Absent
- Attend Time
|
Shows the number of days marked as Present, Present 1/2, or Absent for the Student in the selected School Year
Where applicable, displays Attendance hours or Sessions totals for the Student in the selected School Year |
Visible |
| Active |
Shows 'Y' if the Student is active and 'N' if the Student is archived |
Visible |
 Student List
Student List Controls
|
- School Year Drop Down: Select a School Year from the drop down list and click or touch the Go button to see the Days and Attendance details for each Student for the
selected year.
- Action Button:
- Add: Add one or more Students to the list. This action is available until you have created the maximum number of Student accounts allowed
for your subscription.
- Edit: With one Student selected, this action becomes available. Choose edit to change the Student's personal information.
- Options Button:
- Filter: Click or touch this option to select which Students will be displayed.
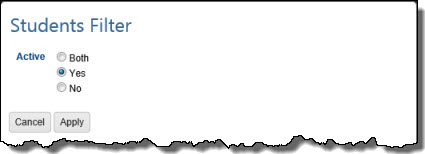 Students Filter
In the Student Filter you can view items by Active Status: Both, Yes (Active only), or No (Archived only). The default selection shows all Active Students. When anything other than
Both is selected, the Filter Settings badge shows which types of Students are being displayed.
Students Filter
In the Student Filter you can view items by Active Status: Both, Yes (Active only), or No (Archived only). The default selection shows all Active Students. When anything other than
Both is selected, the Filter Settings badge shows which types of Students are being displayed.
|
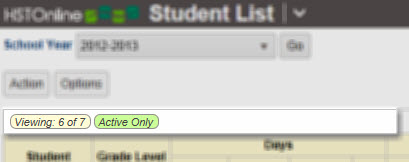
Student List Badges
|
- Viewing: Indicates the number of Students being displayed out of the total based on the current settings.
- Filter Settings: If you have limited the types of Students to be displayed, the filter badge will appear showing the types of items being displayed - either
Active Only or Archived Only.
 Student List Badges
|
The Student List Display
The Student List displays the Grade Level, School Days and Attendance records for each Student for the School Year selected. You will also use this area to enter and update personal contact information
for the Student which can be included on the Report Card and Transcript. See above for a list of other areas of the program where you can enter or update additional information
for each Student.
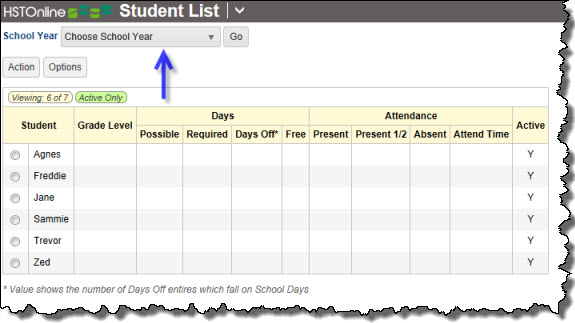 Student List with no School Year selected
- School Year: Use the School Year drop down list to select the year you want to review. Click or touch the Go button to change the display to the selected year.
- Student: This field shows the Display Name entered in the Student Record.
- Grade Level: The Grade Level entered for the Student for the selected School Year. This optional information is entered and edited in the
Grade Level page.
 Student List
- Days:
- Possible: The number of potential school days in the selected School Year. This value is determined by taking all the days from the start date to the end date
of the School Year and subtracting all the non-school days (like Saturdays/Sundays or whatever you have designated and non-school days in the School Profile.)
- Required: The number of school days required for the School Year. This value comes directly from what you entered into the
School Year Calculator when creating the School Year.
- Days Off: The number of Days Off that have been added for this student which fall on a school day. This number does not include Days Off which fall on
non-school days (like Saturdays/Sundays or whatever you have designated and non-school days in the School Profile.) This number will change as you add
additional Days Off for the Student.
- Free: The number of additional days in the year which can be skipped due to Absence or Days Off and still meet the minimum required number of school days for
the year. This number is calculated by taking the total number of Possible days minus the number of Required days minus the existing Days Off and will be changed as you add additional Days
Off for the Student.
- Attendance:
- Present: The number of days marked as 'Present' in the selected School Year.
- Present 1/2: The number of days marked as 'Present 1/2 Day' in the selected School Year.
- Absent: The number of days marked as Absent in the selected School Year.
- Attend Time: The number of hours or sessions entered along with Attendance for selected School Year. This column will only appear if you have selected a Time
Entry Method other than 'None' in Program Options.
- Active:
- Shows 'Y' if the Student is active and 'N' if the Student is archived
Adding a Student
You can add Students up to the total number permitted by your HSTOnline Subscription. The default limit is 20 students. If desired, you can
choose a background color for your student which will serve as the background color of the Student cell of the various lists and preview lists throughout the program.
- On the HSTOnline menu, click or touch List under the 'Student' section.
- On the Student List page, click or touch the Action button and choose Add.
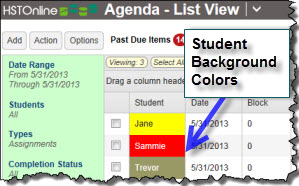 Agenda List Showing Student Background Colors
- Fill in each field as needed. Only the Display Name and Full Name fields are required.
- Display Name: This is the name that will appear on screens throughout HSTOnline. Enter up to 20 characters.
- Full Name (for Reports): As this is the name that will appear on Attendance reports, Report Cards and Transcripts, you may want to enter the Student's full legal
name.
- Address: Enter as much of the student's home address as you wish. This can be displayed on Report Cards and Transcripts.
- Parent/Guardian: This information can be displayed on Transcripts.
- Email: This information can be displayed on Report Cards Transcripts.
- Entrance Date: This is a text field. You can enter any date format you like or leave it blank. This information can be displayed on the Transcript. It is
intended to be the date on which your Student started in your homeschool.
- Expected Graduation Date: This is a text field. You can enter any date format you like or leave it blank. This information can be displayed on the Transcript.
- Background Color: Click or touch the Background Color field name or the pencil icon to open the background color selector. Click or touch any color in the spectrum
to select it for this Student. Once you're happy with the color, click or touch OK. To change a Student back to the 'no color' option, click the Reset button.
- Text Color: After selecting your background color, the selected color will appear in the window with the word 'Sample' to assist you in choosing whether to use
black or white text - whichever is easier for you to read on the background color you have selected.
- Active: All Student records start as Active. Click or touch 'No' if you want this Student record to be archived.
- Click or touch:
- Cancel to abandon the new Student without adding to your list.
- Save to add this Student to your list.
- Repeat steps 2-4 as needed until all Students have been entered. When you have reached the limit of Student entries for your subscription level, the Add option will change to show the
message 'Maximum Students entered'. If you wish to extend the limits of your subscription, contact Support@HomeschoolTracker.com.
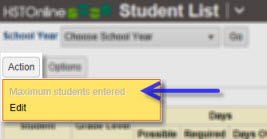 Student Limit Met
Editing a Student
You can edit any field of a single Student record.
- On the Student List page, double-click on the item you want to change to open the Edit Student window.
- Alternatively, you can click once on the item you want to change and then click the Action button and choose Edit to open the Edit Student window.
- On a touch device, touch the item you wish to edit and then touch the Action button and touch Edit to open the Edit Student window.
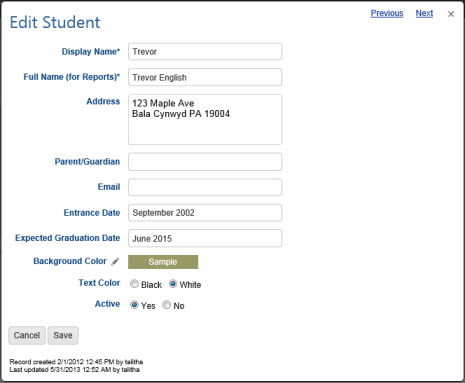 Edit Student
- Make whatever changes are necessary. To archive this Student, select 'No' in the Active field. To change a Student back to the 'no color' option, click or touch the Background color field and
then click or touch the Reset button.
- Click or touch:
- Cancel to abandon the new Student without adding to your list.
- Save to add this Student to your list.
- Click or touch the Previous or Next hyperlink in the top right corner to save your changes to this Student and move to the previous or
next Student in the list. You can click or touch Previous or Next until you have made all the changes you want to your Students and then click the Save button to end the Edit process. If you
reach the beginning or end of the list when clicking or touching Previous or Next, the Edit window will close and you will be returned to the list view.
Deleting a Student
Students cannot be deleted. When a Student has been graduated from or otherwise left your homeschool, you can choose to edit the Student to archive his record and remove his name from
all Student selection boxes.
Archiving Students
You can Archive the records for any Student who is no longer active in your homeshcool. When you archive a Student, all records for that Student will be hidden from view and you will not be able to select
his name for any newly created items. All records are retained in the database, but cannot be viewed unless and until you choose to reactivate the Student. Use the Edit directions above
to change the Active status of your Student. Archving a Student does not provide room to add additional Students to your subscription.
A Student whose records have been archived will no longer be able to login to the program unless and until his records are reactivated, even if he has a valid
Student User Account.