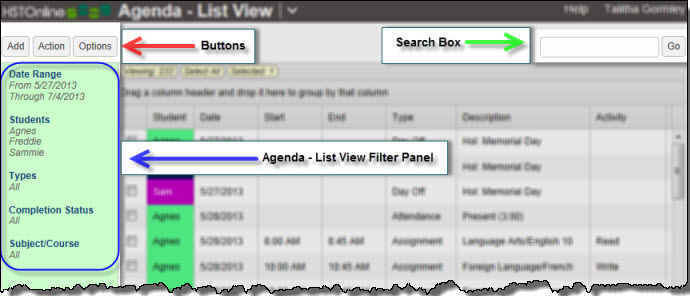
Agenda - List View
Introduction
All of your Appointments, Assignments, Attendance records,
Chores and Day Off entries are stored in the Agenda and can be viewed in the List view and Calendar view. This Help Page
deals exclusively with the Agenda - List View. See the Agenda - Calendar View Help Page for details on that area of the program.
 HSTOnline Menu - Agenda-List View
In the Agenda - List View, you can view any one or more of the different items types for any one or more Students over any date range you select. In addition to viewing these items, you can add new items, copy,
duplicate, edit, reschedule and/or delete existing items, and mark Assignments and/or Chores as complete. Further details on these functions are detailed below.
To optimize performance, the Agenda - List View displays no more than 500 items at a time. When there are more than 500 items to be displayed, the list will be divided into additional pages of no more
than 500 items each. Searching or filtering a list will search the entire list, not just the items currently in view. For more information on paging, please see:
Customizing the Data Display: Automated Paging.
The Agenda - List View has no default display has no pre-set grouping, and items are sorted by Date, then by Student, then by Time or Block and finally by Order. You can choose to
group the list in any way you choose. HSTOnline will remember your settings unless and until you change them. Likewise, you can change the
sorting of the Agenda - List View to anything you would like and again, HSTOnline will remember your settings unless and until you change them.
Each User Account will have its own saved settings.
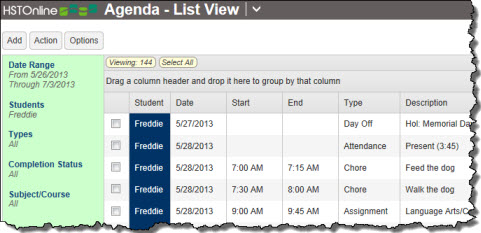 No Grouping
|
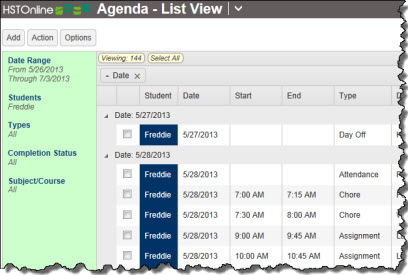
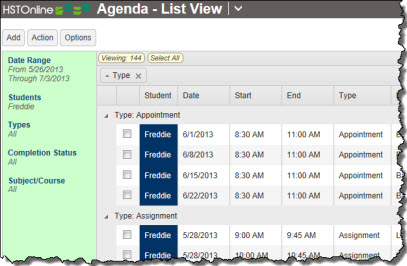
An example grouped by Date on the left and one grouped by Type on the right
|
Agenda - List View Controls
|
- Add Button:
- Action Button:
- Use the options under this button to work with the items in your Agenda - List View. Different options are available depending on the items you select to work with. See
below for further details.
- Options Button:
- Choose Columns: Click or touch this option to select which fields will be displayed in the Agenda - List View. You must select at least one column.
- Expand All: When the list is Grouped, click or touch this option to expand (open) all groupings.
- Collapse All: When the list is Grouped, click or touch this option to collapse (close) all groupings.
- Search Box and Go Button: Use the Search box to enter text and click the Go button to find items matching your entry. HSTOnline will do an exact search for
whatever text you enter. Leave the search box blank and click Go or click or touch the Search text badge to return to the full list of items.
- The fields that will be searched are: Description, Activity, Resource, Topic, PLC, Custom, Directions (Preview), Notes (Preview)
- Filter Panel: Use the Date Range, Students, Type, Completion Status and Subject/Course filters to determine which items will be displayed in the Agenda - List View. Please see the
Agenda - List View Filters section below for complete details.
 Agenda - List View Controls
|
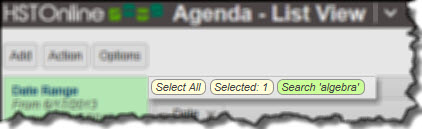
Agenda - List View Badges
|
- Select All: Click or touch this badge to quickly select all the items in the list.
- Selected: When one or more items are highlighted, this badge will appear to show the number items selected. Click or touch this badge to deselect all items.
- Search text: Shows the text entered into the Search box which is limiting which items are displayed. Click or touch this badge to clear the text
from the search box and remove that limitation.
 Agenda - List View Badges
|
Setting the Agenda - List View Filters
In the Agenda - List View you can view Appointments, Assignments, Attendance, Chores and Day Off entries for one or more Students for any date range you like. While there will be times when you want to see
all those things at once, there are other times when you'll want to concentrate on certain items or students or date ranges. The Filter options help you do just that. Each filter will display your
selections in the filter panel so you will always know which items you are viewing.
 Agenda - List View Filters Panel
Make your selections for each filter setting and HSTOnline will remember those settings until you change them. You can change your filter settings at any time to change which items are visible. The
Student, Types, Completion Status and Subject/Course filters are shared between the
Agenda - Calendar View and the Agenda - List View. The Date filters are specific to each of the Agenda views.
Skip to:
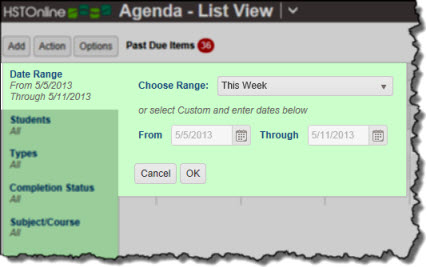
The Date Range Filter
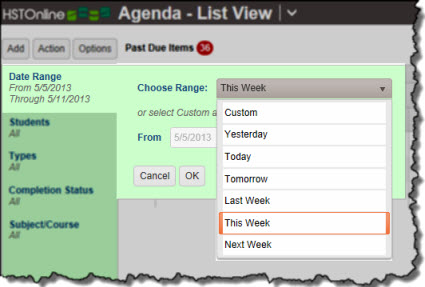
In the Date Range filter, you can select a pre-set date range or select Custom and enter the start/end dates of your choice. The default Date Range is 'This Week'. The selected start/end dates will be
displayed in the filter panel on the left (Date Range - Fig. 1).
As the actual date changes, your date range will be updated accordingly to comply with your selection. For example, if you choose 'Today' on July 1, 2013, then your From/Through dates will be 7/1/2013.
When you login on the next day and your Date Range selection is still set to 'Today', the From/Through dates will show 7/2/2013 as that is the current 'Today' date.
The Date Range filter in the Agenda - List View is separate from the one in the Agenda - Calendar View. Changing the date range in the List View will
not change the selected date range in the Calendar View and vice versa.
 Date Range Filter - Fig. 1
 Date Range Filter - Fig. 2
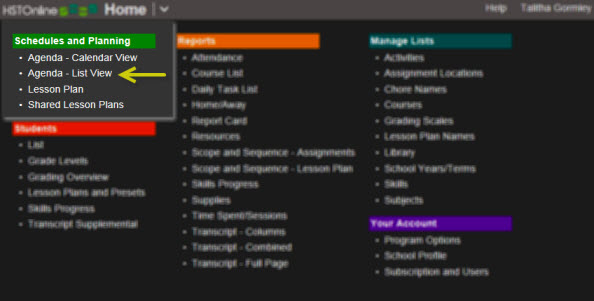
- On the HSTOnline menu, click or touch 'Agenda - List View' under the 'Schedules and Planning' section.
- On the Agenda - List View page, click or touch Date Range in the filter panel.
- Click or touch the Choose Range drop down list and select your preference (Date Range - Fig. 2):
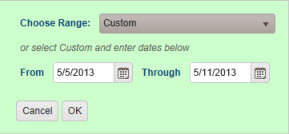
- Custom: Choose this option to enable the date fields and enter whatever start/end dates you want to view. Enter a date in the From and Through fields in the
mm/dd/yyyy format or use the Calendar icon to select the date of your choice (Date Range - Fig. 3).
 Date Range Filter - Fig. 3
- Yesterday: Select this option and the date range will be whatever yesterday's date was.
- Today: Choose this option and the date range will be today's date.
- Tomorrow: Select this option and the date range will be whatever tomorrow's date is.
- Last Week: This will show the date range for the previous Sunday to Saturday.
- This Week: This will show the date range for the current Sunday to Saturday.
- Next Week: This will show the date range for the next Sunday to Saturday.
- Click or touch:
- Cancel to return to the prior date range selection.
- Ok to update the date range to your new selections.
The Students Filter
In the Student filter, you can select the 'All Active Students' option, or choose 'Selected Students' and pick which Students you want to view at this time. The
default setting is 'All Active Students'.
The settings of the Students filter are shared between the Agenda - List View and Agenda - Calendar View. If you change the Student filter in the
Agenda - List View, the Student filter will be changed in the Agenda - Calendar View and vice versa.
 Students Filter - All (Fig. 1)
 Students Filter - Selected (Fig. 2)
- On the HSTOnline menu, click or touch 'Agenda - List View' under the 'Schedules and Planning' section.
- On the Agenda - List View page, click or touch Students in the filter panel. The filter will display the current settings you are viewing.
- The first time you visit the Agenda - List View, the Student filter will be set to the 'All Active Students' option.
- Subsequent visits will remember your prior settings for the filter.
- Click or touch one of the radio buttons.
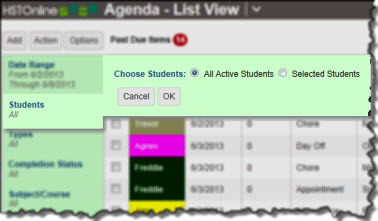
- All Active Students:
- Any items which meet your Date Range, Types, Completion Status and Subject/Course filters will be displayed for all Students in your
homeschool whose records have not been archived. (Fig. 1)
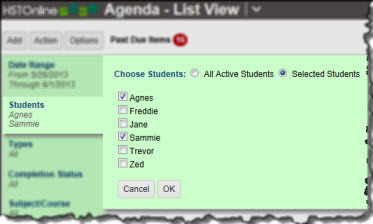
- Selected Students:
- A list of all your active students will appear.
- Click or touch the checkbox next to any student to add a checkmark (to view that Student's items) or to remove a checkmark (to hide that Student's items).
- When you pick the 'Selected Students' option, the names of those selected will be displayed in the Students section of the filter panel. (Fig. 2)
- If you choose 'Selected Students' and then choose all the names on the list, when you click OK the filter will automatically revert to the 'All Active Students' selection.
- Any items which meet your Date Range, Types, Completion Status and Subject/Course filters will be displayed for the Students you have selected.
- Click or touch:
- Cancel to return to the prior Student selection.
- Ok to update the Student filter your new selections.
The Types Filter
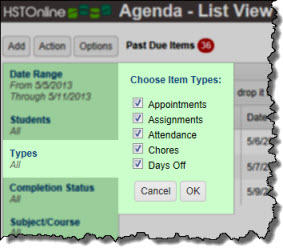 Types Filter (Fig. 1)
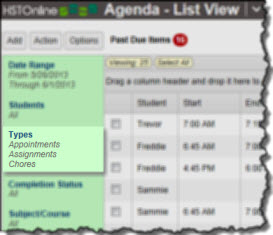 Types Filter - Fewer than All Types Selected (Fig. 2)
Use the Types filter to choose which kinds of items are displayed for the Date Range, Students, Completion Status and Subject/Course filters you have set. You can choose one or more of the following:
Appointments, Assignments, Attendance,
Chores and/or Days Off.
The settings of the Types filter are shared between the Agenda - List View and Agenda - Calendar View. If you change the Type filter in the Agenda - List View,
the Type filter will be changed in the Agenda - Calendar View and vice versa.
- On the HSTOnline menu, click or touch Agenda - List View under the 'Schedules and Planning' section.
- On the Agenda - List View page, click or touch Types in the filter panel. The filter will display the current settings you are viewing. (Fig. 1)
- The first time you visit the Agenda - List View, the Types filter will be set to show all item types.
- Subsequent visits will remember your prior settings for the filter.
- Click or touch the checkbox next to any item type to add a checkmark (to view that item type) or to remove a checkmark (to hide that item type).
- If you have selected fewer than all of the item types, those selected types will be displayed in the Types section of the filter panel. (Fig. 2)
- Click or touch:
- Cancel to return to the prior Types selection.
- Ok to update the Types filter your new selections.
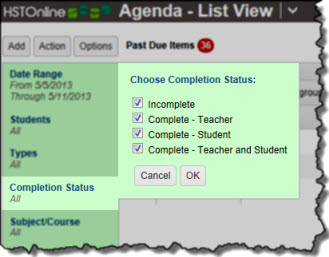
The Completion Status Filter
Use the Completion Status filter to choose which types of items are displayed for the Date Range, Students, Types and Subject/Course filters you have set. You can choose one or more of the following:
- Incomplete: Items which have a check in neither the Teacher nor the Student box
- Complete - Teacher: Items which have a check in the Complete - Teacher box but not in the Complete - Student box
- Complete - Student: Items which have a check in the Complete - Student box but not in the Complete - Teacher box
- Complete - Teacher and Student: Items which have a check in the Complete - Teacher and Complete - Student boxes
If the Complete by Student field has been disabled, the only options in the filter will be 'Incomplete' and 'Complete - Teacher'.
The settings of the Completion Status filter are shared between the Agenda - List View and Agenda - Calendar View. If you change the Completion Status
filter in the Agenda - List View, the Completion Status filter will be changed in the Agenda - Calendar View and vice versa. Completion Status only affects Assignments and Chores as these are the only two
of the five items types which can be marked as completed.
 Completion Status Filter (Fig. 1)
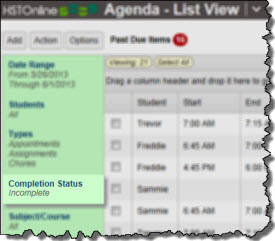 Completion Status Filter - Fewer than All Statuses Selected (Fig. 2)
- On the HSTOnline menu, click or touch 'Agenda - List View' under the 'Schedules and Planning' section.
- On the Agenda - List View page, click or touch Completion Status in the filter panel. The filter will display the current settings you are viewing. (Fig. 1)
- The first time you visit the Agenda - List View, the Completion Status filter will be set to the 'All Active Students' option.
- Subsequent visits will remember your prior settings for the filter.
- Click or touch the checkbox next to any item completion status to add a checkmark (to view items with that status) or to remove a checkmark (to hide items with that status) in the Agenda - List View.
- Incomplete: Items which have no checkmark in the Teacher or Student Complete box will be included in the display.
- Complete - Teacher: Items which have a checkmark in the Teacher Complete box but not in the Student box (or if the Student Complete field is hidden) will be
included in the display.
- Complete - Student: This option will only appear if you have enabled the 'Complete by Student' field in the Optional Fields section of the
Program Options. Items which have a checkmark in the Student Complete box but not in the Teacher Complete box will be included in the display.
- Complete - Teacher and Student: This option will only appear if you have enabled the 'Complete by Student' field in the Optional Fields section of the
Program Options. When you select this option, items which have a checkmark in the Teacher Complete box and the Student Complete box will be
included in the display.
- If you have selected fewer than all of the Completion Statuses, those selected choices will be displayed in the Completion Status section of the filter panel. (Fig. 2)
- Click or touch:
- Cancel to return to the prior Completion Status selections.
- Ok to update the Completion Status filter your new selections.
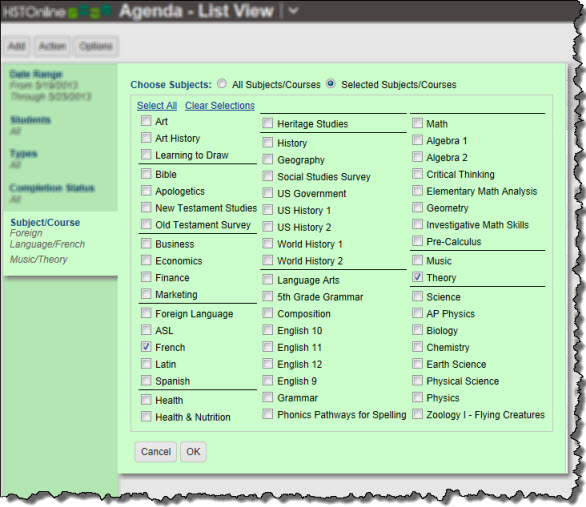
The Subject/Course Filter
Use the Subject/Course filter to determine which Assignments will be displayed for the Date Range, Students, and Completion Status filters you have set. The Subject/Course filter affects only
Assignments as they are the only item type which can have a Subject/Course affiliation.
The settings of the Subject/Course filter are shared between the Agenda - List View and Agenda - Calendar View. If you change the Subject/Course filter
in the Agenda - List View, the Subject/Course filter will be changed in the Agenda - Calendar View and vice versa.
 Agenda - List View Subject/Course Filter
- On the HSTOnline menu, click or touch 'Agenda - List View' under the 'Schedules and Planning' section.
- On the Agenda - List View page, click or touch Subject/Course in the filter panel. The filter will display the current settings you are viewing.
- The first time you visit the Agenda - List View, the Subject/Course Filter will be set to the 'All Subjects/Courses' option.
- Subsequent visits will remember your prior settings for the filter.
- Click or touch one of the radio buttons.
- All Subjects/Courses:
- Any Assignments which meet your Date Range, Students, and Completion Status filters will be displayed for all Subjects/Courses in your
database.
- Selected Subjects/Courses:
- A list of all your active Subjects and Courses will appear, with sections between Subjects divided by a black line.
- The first entry in each section will show the name of a Subject (listed in alphabetical order) followed by any active Courses within that Subject.
- When you click or touch the checkbox next to a Subject name to add a checkmark, a check will automatically be entered for each of the Courses belonging to that Subject as well.
- Clicking or touching to remove a checkmark next to a Subject will only remove that single checkmark, excluding any Assignments that have that Subject attached but no related Course.
- Click or touch the 'Clear Selections' link in the top left of the Subject/Course filter to remove all checkmarks at once and start again.
- In the example pictured above, only the Courses of French (under Foreign Language) and Theory (under Music) are checked. That means that the only Assignments that will be included in
the display are those which are attached to:
- Subject/Course: Foreign Language/French
- Subject/Course: Music/Theory
- Click or touch:
- Cancel to return to the prior Subject/Course selection.
- Ok to update the Subject/Course filter your new selections.
Special Fields in the Agenda - List View
The Agenda - List View displays 5 different types of items in the same grid. To accommodate these different items, two fields have been especially created for this view:
The Type Field
This field will display the item Type to allow you to group or sort the grid based on Type: Appointment, Assignment, Attendance, Chore or Day Off.
In Program Options: Agenda you can choose to use the background colors of each type from Agenda - Calendar View as the background for the Type field in
the Agenda - List View to help you differentiate more easily between them.
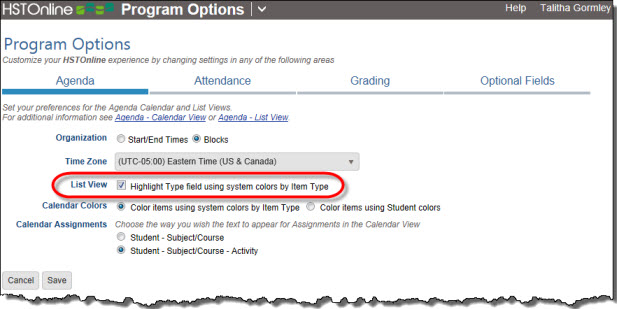 Program Options: Agenda
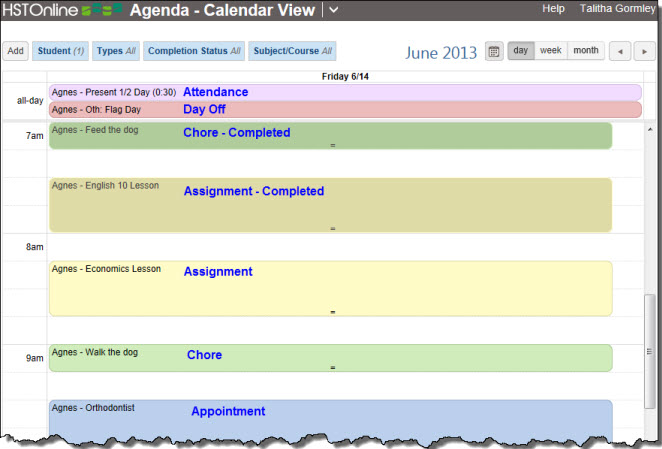 Background colors on entries in Agenda - Calendar View
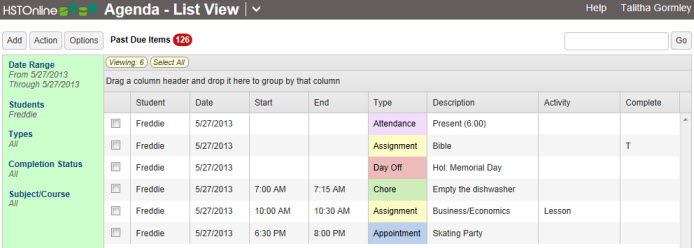 Background colors on TYPE cell in Agenda - List View
The Description Field
The description field displays information based on the type of item:
| Item Type |
Description Field Display |
| Appointment |
Event - the event name given to the Appointment |
| Assignment |
Subject/Course - the Subject or Subject/Course selected for the Assignment |
| Attendance |
Type - Present, Present 1/2 Day or Absent. If you are tracking Time Spent, Sessions, or Manual Hours with Attendance, those values will be
displayed in parentheses following the Present or Present 1/2 Day notation. |
| Chore |
Chore Name - the name given to the Chore |
| Days Off |
Type: Description - Hol:, Vac:, or Oth: followed by the text entered in the Day Off Description field |
 Agenda - List View Type & Description Fields
Adding items to the Agenda - List View
 Agenda - List View Add Button
Use the options under the Add button to add any one or more new entries for Appointments, Assignments,
Attendance, Chores and/or Days Off. Adding items to
the Agenda - List View will also add them to the Agenda - Calendar View and vice versa. The two views just provide two different ways to view the same items - in list view or in a day, week or month
calendar view.
In addition to the manual entry of Attendance records using the Add: Attendance option here, you can go to Program Options: Attendance and turn on
Auto-Attendance. With Auto-Attendance enabled, HSTOnline will add an Attendance entry for a Student for any date on which there is at least one Assignment which has been marked as Teacher - Complete.
Even with Auto-Attendance enabled, you can manually enter or adjust Attendance records at any time.
In addition to the manual entry of Assignments using the Add: Assignment - Single or Add: Assignment - Multiple options here, Assignments can be added using the
Scheduler tool to create Assignments from your Lesson Plans.
Agenda - List View Action Button
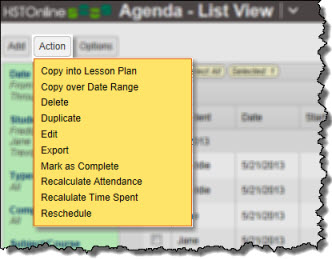 Agenda - List View Action Button
Use the options under this button to work with the items in your Agenda - List View. Different options are available in the menu depending on the items you select. Consult the linked help pages for each
area for complete details on using these features.
Copy into Lesson Plan - Select one or more Assignments to copy into a new or existing Lesson Plan.
- The selected Assignments will still be part of the Agenda - List View
- This option is not available when any type of item other than Assignment is selected
- This option is not available when multiple items are selected unless all of the selected items are Assignments
Copy over Date Range: Select a single Appointment, Assignment,
Chore, or Day Off to use as the basis for creating additional items of the same type using the original
information as a starting point.
- This option is not available when an Attendance item is selected
- This option is not available when multiple items are selected - either of the same or of differing types
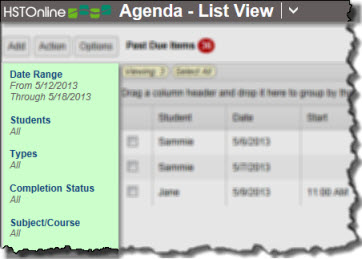
Delete: Select any single item, or any group of items of the same or mixed types to remove them from the database.
- All item types may be deleted in this manner
- The 'Confirm Delete' window will show you how many of each type of item you have selected for deletion
- Deleted items cannot be retrieved
Duplicate: Select any one or more Appointment, Assignment,
Chore, or Day Off to duplicate all of the selected items to another student.
- All the details of the original items, including date, will be part of the newly created items
- Your selection can include one item, or multiple items and be of one type or multiple types
- Attendance items cannot be duplicated. If Attendance items are included in your selection, they will be ignored. If your selection contains only Attendance items, you will get a message
reminding you that these types cannot be duplicated.
- The 'Duplicate' window will show you how many of each type of item have you selected for duplication.
- The original items will remain part of the Agenda - List View.
Edit: Select any one Appointment, Assignment,
Attendance, Chore, or Day Off entry to make changes to
that item.
- This option is only available for single item selection.
- When in the Edit window for an Appointment, Assignment, Attendance item, Chore, or Day Off entry, you can use the Previous or Next links at the top right of the edit window to move to the
previous or next item of the same type in the Agenda - List View
Multi-Edit: Select any two or more Appointments, Assignments, Attendance items,
Chores, or Day Off entries to make the same change to all of the selected items.
- This option is only available for multiple item selection
- This option is not available when multiple items are selected if the selection contains items of more than one type
- When in the Multi-Edit window for Appointments, Assignments, Attendance items, Chores or Day Off entries, you can make the same change for any or all fields in the Multi-Edit form
Export: This option is always available. Use this function to Export the displayed items to a .CSV file.
- All fields will be included in the .CSV file, regardless of hidden fields in the Agenda - List View at the time of export
- Only the items currently in view on the Agenda - List View - based on your filter settings - will be included in the exported file
Mark as Complete: Select any one or more Assignments and/or
Chores to mark them as completed.
- When logged in under a Student User Account this option is only available if the 'Complete by Student field is enabled in
Program Options: Optional Fields.
- When logged in under a Student User Account, the 'mark as complete' function will put a check in the Complete - Student field and display an S in the Complete column of the
Agenda - List View.
- When logged in under a Teacher or Administrator User Account, the 'mark as complete' function will put a check in the Complete - Teacher
field and display a T in the Complete column of the Agenda - List View
- If you have your Completion Status Filter set to show only 'Incomplete' items, selected items will be removed from the view when the page is refreshed.
- Your selection can contain just one or more Assignments, just one or more Chores, or a mix of any types of items as long as there is at least one Assignment or Chore included in the
selection. Items of other types will be ignored during this process as only Assignments and Chores are able to be marked as completed.
Recalculate Attendance: This option is always available. Use this function to have HSTOnline audit your
Assignments within a selected date range to insure that each date with at least one completed Assignment is marked as 'Present' or 'Present 1/2 Day', according to your
Attendance options.
- The Recalculate Attendance feature is available whether you are using Auto-Attendance or not.
- Recalculate Attendance will not remove any 'Present' or 'Present 1/2 Day' entries that have been made. It only insures that there is an Attendance entry for every date with at least one
Assignment marked as 'Complete by Teacher'.
Recalculate Time Spent: This option is always available. Use this function to have HSTOnline audit your
Assignments within a selected date range to update the Time Spent fields based on the Start/End times.
- This menu option is only available when the Time Spent field is enabled and Start/End Times are in use. See Program Options.
- This process will overwrite existing Time Spent values to coincide with the action start/end times for your Assignments
- The Time Spent value will be set to zero (0) for Assignments where the Start/End time fields are blank.
Reschedule: Select any one or more Appointments, Assignments, and/or Chores to move the selected items
forward or backward in time.
- Attendance and Day Off entries cannot be moved using the Reschedule tool. If these item types are included in the selection, they will be ignored
- The Reschedule process provides a preview of the changes to be made so you can review them before committing to the changes
Printing Agenda - List View Items
If you give your Students access to the program with their own User account, you many not need to print a list of Assignments, Chores and Appointments for them.
However, at some point you may want to have hard-copy documentation of the actual work that has been done. Use the Daily Task List to create such a document. All
reports are generated as PDF documents which you can then print, save, email, etc. as needed.
When creating a Daily Task List, you can choose to include nay combination of Appointments; incomplete, complete or past due Assignments; and incomplete, complete or past due Chores for any date range. The
Daily Task List can be grouped by Date or by Subject/Course. See the Daily Task List Help Page for more information.