Editing Assignments
Skip to
Related Assignment Topics
Related Topics
Introduction
You can edit any single Assignment to change any field, or use the Multi-Edit feature to change the same field(s) for two or more Assignments at a time.
Use the Mark as Complete option to indicate that work has been completed on an Assignment. When logged in under a Student User Account, using
'Mark as Complete' will mark the Complete - Student checkbox. When logged in under a Teacher User Account or as the Administrator, using 'Mark as
Complete' will mark the Complete - Teacher checkbox.
This Help Page covers editing existing Assignments and using the 'Mark as Complete' feature. You can also preform the following actions on Assignments:
- Add one Assignment for one Student on one date
- Add multiple Assignments for one or more students on one date or over a range of dates.
- Copy an Assignment to one or more Students over a date range
- Copy Assignments into a new or existing Lesson Plan
- Delete one or more Assignments
- Duplicate an Assignment to one or more Students
- Print Assignments - alone, or along with Appointments and Chores - in a Daily Task List for your Student
- Reschedule Assignments that were not completed as scheduled
- View Assignments in the Agenda - Calendar View or Agenda - List View
|
Editing a Single Assignment
- On the HSTOnline menu, click or touch 'Agenda - Calendar View' or 'Agenda - List View' under the 'Schedules and Planning' section.
- On the Agenda - Calendar View:
- Set the filters to view the item you want to change.
- Click or touch on the item you want to change to open the tool tip window.
- Click or touch 'More' to open the Edit window for that item
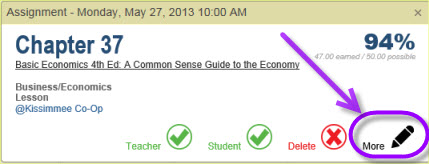 Agenda - Calendar View Tool Tip - More Button
- On the Agenda - List View:
- Set the Date Range, Students, Types, Completion Status and Subject/Course filters to display the Assignment you want to edit.
- Double-click on the Assignment you want to change to open the Edit Assignment window.
- Alternatively, you can click once on the Assignment you want to change and then click the Action button and choose Edit to open the Edit Assignment window.
- On a touch device, touch the Assignment you wish to edit and then touch the Action button and touch Edit to open the Edit Assignment window.
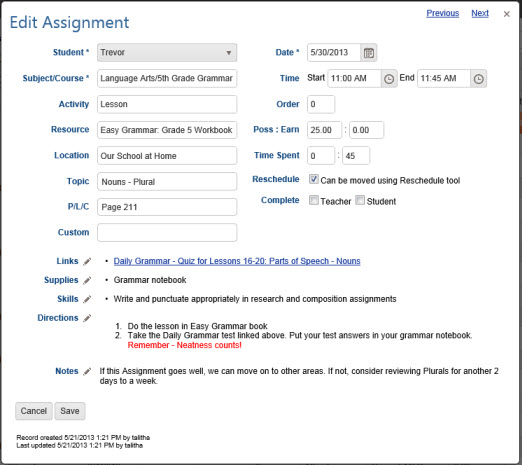 Edit Assignment form
- HSTOnline will show you when and by whom the original item was created and when and by whom it was last changed.
- Make whatever changes are needed.
- The Subject or Subject/Course, Activity, Resource, and Location fields are all Smart-Entry Fields. Smart-Entry fields allow you to create new entries for
each of these fields 'on-the-fly'. Simply type in the new entry you need and HSTOnline will automatically add it to the appropriate list.
- If you change the Student while in the Edit view, the Assignment will no longer belong to the original student, but to the new student selected. If you want to give the same Assignment to
another student while keeping the original, use the Duplicate feature.
- To generate a Grade for the Assignment, enter Points Possible and Points Earned and check the Teacher box in the Complete field.
- Click or touch:
- Cancel to abandon this process.
- Save to keep your changes and update the Agenda.
- The Previous or Next hyperlink in the top right corner to save your changes to this Assignment and move to the previous or next
Assignment in the list. You can click or touch Previous or Next until you have made all the changes you want to your Assignments and then click the Save button to end the Edit process.
If you reach the beginning or end of the list when clicking or touching Previous or Next, the Edit window will close and you will be returned to the list view. Note: When using Previous/Next,
HSTOnline will move to the next or previous item of the same type - in this case, Assignments - skipping over the other items in the Agenda - List View.
- Previous and Next are only available when editing items from the Agenda - List view.
- If you have entered a new Subject or Course in the Subject or Subject/Course field, HSTOnline will ask for clarification when you click or touch the Save button or the 'Previous' or
'Next' link.
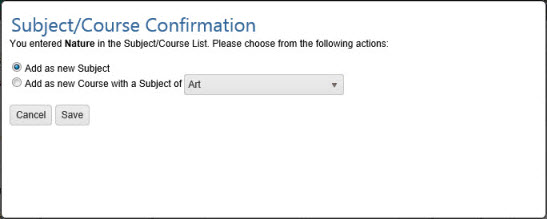 New Subject/Course Confirmation
- Choose whether to create your new entry as a new Subject or a new Course.
- Add as new Subject: the new entry will be added to your Subjects list with a status of 'Core'. You can edit the
item in your Subjects list to change the status as needed.
- Add as new Course with a Subject of: Select a Subject from the drop down list. The Course will be attached to that Subject and created with the following
settings:
- Credit Hours - 0.00
- Calculation Option - Basic
- Grading Scale - Default Grading Scale
- Weighting - Off
You can edit the item in your Courses list to change the parameters as needed.
- Click or touch:
- Cancel to be returned to the Add Assignment window to make a new selection in the Subject/Course field.
- Save to keep the new Subject or Course and add the Assignment to your Agenda.
Editing Multiple Assignments
- On the HSTOnline menu, click or touch 'Agenda - List View' under the 'Schedules and Planning' section.
- Set the Date Range, Students, Types Completion Status, and Subject/Course filters to display the Assignments you want to change.
- Choose the Assignments you want to multi-edit.
- Click the checkbox for each Assignment you want to change.
- You can use your mouse to click and drag over contiguous Assignments in the list to select those items.
- On a touch device, you can touch and drag your finger over contiguous Assignments in the list to select those items.
- Click or touch the Action button and click or touch Multi-Edit to open the Multi-Edit Assignments window.
- If your selection includes Assignments and other item types (Appointments, Attendance,
Chores and/or Day Off) the Multi-Edit option will be disabled. Reselect items to include only
Assignments.
- HSTOnline will show you how many items have been selected for editing.
- The fields in the Multi-Edit window will show the settings for the first Assignment in your selection.
 Multi-Edit Assignment form
- To enable the form, click or touch the box to the left of each field you want to change for all selected Assignments. Make your selection for each of those fields.
- Click or touch:
- Cancel to abandon this process.
- Save to keep your changes and update the Agenda.
Marking Assignments as Completed
Students with can mark Assignments as completed when the 'Complete by Student' field is enabled. When a
Student uses 'Mark as Complete', an S will be added to the Complete column in the Agenda - List View and a checkmark will be added to the Student box in the
Complete field. Having a Student mark work as completed can help the Teacher know when items are ready for review and grading.
Teachers need to mark assignments as completed (adding a T to the Complete to the Complete column in the Agenda - List View and a checkmark to the Teacher box
in the Complete field) in order for:
- grades to be calculated
- auto-attendance to be generated
- time spent/sessions to be added to attendance entries
- time spent/sessions to count towards credit hours
Marking as Complete in the Agenda - Calendar View
 Assignment Tool Tip (Fig. 1)
 Enter Assignment Grade (Fig. 2)
Use this feature to mark any one Assignment as completed while in the Agenda - Calendar View.
- On the HSTOnline menu, click or touch 'Agenda - Calendar View' under the 'Schedules and Planning' section.
- Set the Student, Types, Completion Status and Subject/Course filters to display the item you want to work with.
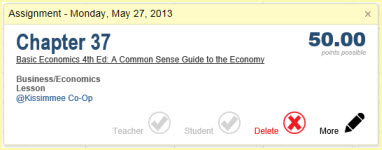
- Click or touch the Assignment you want to mark as completed to open the Tool Tip window for that item. (Fig. 1)
- Click or touch 'Teacher' or 'Student' in the tool tip window to mark the item as completed.
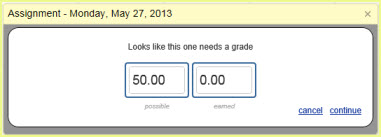
- When you click 'Teacher' for an Assignment and the Points Possible for the Assignment are greater than zero, you will be given the option to enter the Points Earned. (Fig. 2)
- Adjust points possible and earned as needed, then click or touch 'Continue' to finish the completion process.
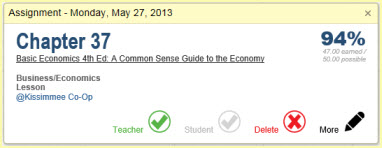
- Completed items will show the percentage grade in the top right corner. (Fig. 3)
- Click or touch:
- the X in to the top right corner to close the tool tip window
- another Assignment or Chore in the Agenda - Calendar View to open the Tool Tip window for that item
 Completed Assignment Tool Tip (Fig. 3)
Marking as Complete in the Agenda - List View
Use this feature to mark any one or more Assignments as Complete at the same time. You can use the 'Mark as Complete' feature to mark Assignments and Chores as completed at the same time. Your selection
can include items that are neither Assignments nor Chores. HSTOnline will simply ignore those items that are not eligible to be marked as completed.
 More Button Menu
- On the HSTOnline menu, click or touch 'Agenda - List View' under the 'Schedules and Planning' section.
- Set the Date Range, Students, Types, Completion Status, and Subject/Course filters to display the items you want to work with.
- Choose the Assignments you want to mark as completed.
- Click the checkbox for each Assignment you want to mark.
- You can use your mouse to click and drag over contiguous Assignments in the list to select those items.
- On a touch device, you can touch and drag your finger over contiguous Assignments in the list to select those items.
- Click or touch the Action button and choose 'Mark as Complete'.
- All the selected Assignments will be marked as completed.
- If logged in under a Teacher account, the Teacher Complete box will be checked and a T displayed in the Complete column.
- If logged in under a Student account, the Student Complete box will be checked and an S displayed in the Complete column.