Past Due Assignments and Chores
Introduction
In HSTOnline, a Past Due Assignment or Chore is any item which falls on a date prior to today's date and which has not been marked as Completed.
When a Student logs in under a Student User Account, and the 'Complete by Student' field has been
enabled, they will get a notification regarding the number of their own Assignments and Chores which fall on dates prior to 'Today' which have not been
marked as Complete by Student or Teacher. If the items have been marked as Teacher-Complete, they are no longer considered Past Due.
When logged in under a Teacher User Account or as the Administrator, notifications will appear regarding the number of Assignments and Chores which fall on
date prior to 'Today' which have not been marked as Complete by Teacher for any Student.
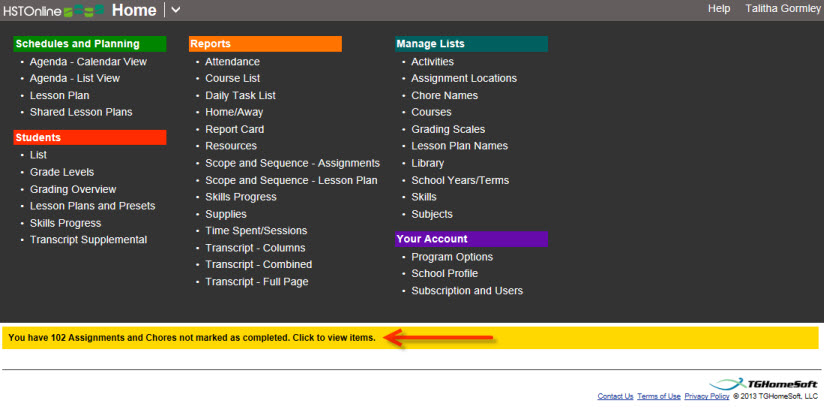
Notifications appear at the bottom of the HSTOnline menu when you first login each day, and at the top of the Agenda - List View page. The notifications
will remain until the Past Due items have been marked as Completed.
Past Due Notification on HSTOnline Menu
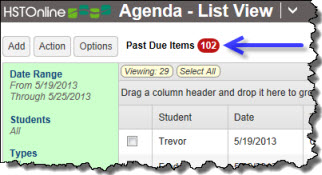 Past Due Notification on Agenda - List View
An Assignment or Chore which is Past Due can receive any of the following actions:
- Do Nothing - leave the item as 'Past Due' and simply mark it as complete once the work has been finished.
- Edit one or more Assignments or Chores to change any field. Student can change fields according to their user account permissions.
- Delete one or more Assignments or Chores in the list. Students may never delete any records.
- Mark the Assignment or Chore as Completed. Students can mark as Complete - Student; Teachers/Administrators will mark as Complete-Teacher.
- Reschedule one or more Assignments or Chores on the list to move them forward in time so that they are no longer Past Due. Students can reschedule according to their
user account permissions.
The Past Due List
Notifications appear at the bottom of the HSTOnline menu when you first login each day, and at the top of the Agenda - List View pages. The
notifications on the Agenda pages will remain until the Past Due items have been marked as Completed. Click or touch the notification to open the Past Due list.
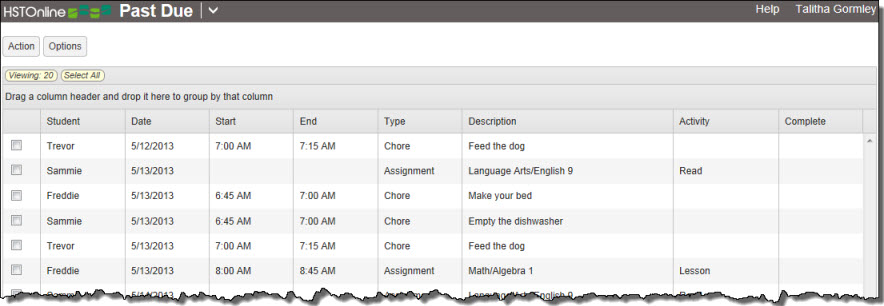 Past Due List
Past Due List Columns
| Column Name |
Notes |
Default Visibility |
| Student |
The name of the Student attached to the Past Due Assignment or Chore |
Visible |
| Date |
The date of the past due Assignment or Chore. The primary sort of this list is the Date field. |
Visible |
| Start/Block |
This filed will show either Start or Block, depending on your selection in Program Options. Start shows the starting time for the Assignment or
Chore; Block shows the block number attributed to the Assignment or Chore. |
Visible |
| End |
When using Start/End times, this column is visible by default and will display the ending time for the Assignment or Chore. |
Visible |
| Type |
Displays 'Assignment' or 'Chore' so you know which type of item you are viewing. |
Visible |
| Description |
For Assignments, displays the Subject or Subject/Course; for a Chore, displays the Chore Name. |
Visible |
| Activity |
For Assignments, displays the Activity; for a Chore, this field is always blank. |
Visible |
| Resource |
For Assignments, displays the Resource; for a Chore, this field is always blank. |
Hidden |
| PLC |
For Assignments, displays the Page/Lesson/Chapter details; for a Chore, this field is always blank. |
Hidden |
| Poss |
For Assignments, displays the Points Possible; for a Chore, this field is always blank. |
Hidden |
| Earn |
For Assignments, displays the Points Earned; for a Chore, this field is always blank. |
Hidden |
| Complete |
On the Student Past Due List, this column will always be blank
On the Teacher/Administrator Past Due List, this column will be blank, or will show an 'S' if marked as Student-Complete. |
Visible |
Past Due List Controls
|
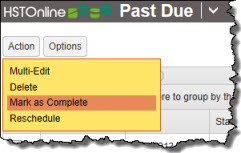
- Action Button:
- Edit: With one Assignment or Chore selected, this action becomes available. Choose edit to make changes to the selected Assignment
or Chore.
- Multi-Edit: With two or more Assignments or two or more Chores selected, this action becomes available. Choose this option to edit
make changes to the selected Assignments or Chores.
- Delete: With two or more Assignments and/or Chores selected, this option becomes available. Choose this option to permanently delete
the selected items from your database. This option is never visible when logged in under a Student Account.
- Mark as Complete: With one or more Assignments and/or Chores selected, this option becomes available. Choose this option to mark the selected items as
complete. When logged in under a Student account, an S will be added to the Complete field; when logged in under an Administrator or Teacher account, a T will
be added to the Complete field. Once marked as Complete, the items will fall off of the Past Due list.
- Reschedule: With one or more Activities selected, this option becomes available. Choose this option to permanently delete the
selected items from your database. When logged in under a Student account, this option will only be available if the Student has permission to change Assignment Date and Time Block.
- Options Button:
- Choose Columns: Click or touch this option to select which fields will be displayed in the Past Due list. You must select at least one column.
- Expand All: When the list is Grouped, click or touch this option to expand (open) all groupings.
- Collapse All: When the list is Grouped, click or touch this option to collapse (close) all groupings.
|
Past Due List Badges
|
- Viewing: Indicates the number of Past Due items being displayed.
- Select All: Click or touch this badge to quickly select all the Assignments and Chores in the list.
- Selected: When one or more Assignments and/or Chores are highlighted, this badge will appear to show the number items selected. Click or touch this badge to
deselect all selected items.
|
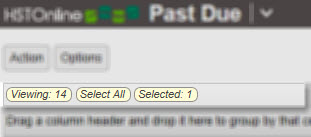 Past Due List Badges
Editing Past Due Items
You can edit any Past Due Assignment or Chore to change any aspect of that item - including the date or completion status. If you change the date to match today or a future date, or if you mark the item as
Completed, it will fall off the Past Due List as it will no longer meet the criteria to be included on the list.
Students: can only edit Assignments or Chores according to their user account permissions
Editing a Single Past Due Assignment or Chore
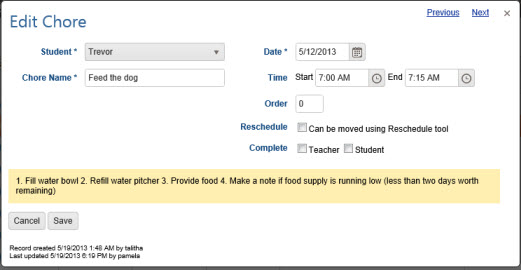 Edit Chore
- Click or touch the Past Due notification on the HSTOnline menu or on the Agenda - List View to open the Past Due list.
- On the Past Due page, double-click on the item you want to change to open the Edit window.
- Alternatively, you can click once on the item you want to change and then click the Action button and choose Edit to open the Edit window.
- On a touch device, touch the item you wish to edit and then touch the Action button and touch Edit to open the Edit window.
- At the bottom of the edit view, you will see when and by whom the item was created as well as when and by whom it was last updated.
- Make whatever changes are needed to the Chore or Assignment.
- If you change the date to 'Today' or a future date, when you click Save the item will fall off the Past Due list.
- If you mark the item as Complete, when you click Save the item will fall off the Past Due list.
- Student users will only be able to edit fields based on their user account permissions.
- Click or touch:
- Cancel to abandon the changes and close the Edit window.
- Save to commit the changes to your Activity and close the Edit window.
- The Previous or Next hyperlink in the top right corner to save your changes to this item and move to the previous or next
item in the list. If you are editing a Chore, the Previous/Next links will take you to the previous or next Chore on the list; if you are editing an Assignment, the Previous/Next links will
take you to the previous or next Assignment on the list. You can click or touch Previous or Next until you have made all the changes you want and then click the Save button to end the Edit
process. If you reach the beginning or end of the list when clicking or touching Previous or Next, the Edit window will close and you will be returned to the list view.
 Edit Assignment
- If you have entered a new Subject or Course in the Subject or Subject/Course field, HSTOnline will ask for clarification when you click or touch the Save button or the 'Previous' or
'Next' link.
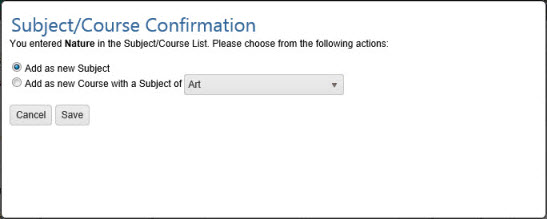 New Subject/Course Confirmation
- Choose whether to create your new entry as a new Subject or a new Course.
- Add as new Subject: the new entry will be added to your Subjects list with a status of 'Core'. You can edit the
item in your Subjects list to change the status as needed.
- Add as new Course with a Subject of: Select a Subject from the drop down list. The Course will be attached to that Subject and created with the following
settings:
- Credit Hours - 0.00
- Calculation Option - Basic
- Grading Scale - Default Grading Scale
- Weighting - Off
You can edit the item in your Courses list to change the parameters as needed.
- Click or touch:
- Cancel to be returned to the Add Assignment window to make a new selection in the Subject/Course field.
- Save to keep the new Subject or Course and add the Assignment to your Agenda.
Editing Multiple Past Due Assignments or Chores
The multi-edit feature allows you to make the same change to two or more items at the same time.
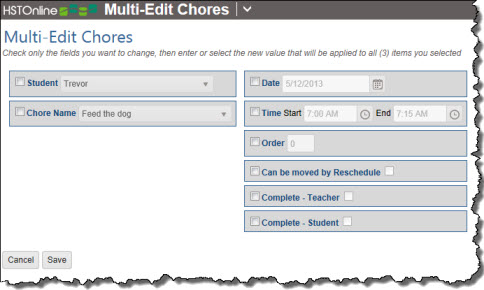 Multi-Edit Chores
- Click or touch the Past Due notification on the HSTOnline menu or the Agenda - List View to open the Past Due list.
- On the Past Due page, select the items you want to change. You can use the Grouping and Sorting features to isolate the items you want to change.
- Click the checkbox for each item you want to change.
- You can use your mouse to click and drag over contiguous items of the same type in the list.
- On a touch device, you can touch and drag your finger over contiguous items of the same type in the list.
- Your selection must include just Assignments or just Chores or the Multi-Edit option will be disabled.
- Click or touch the Action button and click or touch Multi-Edit to open the Multi-Edit window.
- HSTOnline will show you how many items have been selected for editing.
- Click or touch the checkbox next to each field you want to change for the selected items and make whatever changes are needed to the Chore or Assignment.
- If you change the date to 'Today' or a future date, when you click Save the item will fall off the Past Due list.
- If you mark the item as Complete, when you click Save the item will fall off the Past Due list.
- Student users will only be able to edit fields based on their user account permissions.
- Click or touch:
- Cancel to abandon the changes and close the Multi-Edit window.
- Save to commit the changes and close the Multi-Edit window.
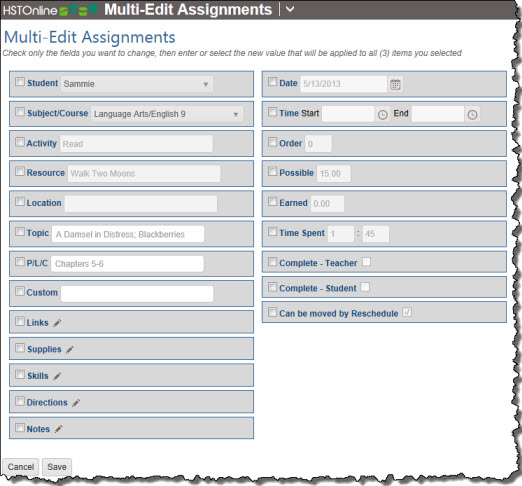 Multi-Edit Assignments
Deleting Past Due Assignments and Chores
You can delete any Assignments or Chores which appear in the Past Due list to remove them completely from your database. Deleted items cannot be retrieved.
Students: never have the option to delete any records.
 Delete Multiple Items
- Click or touch the Past Due notification on the HSTOnline menu or the Agenda - List View to open the Past Due list.
- On the Past Due page, select the items you want to remove. You can use the Grouping and Sorting features to isolate the items you want to remove. You can
delete Assignments and Chores at the same time.
- Click the checkbox for each item you want to remove.
- You can use your mouse to click and drag over contiguous items in the list to select those items.
- On a touch device, you can touch and drag your finger over contiguous items in the list to select those items.
- Click or touch the 'Select All' badge to select all the items in the list.
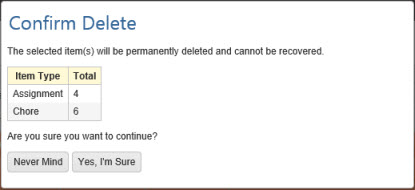
- Click or touch the Action button and click or touch Delete to open the Confirm Delete window.
- HSTOnline will show you how many items of each type have been selected for deletion.
- Click or touch:
- 'Never Mind' to cancel the delete process.
- 'Yes, I'm Sure' to complete the deletion process. HSTOnline will delete all selected items from your database. Deleted items cannot be retrieved.
Mark as Complete
Students: can always mark their Chores or Assignments as Student-Complete. If the Complete by Student field is disabled, the
Student will never receive a Past Due notification.
 Action: Mark as Complete
- Click or touch the Past Due notification on the HSTOnline menu or the Agenda - List View to open the Past Due list.
- On the Past Due page, select the items you want to remove. You can use the Grouping and Sorting features to isolate the items you want to remove. You can
mark Assignments and Chores complete at the same time.
- Click the checkbox for each item you want to mark complete.
- You can use your mouse to click and drag over contiguous items in the list to select those items.
- On a touch device, you can touch and drag your finger over contiguous items in the list to select those items.
- Click or touch the 'Select All' badge to select all the items in the list.
- Click or touch the Action button and click or touch 'Mark as Complete'.
- The selected items will be immediately marked as Complete and will fall off the Past Due list
- Student: Mark as Complete will add an S to the Complete column and check the Student box in the Complete field.
- Teacher/Administrator: Mark as Complete will add a T to the Complete column and check the Teacher box in the Complete field.
Rescheduling Past Due Items
You can choose to Reschedule any of the Assignments and Chores in the Past Due list to push them into the future. When you reschedule, items that start on the same date for a Student will be on the same
new date in the future.
Students: can only reschedule Assignments or Chores according to their user account permissions
You have two options when Rescheduling: |
Option 1: Continue until all items are moved
- Select this option to have HSTOnline begin with the Start Date you enter and place your items as far into the future as necessary to move
all the items according to the Day Options you set above.
- When you use this option, HSTOnline will use the original date of each item to determine where it will be placed in the new date range. All items that fall on the same original date
for the Student will be placed on the same new date in the future.
Option 2: Make all items fit between Start and End Dates
- Select this option to have HSTOnline spread your items evenly within the date range selected.
- When you use this option, HSTOnline will keep your items in order based on their original date and follow the Day Options you set.
- Items will be placed across the selected date range, spreading the total number of selected items - Appointments, Assignments and Chores - evenly across the available dates.
|
- Click or touch the Past Due notification on the HSTOnline menu or the Agenda - List View to open the Past Due list.
- Choose items to Reschedule
- Either click or touch Action and then Reschedule to automatically select all items in the Past Due list and open the Day and Date options page.
- Or select specific items to move
- Click the checkbox for each entry you want to move.
- You can use your mouse to click and drag over contiguous items to select them.
- On a touch device, you can touch and drag your finger over contiguous items to select them.
- Click or touch the 'Select All' badge to select all the items on the current page.
- Click or touch the Action button and click or touch 'Reschedule' to open the Day and Date options page.
 Past Due Reschedule: Day and Date Options
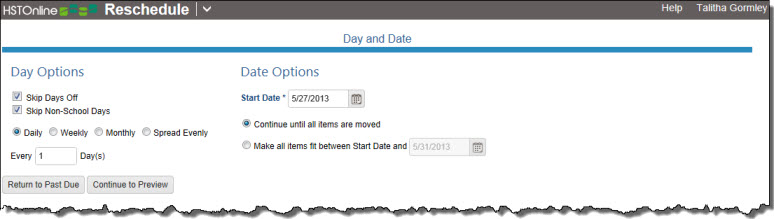
- Set the Day Options for the selected items.
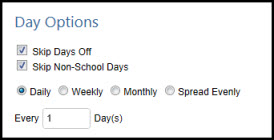 Day Options
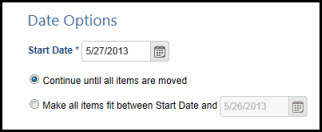 Date Options
- Skip Days Off: Check this box to prevent Rescheduled items from being placed on dates which are designated as a Day Off.
- Skip Non-School Days: Check this box to prevent Rescheduled items from being placed on non-school days, as indicated in your
School Profile page.
- Select a Daily, Weekly, or Monthly pattern for HSTOnline to follow when moving your selected
Assignments and Chores. See the Day Options Help Page for full details on these options.
- Set the Date Options for the selected items.
- Set the Start date for the Reschedule process by entering a date using the mm/dd/yyyy format, or use the
Calendar icon to select a date. This will be the first date used in the Reschedule process unless it violates one of your Day Options settings.
- Make a selection from the two options:
- Continue until all items are moved: Select this option to have HSTOnline begin with the Start Date you enter and place your items as far into the
future as necessary to move all the items according to the Day Options you set above. This is the default selection.
- Make all items fit between Start Date and: Enter a date using the mm/dd/yyyy format, or use the Calendar icon
to select an end date. Select this option to have HSTOnline keep your items in order and spread them evenly within the date range you have selected using the Day Options you set
above. If you chose 'Spread Evenly' in the Day Options area, this is the only choice for Date Options as the Spread Evenly process requires an established start and end date.
- Click or touch:
- Return to Past Due to cancel this process and return to the Past Due list.
- Continue to Preview to see a preview of reschedule items that will be added to your Agenda.
- If you choose 'Continue to Preview', HSTOnline will show you the rescheduled Appointments and Chores with their Existing Date and the proposed New Date. Use this opportunity to review the items
before accepting them to be added to your database.
- You can group or sort the preview in any way to help review these items. The original preview has no grouping, and is sorted by New Date and then
by Student.
- You can use the Options: Choose Columns menu to select which columns are visible. All columns are visible by default: Student, Type, Existing Date, New Date, Description, PLC and Status.
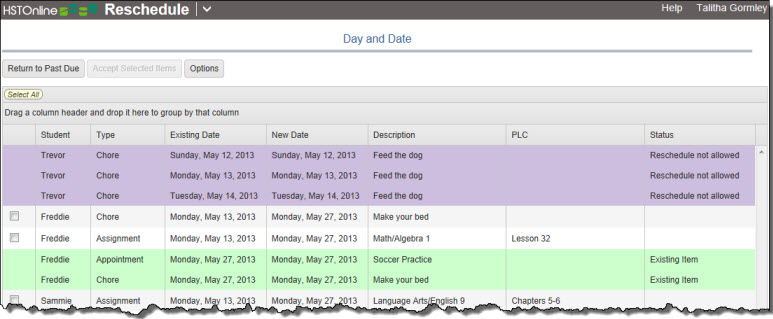 Past Due Reschedule: Preview 1
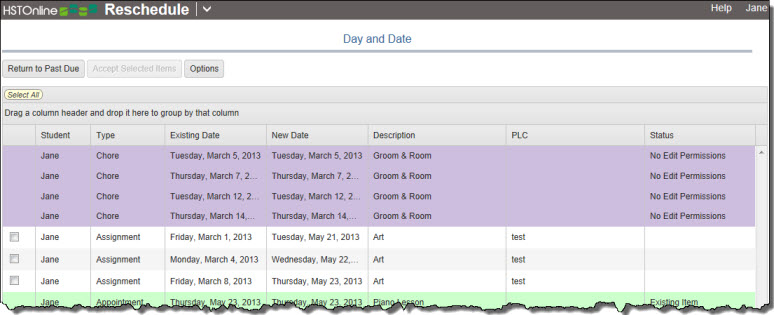 Past Due Reschedule: Preview 2
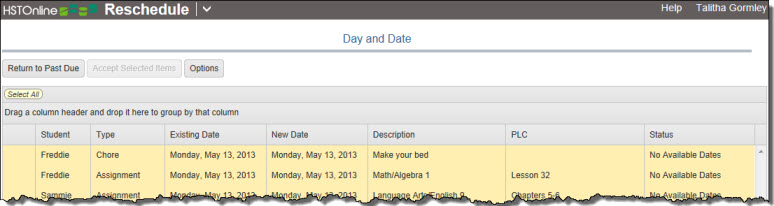 Past Due Reschedule: Preview 3
- Items which cannot be moved because the 'Can be Rescheduled' box is unchecked will appear with a lavender background, showing the same Existing Date and New Date,
and display a Status of 'Reschedule not allowed' (Preview 1).
- Items that Students cannot move due to a lack of permissions will appear with a lavender background, showing the same Existing Date and New Date, and display a
Status of 'No Edit Permissions' (Preview 2). This will only appear when a Student is Rescheduling their own Assignments or Chores and lack sufficient
permissions to do so.
- Items which cannot be moved because there are no valid dates in your selection will appear with a yellow background, showing the same Existing Date and New Date,
and display a Status of 'No Available Dates' (Preview 3). How can that happen?
- Items which are being moved will appear with a white background, show their Existing Date and a proposed New Date which will fall in your selected date range, and
display no Status message.
- Items which are already in the Agenda on the new dates being used for the Reschedule will appear with a green background, showing the same Existing Date and New
Date, and display a Status of 'Existing Item'. These items are included so that you can see if you are doubling up on work for your Student.
- Look over the preview carefully. Once you accept the changes, there is no 'undo' option. If there is a problem with the preview you can:
- click or touch the Day and Date label at the top of the page to reset your options and try again
- click or touch the Return to Past Due button to go back to the Past Due list and choose different items
- Once you are satisfied with the items displayed in the Preview, you can select the changes you want to accept. Click or touch the Select All badge to select all
the Rescheduled items in the list. Alternatively,
- you can click or touch the checkbox for each item you want to accept.
- you can use your mouse to click and drag over Rescheduled items in the list to select them. Only items eligible to be moved will be selected.
- on a touch device, you can touch and drag your finger over Rescheduled items in the list to select them. Only items eligible to be moved will be selected.
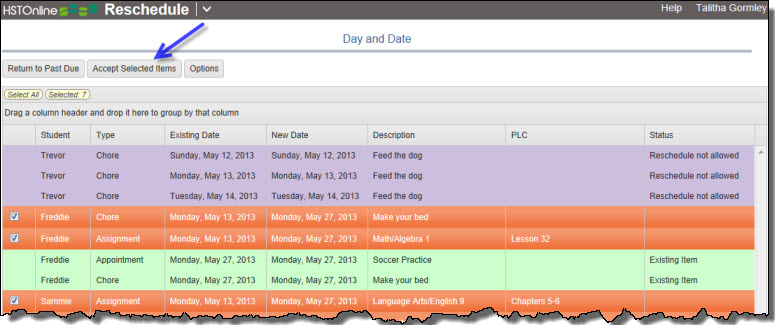 Past Due Reschedule: Select and Accept
- Click or touch:
- Return to Past Due to abandon this process and return to the Past Due list.
- 'Accept Selected Items' to make the selected changes to your Agenda.
How can that happen?
How can I end up with 'No Available Dates' when rescheduling? It's all dependent on what you select in the Day and Date Options area. For instance, if you choose the Weekly option and check off only Sundays, but
also check the option to 'Skip non-school days' - if Sunday is listed as a non-school day for you - there will be no valid date to move the selected items to. Likewise, if you choose something like
'Make all items fit between Start Date and ______' but the date range you picked is marked off as Days Off and you have checked the box to 'Skip Days Off', there will be no valid dates available.
If you get the 'No Available Dates' result, you can click or touch the Day and Date label above the preview to reset your options and try again.
Printing Past Due Items
You can create a printed list of Past Due Assignments and/or Chores for any date range using the Daily Task List report. The report can include any combination of
Appointments, Assignments and/or Chores.
You can export a list of Assignments and/or Chores from the Agenda - List View for any date range to a .CSV file using the
Option: Export menu.