Reschedule
Introduction to Rescheduling
When we homeschool, life sometimes takes over our schedule in unexpected ways. The Reschedule tool allows you to bump assignments forward or backward as many days as necessary. This alleviates the
need to go in and manually change a large number of individual items. Appointments, Assignments and/or Chores can be rescheduled for one or more students at a time.
Using the Lesson Plan feature can help you plan out your entire school year without having to commit to specific dates for your Student's work too far in advance.
With everything set out in one or more Lesson Plans, you can then schedule work as just a few weeks in advance, when you are fairly certain of what your actual school days might before that period. By
utilizing this feature to its fullest potential, you may find that you never need to reschedule items. However, if that eventuality does occur, the Reschedule feature will assist you in adjusting
Appointments, Assignments and Chores as needed.
You have two ways of selecting items to be Rescheduled: |
Option 1: Select specific items from the Agenda - List View
- Use the Date Range, Students, Types, Completion Status, Subject/Course and/or Search box filters as needed.
- Select one or more items to Reschedule by clicking checkboxes, or click and drag over a contiguous items to select them.
- Only the selected items will be included in the Reschedule process. Attendance and Day Off entries included in your selection will be ignored as those items are not eligible for Rescheduling.
Option 2: Use the Agenda - List View Filters to select the items to be moved
- Use the Date Range, Students, Types, Completion Status, Subject/Course, and/or Search box filters to isolate the items you want to Reschedule.
- Click or touch the Action button, and choose Reschedule
- All items that are returned based on those settings will be included in the Reschedule process. Attendance and Day Off entries included in the list will be ignored as those items are not
eligible for Rescheduling.
|
|
|
You have two options when Rescheduling: |
Option 1: Continue until all items are moved
- Select this option to have HSTOnline begin with the Start Date you enter and place your items as far into the future as necessary to move
all the items according to the Day Options you set above.
- When you use this option, HSTOnline will use the original date of each item to determine where it will be placed in the new date range. All items that fall on the same original date
for the Student will be placed on the same new date in the future.
Option 2: Make all items fit between Start and End Dates
- Select this option to have HSTOnline spread your items evenly within the date range selected.
- When you use this option, HSTOnline will keep your items in order based on their original date and follow the Day Options you set.
- Items will be placed across the selected date range, spreading the total number of selected items - Appointments, Assignments and Chores - evenly across the available dates.
|
|
Things to keep in mind:
|
- Only Appointments, Assignments and Chores with a check in the "Can be moved using Reschedule tool" box will be moved.
- Assignments and Chores which have been marked as Complete - Teacher will never be moved.
- You can select any number of Appointments, Assignments and Chores to move at the same time.
- If you have specific 'day of the week' needs for certain Subjects/Courses it may be best to Reschedule your Assignments in smaller chunks.
- Reschedule can only be initiated from the Agenda - List View page.
|
Selecting Items to Reschedule
You can choose to Reschedule any Assignment, Appointment or Chore which:
- has a checkmark in the 'Can be moved using Reschedule tool' box
- has not been marked as Teacher-Complete
HSTOnline allows you to select a group of items which includes Day Off and Attendance entries and still access the Reschedule option. The Day Off and Attendance entries will be ignored as they
cannot be moved in this manner.
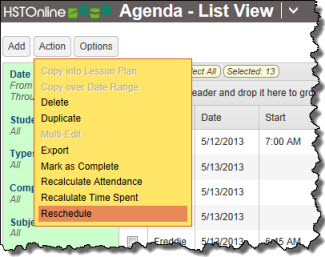 Action: Reschedule menu
- On the HSTOnline menu, click or touch 'Agenda - List View' under the 'Schedules and Planning' section.
- Set the Date Range, Students, Types, Completion Status and Subject/Course filters to display the items you want to reschedule.
- Choose items to Reschedule
- Either click or touch Action and then Reschedule to automatically select all items that match your filter settings and open the Day and Date options page.
- Or select specific items to move
- Click the checkbox for each entry you want to move.
- You can use your mouse to click and drag over contiguous items to select them.
- On a touch device, you can touch and drag your finger over contiguous items to select them.
- Click or touch the 'Select All' badge to select all the items on the current page. Note: You can Reschedule Appointments,
Assignments and Chores at the same time. Any
Attendance and Day Off entries that are included in the selection will be ignored as they cannot be
moved in this manner.
- Click or touch the Action button and click or touch 'Reschedule' to open the Day and Date options page.
Setting Day and Date Options
In this area you will set the pattern you want HSTOnline to follow when moving the selected items.
Items that are on the same date originally will be placed on the same date in the Reschedule process. Items will be kept in their original order, except where items in your selection are marked as Teacher-
Complete or which cannot be rescheduled due to the 'Can be moved...' setting. Those items will be skipped over as part of this process.
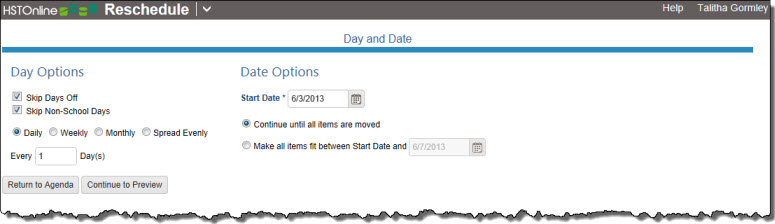 Reschedule: Day and Date Options
- Day Options: Set the pattern of days you want HSTOnline to follow when creating the copies.
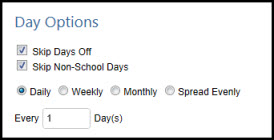 Day Options
- Check the boxes to Skip Days off and/or Skip Non-School Days.
- Both boxes are checked by default. HSTOnline will remember your settings when you return to this area.
- Skip Days off will cause HSTOnline to skip over any days that have already been noted as a Day Off within your school year.
- Non-School Days are those days of the week that are unchecked in your School Profile.
- Click or touch the radio button for Daily, Weekly, Monthly or Spread Evenly. See the Day Options Help Page for
step-by-step instructions on completing this section. Below is a brief description of each option:
- Daily: HSTOnline will gather a list of all dates that fall within your selected date range, remove the
dates that violate your 'Skip' settings, and then place an Assignment on each date in the date range according to your 'Every_Day' entry.
- Weekly: HSTOnline will gather a list of all dates that fall within your selected date range, cull the
list to only those dates which match the days of the week you have selected for your Weekly options, and then remove from the remaining dates any that violate your
'Skip' settings. Finally, HSTOnline will place an Assignment entry on each remaining date in the range according to your
'Every _ Weeks' entry.
- Monthly: HSTOnline will gather a list of all dates that fall within your selected date range, cull the
list to only those dates which match the date of the month or # day of the month you have selected (First Tuesday, Third Monday, etc.) and then remove from the
remaining dates any that violate your 'Skip' settings. Finally, HSTOnline will place an Assignment entry on each remaining date in the date range.
- Spread Evenly: Choose this option when you want to force all the created items to fit between a start/end date
that you specify. If you have more items than there are valid dates in your range, you will get multiple items on some or all dates; if you have fewer items than
there are valid dates in your range, you will have one or more days between Assignments.
- Set the Date Options for the selected items.
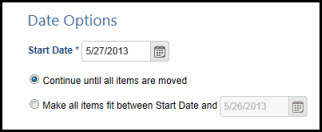 Date Options
- Set the Start date for the Reschedule process by entering a date using the mm/dd/yyyy format, or use the
Calendar icon to select a date. This will be the first date used in the Reschedule process unless it violates one of your Day Options settings.
Items can be moved forward or backward in time.
- Make a selection from the two options:
- Continue until all items are moved: Select this option to have HSTOnline begin with the Start Date you enter and place your items as far into the
future as necessary to move all the items according to the Day Options you set above. This is the default selection.
- Make all items fit between Start Date and: Enter a date using the mm/dd/yyyy format, or use the Calendar icon to select an
end date. Select this option to have HSTOnline keep your items in order and spread them evenly within the date range you have selected using the Day Options you set above. If
you chose 'Spread Evenly' in the Day Options area, this is the only choice for Date Options as the Spread Evenly process requires an established start and end date.
- Click or touch:
- Return to Agenda to cancel this process and return to the Agenda - List View.
- Continue to Preview to see a preview of reschedule items that will be added to your Agenda.
The Preview Grid
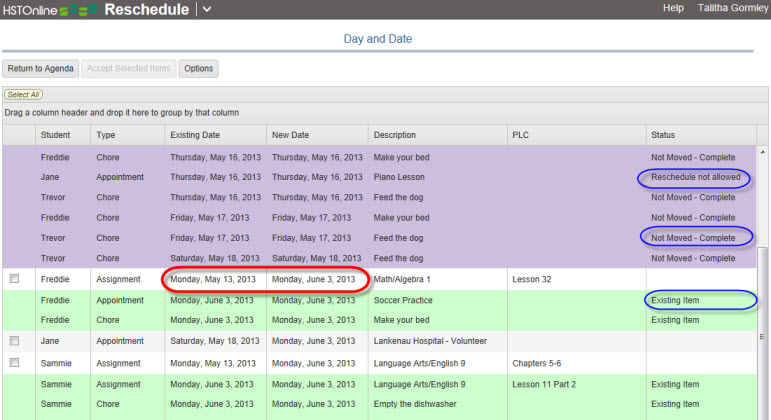
When you click or touch 'Continue to Preview', HSTOnline will show you the rescheduled Appointments and Chores with their Existing Date and the proposed New Date. Use this opportunity to review the
items before accepting them to be added to your database.
- You can group or sort the preview in any way to help review these items. The original preview has no grouping, and is sorted by New Date and then
by Student.
- You can use the Options: Choose Columns menu to select which columns are visible. All columns are visible by default: Student, Type, Existing Date, New Date, Description, PLC and Status.
Preview 1
- Items which cannot be moved because the 'Can be Rescheduled' box is unchecked will appear with a lavender background, showing the same Existing
Date and New Date, and display a Status of 'Reschedule not allowed'.
- Items which cannot be moved because they are marked as 'Teacher - Complete' will appear with a lavender background, showing the same Existing Date
and New Date, and display a Status of Not Moved - Complete'
- Items which are being moved will appear with a white background, show their Existing Date and a proposed New Date which will fall in your selected date range, and
display no Status message.
- Items which are already in the Agenda on the new dates being used for the Reschedule will appear with a green background, showing the same Existing Date and New
Date, and display a Status of 'Existing Item'. These items are included so that you can see if you are doubling up on work for your Student.
 Past Due Reschedule: Preview 1
Preview 2
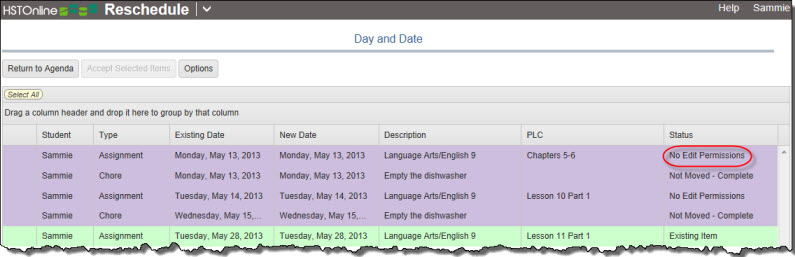
- Items that Students cannot move due to a lack of permissions will appear with a lavender background, showing the same Existing Date and New Date, and display a
Status of 'No Edit Permissions' (Preview 2). This will only appear when a Student is Rescheduling their own Assignments, Appointments or Chores and lack sufficient
permissions to do so.
 Past Due Reschedule: Preview 2 (Student)
Preview 3
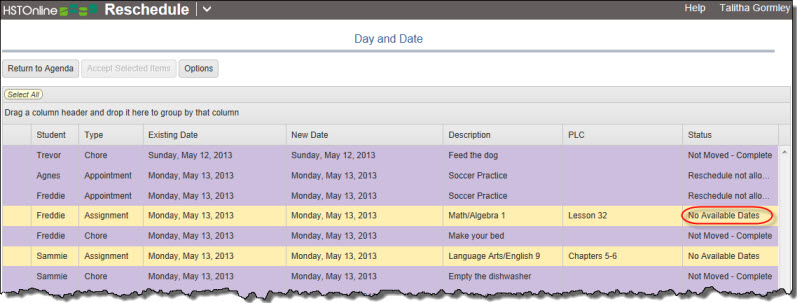
- Items which cannot be moved because there are no valid dates in your selection will appear with a yellow background, showing the same Existing Date and New Date,
and display a Status of 'No Available Dates' (Preview 3). How can that happen?
 Past Due Reschedule: Preview 3 (No Dates)
- Look over the preview carefully. Once you accept the changes, there is no 'undo' option. If there is a problem with the preview you can:
- click or touch the Day and Date label at the top of the page to reset your options and try again
- click or touch the Return to Agenda button to go back to the Agenda - List View and choose different items
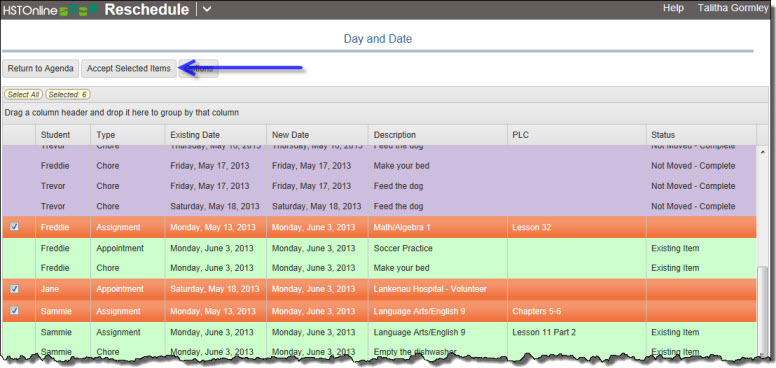
- Once you are satisfied with the items displayed in the Preview, you can select the changes you want to accept. Click or touch the Select All badge to select all
the Rescheduled items in the list. Alternatively,
- you can click or touch the checkbox for each item you want to accept.
- you can use your mouse to click and drag over Rescheduled items in the list to select them. Only items eligible to be moved will be selected.
- on a touch device, you can touch and drag your finger over Rescheduled items in the list to select them. Only items eligible to be moved will be selected.
 Past Due Reschedule: Select and Accept
- Click or touch:
- Return to Agenda to abandon this process and return to the Agenda - List View.
- 'Accept Selected Items' to make the selected changes to your Agenda.
How can that happen?
How can I end up with 'No Available Dates' when rescheduling? It's all dependent on what you select in the Day and Date Options area. For instance, if you choose the Weekly option and check off only Sundays,
but also check the option to 'Skip non-school days' - if Sunday is listed as a non-school day for you - there will be no valid date to move the selected items to. Likewise, if you choose something like
'Make all items fit between Start Date and ______' but the date range you picked is marked off as Days Off and you have checked the box to 'Skip Days Off', there will be no valid dates available.
If you get the 'No Available Dates' result, you can click or touch the Day and Date label above the preview to reset your options and try again.