Report: Report Card
Introduction
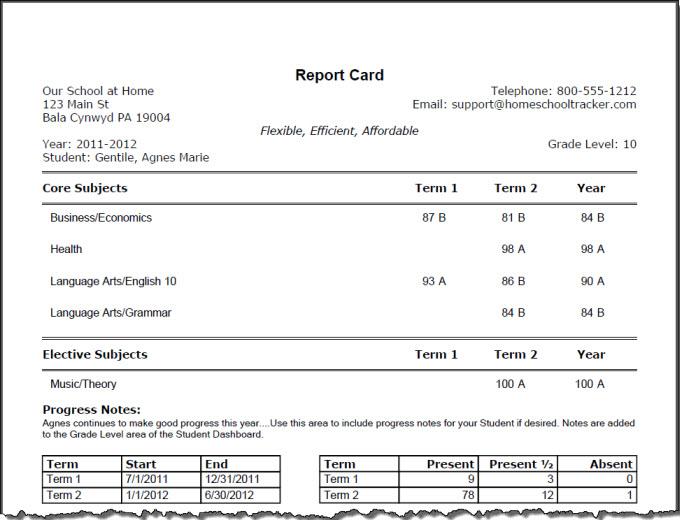
A report card is a document which contains grading information for any single selected School Year. You can generate a Report Card for an entire year, or for particular terms within the year which is helpful
if you need an interim progress report.
You can run a Report Card for any one Student at a time. You can choose which Subjects/Courses to include, whether to show letter grades, percentages, or both, and whether to include Term dates, Attendance
and/or Progress Notes.
Grades are calculated in the following manner:
- Term grades are calculated and rounded according to your Grading Options.
- Term grades are averaged together to generate the Year grade.
|
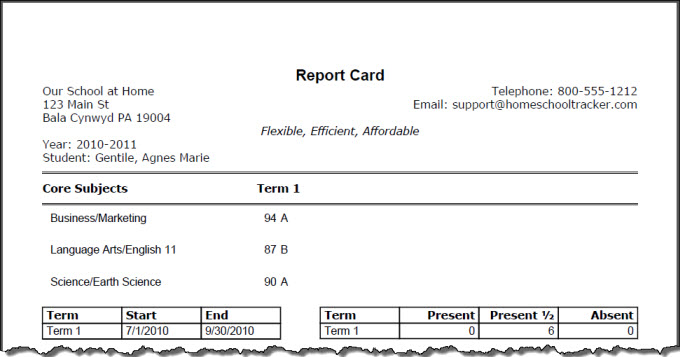
 Report Card Sample
Report Card Options
 Report Card Options
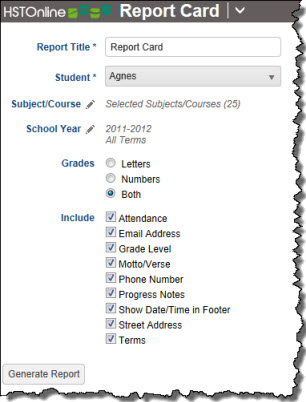
Set the options needed for the report. HSTOnline will remember your settings until you change them.
Report Title
The default name for this report is: Report Card. You can change the Report Title to anything you like, up to 150 characters.
Student
Select a Student from the drop down list. The Report Card can be created for one Student at a time.
 Student Options
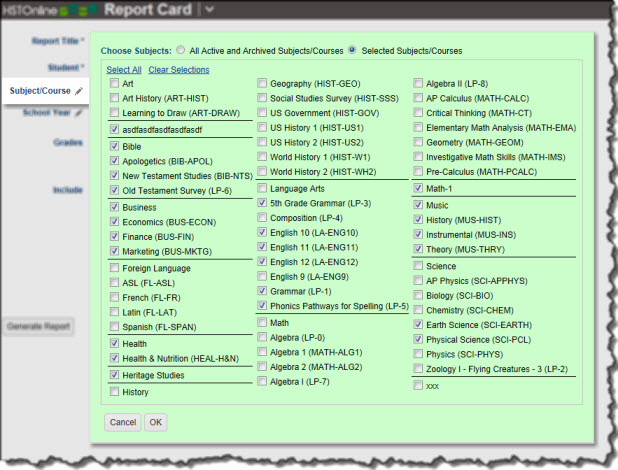
Subject/Course
Click or touch the Subject/Course field name or the pencil icon to choose the Subjects/Courses you want to include in the report. The Subject/Course option window includes all Active and Archived Subjects
and Courses for selection.
 Subject/Course Selection
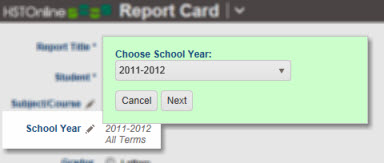
School Year
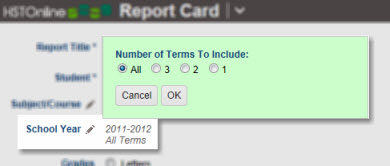
Choose the School Year and Terms you want for this Report Card.
- Select a School Year from the drop down list and click or touch Next.
- Select the number of Terms you want to display on the report
- If you have one terms in the School Year, your options will be All
- If you have two terms in the School Year, your options will be All and 1
- If you have three terms in the School Year, your options will be All, 2 and 1
- If you have four terms in the School Year, your options will be All, 3, 2 and
1
 School Year and Terms selection
- In a School Year with more than one Term:
- if you choose 1, you'll get the results for the 1st term in the year
- if you choose 2, you'll get the results for the first 2 terms in the year
- if you choose 3, you'll get the results for the first 3 terms in the year
- if you choose All, you'll get the results for all Terms in the year, as well as the yearly grade. Year grades are only displayed when all terms in the year are included in the Report Card.
 Report Card for just one Term
Grades
Choose to display Letter grades, Number (percentage) grades, or Both.
Include
Choose which items to include in your report.
- Attendance: Choose whether to include a summary of Attendance on the report.
- Email: Choose whether or not to include your email in the top right of the report header.
- Grade Level: Choose whether to display the Student's Grade Level for the selected School Year. If you have not set a
Grade Level for the selected School Year, the label will be suppressed on the Report Card.
- Motto/Verse: Choose whether to have your School Motto/Verse printed on the report above the Attendance grid.
- Phone Number: Choose whether or not to include the School phone number in the top right of the report header.
- Address: Your School Name will always appear in the top left corner of the report. Use this option to choose whether or not to include the
School Address as well.
- Progress Notes: Choose whether to include Progress Notes on the report. You can enter Progress Notes in the Student
Grade Level area.
- Terms: Choose whether to include a summary of Term dates on the report.
Creating a Report Card for Prior Years
To create data from previous years (prior to your using HSTOnline) to be included in a Transcript, you only need to create one completed and graded assignment for each
subject/course for each term the class was taken. You can follow these steps to enter summary grades for any year of homeschooling.
Step One: Create School Years and Terms
- On the HSTOnline menu, click or touch School Years/Terms under the 'Manage Lists' section.
- On the School Years page, click or touch the Action button and choose Add.
- Fill in the dates as needed. Please refer to the School Year/Terms Help Page for step-by-step instructions.
- Create all the School Years needed.
Step Two: Create Subjects Needed
You can actually skip this step if you like, and simply use the Smart-Entry feature of the Subject/Course field. If you go the Smart-Entry route,
after you have entered all your Assignments, you can then go to the Subjects page and make any changes needed to the Core/Elective status of the new Subject.
If you want to enter your Subjects first:
- On the HSTOnline menu, click or touch Subjects under the 'Manage Lists' section.
- On the Subjects page, click or touch the Action button and choose Add to open the Add Subject window.
- Enter a name for the new Subject and set the Core/Elective Status. Please refer to the Subjects Help Page for step-by-step instructions.
- Create all the Subjects needed.
Step Three: Create Courses Needed
You can actually skip this step if you like, and simply use the Smart-Entry feature of the Subject/Course field. If you go the Smart-Entry ,
after you have entered all your Assignments, you can then go to the Courses page in turn and make any adjustments necessary to the default entries to award
additional credits or change the grading scale, etc.
If you want to enter your Courses first:
- On the HSTOnline menu, click or touch Courses under the 'Manage Lists' section.
- On the Courses page, click or touch the Action button and choose Add to open the Add Course window.
- Enter a name and other parameters for the new Course. Please refer to the Courses Help Page for step-by-step instructions.
- Create all the Courses you need.
Step Four: Add Assignments
While you can enter Assignments from the Agenda - Calendar View or Agenda - List View, we recommend entering
from the Agenda - List view because you can set the Display Options to see all the newly entered items at once.
- On the HSTOnline menu, click or touch 'Agenda - List View' under the 'Schedules and Planning' section.
- Use the Agenda - List View Filters button to set the Date Range and Student you'll be working with. Set the Types filter to only Assignments, to
simplify the view. Set the Completion and Subject/Course filters as needed for the areas you'll be working on.
- Click or touch the Add button and select 'Assignment - Single' to open the Add Assignment window.
- Enter the bare bones necessary for this Assignment:
- Student: Select a Student from the list.
- Subject/Course: If you did not add the Subjects/Courses you need in Step 2 above, you can use the Smart Entry
feature to add a new Subject, or a new Course for an existing Subject.
- Date: Make sure that date falls within the Term you are reporting for.
- Points Possible/Points Earned: Enter points to generate the percentage grade you need for this Subject/Course for the Term.
- Complete: Click or touch the Teacher box in the Complete field to generate a percentage grade.
- Click or touch:
- Save to add this item to your Agenda.
- The 'Add Another' hyperlink in the top right corner to save this Assignment and add another. You can click 'Add Another' each time until you have entered the
last new Assignment needed and then click the Save button to end the Add process.
Step Five: Create Report Card
Once you have completed all your entries in Step Four, you can run the Report Card.
Generating a Report Card
- On the HSTOnline menu, click or touch 'Report Card' under the 'Reports' section.
- Fill out the Report Card options as needed. HSTOnline will remember your settings until you change them.
- Click or touch the Generate Report button. HSTOnline will create the report using the options you have set.
- When the report is ready, the Pick Up Report button becomes visible. Click or touch it to download the generated file.
- All reports are created as PDFs which you can review, print, email as you would with any PDF document.
- If you made an error in your option settings, just reset the options as needed and click or touch Generate Report again.