Subjects
Introduction to Subjects
To access the Subjects list, click or touch Subjects under the 'Manage Lists' section of the HSTOnline menu.
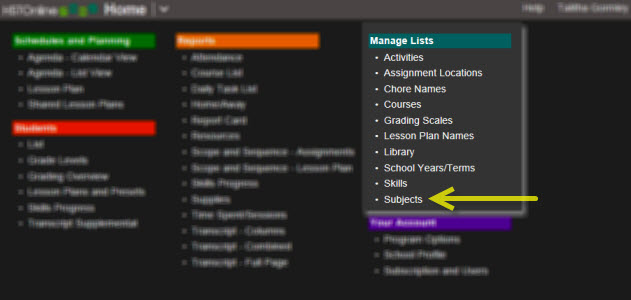 HSTOnline Menu - Subjects
A Subject is a broad description of an area of study, generally falling into the following categories: Language Arts, Math, History, Science, etc. You can name your subjects anything that suits
your needs, up to 150 characters.
Subjects are required for the creation of Assignments and Lesson Plans, and to designate
Library items as Resources. In general, you won't have more than about 10 Subjects total for all of your Students.
As single subject will be used for more than one student and more than one grade level. Use the Course feature to further specify an area of study. For instance,
all of your students may have Math assignments, while for some there is a further designation of a math Course of Algebra or Geometry or Calculus, etc.
Subjects must be designated as "Core" or "Elective". You may change the status of any Subject at any time. If your governing authority requires that you teach certain subjects, you might want to make
these your Core subjects. Report Cards will list Subjects as Core or Elective.
The Subject field in the Course add/edit window and, when the Course field is disabled, the Subject field in Assignment, Lesson Plan and Library add/edit
windows is a Smart-Entry field.
The Subjects list is sorted alphabetically by the Name field. You can group or sort by any column. The Active column shows a 'Y' if the Subject is active and an 'N' if the
Subject is archived.
| Food for Thought |
|
For best results, keep your Subjects as broad as possible and less than 10 or so in number. Use the Course feature to identify a more specific area
of study within a Subject.
You will want to set up Courses within your Subjects if:
|
Subject List Columns
| Column Name |
Notes |
Default Visibility |
| Name |
List is sorted by Subject Name |
Visible |
| Status |
Shows whether Core or Elective |
Visible |
| Courses |
Shows number of Courses tied to Subject; Column hidden when Courses option is off |
Visible |
| Active |
Shows 'Y' if the Subject is active and 'N' if the Subject is archived |
Visible |
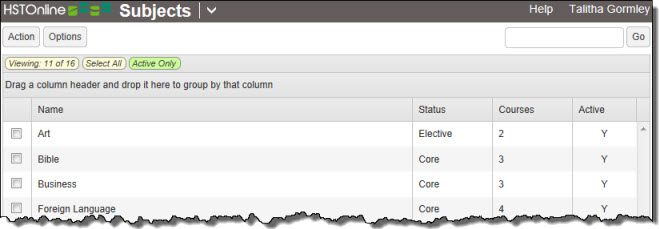 Subjects List
Subjects List Controls
|
- Action Button:
- Add: Add one or more Subjects to the list. This action is always available.
- Edit: With one Subject selected, this action becomes available. Choose edit to change the Subject name, Core/Elective setting or
Active status.
- Multi-Edit: With two or more Subjects selected, this action becomes available. Choose this option to edit the Core/Elective
setting or Active status for all selected items.
- Delete: With one or more Subjects selected, this option becomes available. Choose this option to permanently delete the selected
items from your database.
- Options Button:
- Choose Columns: Click or touch this option to select which columns will be displayed in the Subjects list. You must select at least one column. All
columns are visible by default.
- Filter: Click or touch this option to select which types of Subjects will be displayed.
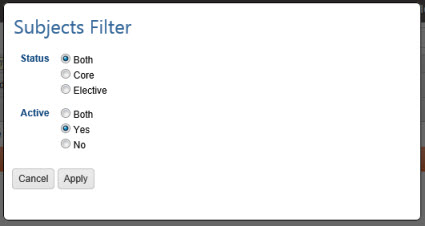 Subjects Filter
In the Subjects filter you can view items by Core/Elective Status: Both, Core or Elective and Active status: Both, Active Only (Yes) or Archive Only (No). For example, if you
choose Core and Active, just those Subjects which are designated as Core and are set as Active will be displayed. The default selection shows all Active Subjects,
both Core and Elective. When anything other than Both is selected for either option, the Filter Settings badges show which types of items are being displayed.
Subjects Filter
In the Subjects filter you can view items by Core/Elective Status: Both, Core or Elective and Active status: Both, Active Only (Yes) or Archive Only (No). For example, if you
choose Core and Active, just those Subjects which are designated as Core and are set as Active will be displayed. The default selection shows all Active Subjects,
both Core and Elective. When anything other than Both is selected for either option, the Filter Settings badges show which types of items are being displayed.
- Expand All: When the list is Grouped, click or touch this option to expand (open) all groupings.
- Collapse All: When the list is Grouped, click or touch this option to collapse (close) all groupings.
- Search Box and Go Button: Use the Search box to enter text and click the Go button to find Subjects matching your entry. HSTOnline will do an exact search for
whatever text you enter. Leave the search box blank and click Go or click or touch the Search text badge to return to the full list of Subjects.
|
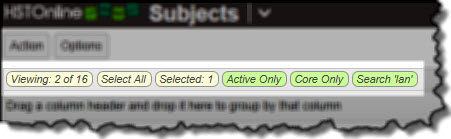
Subjects List Badges
|
- Viewing: Indicates the number of Subjects being displayed out of the total based on the current settings.
- Select All: Click or touch this badge to quickly select all the Subjects in the list.
- Selected: When one or more Subjects are highlighted, this badge will appear to show the number items selected. Click or touch this badge to deselect all Subjects.
- Filter Settings: If you have limited the types of Subjects to be displayed, Filter badges will appear showing the types of items being displayed -
either Core Only, Elective Only
and/or Active Only or Archived Only.
- Search text: Shows the text entered into the Search box which is limiting which Subjects are displayed. Click or touch this badge to clear the text from the
search box and remove that limitation.
 Subjects List Badges
|
Adding Subjects
You can add as many Subjects as you like. If you have multiple Subjects for similar areas of study, you might want to consider setting a master Subject and then using the
Course feature to capture the specific areas of study.
- On the HSTOnline menu, click or touch Subjects under the 'Manage Lists' section.
- On the Subjects page, click or touch the Action button and choose Add to open the Add Subject window.
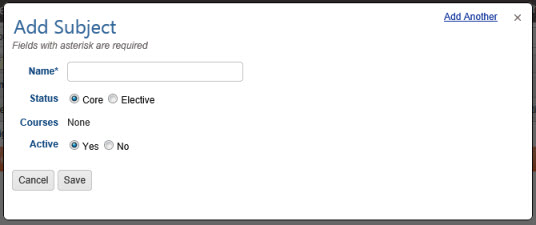 Add Subject
- Name: Enter the name of your Subject, up to 150 characters.
- Status: Designate Core or Elective for this Subject. The default selection is Core. You may change the status at any time in the future by editing the
Subject.
- Courses: When you first create a Subject, it will have no Courses tied to it. As you create and edit your Courses, you will tie
to them to a particular subject. Thereafter, when editing a Subject, this area will show you the names of any Courses that are attached to the Subject.
- Active: All new Subjects start as Active. Click or touch the No radio button if you want to archive this Subject. You may change the status at any time in the future by
editing the Subject.
- Click or touch:
- Cancel to abandon the new item without adding to your list.
- Save to add this item to your list of Subjects.
- The 'Add Another' hyperlink in the top right corner to save this Subject to your list and add another one. You can click 'Add Another' each time until you have
entered the last new Subject and then click the Save button to end the Add process.
- Click or touch the green Added Items notification or refresh the page to see your updated Subjects list.
 Added Items Notification
Editing Subjects
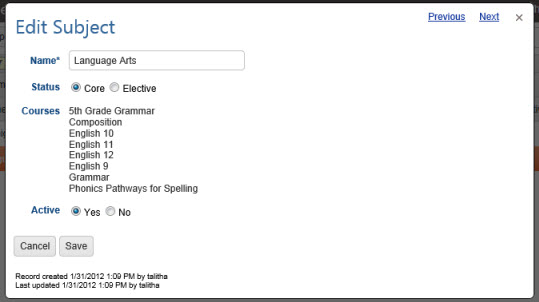
Editing a Single Subject
You can edit any single Subject to change its name, Core/Elective setting or Active status.
- On the HSTOnline menu, click or touch Subjects under the 'Manage Lists' section.
- On the Subjects page, double-click on the item you want to change to open the Edit Subject window.
- Alternatively, you can click once on the item you want to change and then click the Action button and choose Edit to open the Edit Subject window.
- On a touch device, touch the item you wish to edit and then touch the Action button and touch Edit to open the Edit Subject window.
 Edit Subject
- At the bottom of the edit view, you will see when and by whom the item was created as well as when and by whom it was last updated.
- In the Edit Subject window, the Courses which are linked to the selected Subject will be listed. This list is read-only and cannot be edited from this view. To change the Subject designation for
a Course, you will need to edit the Course in question.
- Make whatever changes are needed.
- To change the Active status this Subject, click or touch the Yes radio button to mark the Subject as Active; click or touch the No radio button to Archive the Subject.
- Click or touch:
- Cancel to abandon the changes and close the Edit Subject window.
- Save to commit the changes to this Subject and close the Edit Subject window.
- Click or touch the Previous or Next hyperlink in the top right corner to save your changes to this Subject and move to the
previous or next Subject in the list. You can click or touch Previous or Next until you have made all the changes you want to your Subjects and then click the Save button to end the Edit
process. If you reach the beginning or end of the list when clicking or touching Previous or Next, the Edit window will close and you will be returned to the list view.
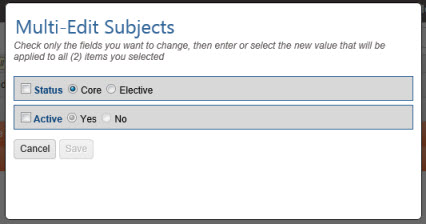
Editing Multiple Subjects
The multi-edit feature allows you to change the Core/Elective status and/or the Active status for any two or more selected Subjects.
 Subject Multi-Edit
- On the HSTOnline menu, click or touch Subjects under the 'Manage Lists' section.
- On the Subjects page, select the items you want to change. You can use the Grouping and Sorting, Filter and
Search features to isolate the items you want to change.
- Click the checkbox for each item you want to change.
- You can use your mouse to click and drag over contiguous Subjects in the list to select those items.
- On a touch device, you can touch and drag your finger over contiguous Subjects in the list to select those items.
- Click or touch the 'Select All' badge to select all the Subjects in the list.
- Click or touch the Action button and click or touch Multi-Edit to open the Multi-Edit Subjects window.
- HSTOnline will show you how many items have been selected for editing.
- To enable the form, click or touch the box to the left of each field you want to change for all selected Subjects. Make your selection for each of those fields.
- To change the Active status of the selected items, click or touch the box to the left of Active.
- To make all the selected items Active, click or touch the 'Yes' radio button.
- To Archive all the selected items, click or touch the 'No' radio button.
- Click or touch:
- Cancel to abandon the changes and close the Multi-Edit Subjects window.
- Save to commit the changes and close the Multi-Edit Assignment Subjects window.
Deleting Subjects
You may delete any Subject or group of Subjects which are not in use throughout your database. If the Subject has been tied to one or more Assignments,
Courses, Lesson Plan items, Library items, or
Presets you will not be permitted to delete it. Instead, you can choose to Archive the item to remove it from the list of
active Subjects. Deleted items cannot be retrieved.
Deleting a Single Subject
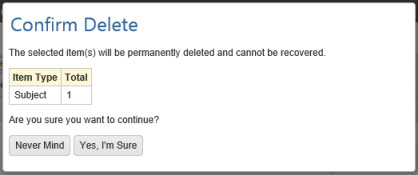 Confirm Delete
- On the HSTOnline menu, click or touch Subjects under the 'Manage Lists' section.
- On the Subjects page, click or touch the item you want to remove and then click the Action button and choose Delete to open the Confirm Delete window.
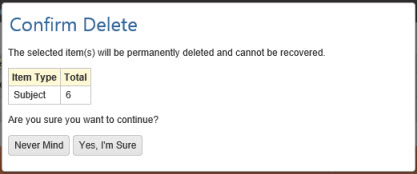
- Click or touch:
- 'Never Mind' to cancel the delete process.
- 'Yes, I'm Sure' to complete the deletion process.
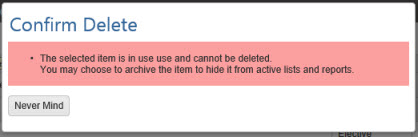
- If the Subject is being used in your database in Assignments, Lesson Plan items, and/or as a Resource designation in one or more Library items, you will
see a message that the selected item cannot be deleted. Click or touch the 'Never Mind' button to return to the Subjects List. From there you can choose
to archive the Subjects to hide it from your list.
 Delete Warning
Deleting Multiple Subjects
 Delete Multiple Subjects
- On the HSTOnline menu, click or touch Subjects under the 'Manage Lists' section.
- On the Subjects page, select the items you want to remove. You can use the Grouping and Sorting, Filter and
Search features to isolate the items you want to remove.
- Click the checkbox for each Subject you want to remove.
- You can use your mouse to click and drag over contiguous Subjects in the list to select those items.
- On a touch device, you can touch and drag your finger over contiguous Subjects in the list to select those items.
- Click or touch the 'Select All' badge to select all the Subjects in the list.
- Click or touch the Action button and click or touch Delete to open the Confirm Delete window.
- HSTOnline will show you how many items have been selected for deletion.
- Click or touch:
- 'Never Mind' to cancel the delete process.
- 'Yes, I'm Sure' to complete the deletion process. HSTOnline will delete any of the selected Subjects which are not being used in your database in
Assignments, Lesson Plan items, and/or as a Resource designation in one or more Library items. Items that are in use will not be deleted.
Archiving Subjects
Archiving allows you to de-clutter your Subjects list of items from previous years or terms that will not be used in the current year while preserving records from previous years. When you archive a Subject
it can still be included in a Transcript but will no longer be available for selection for Assignments, Courses, Lesson Plans items, Library items, or Preset Day Options. Archiving a Subject will
automatically archive all Courses associated with it such that those Courses can no longer be selected for new Assignments, Lesson Plan items or Resource designations. Reactivating a Subject will also
reactivate all associated Courses that were not specifically archived themselves. Use the Edit or Multi-Edit directions above to change the Active status of your
Subjects.