Tips for Unschoolers
I'm not a Planner - Can this work for me?
Absolutely! The most important tip you will ever get regarding HSTOnline is to use the program in the way that works best for you and your homeschool.
You can plan work out in advance, you can document every single assignment your student completes, you can choose to enter work after the fact, or only enter representative assignments of her work
throughout the year. To generate an entry in a Report Card or Transcript you only need to enter a single
Assignment per Subject/Course per Term which has been graded and marked as completed.
In fact, you can simply create placeholder assignments for your Student for the entire year for each subject area and you or your Student can fill in details of what was actually done on that day as you
go along. To do this, use the Add: Assignment - Multiple option from the Agenda - Calendar View or
Agenda - List View to create your items. Set your Day Off entries first, so you can skip over those days. Then, set up
the skeleton assignments for each day of school.
- On the HSTOnline menu, choose 'Agenda - Calendar View' or 'Agenda - List View' in the 'Schedules and Planning' section.
- On the Agenda view that you chose, click or touch the Add button and choose 'Assignment - Multiple' to open the Add Multiple Assignments form.
 Agenda Add Button
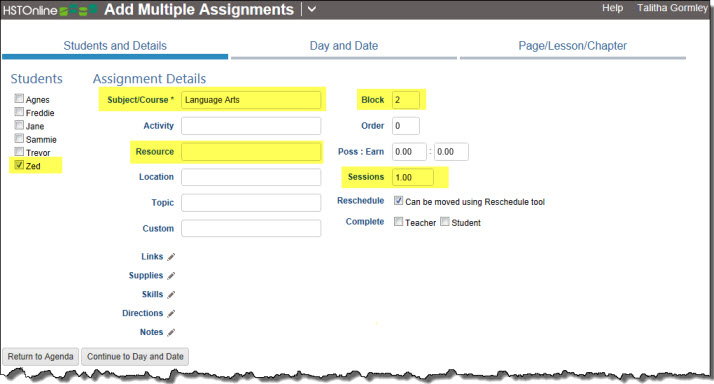
- In the Student and Details section:
 Student and Details
- Choose one or more Students to get these Assignments
- Choose a Subject or Subject/Course. The Subject/Course field is a Smart-Entry field. You can click or touch into the field and press the spacebar
to see a full list of Subjects/Courses available, or start typing the name of a Subject/Course to see a list that matches your entry. Choose one of the options from the list or continue typing
to make a new entry.
- OPTIONAL: Select a Resource for these Assignments. The Resource filed is a Smart-Entry field.
- OPTIONAL: Set a Time or Block for these Assignments if you have a preference of the order in which your Student tackles his Subjects each day.
- OPTIONAL: Set the Sessions for these Assignments to 1.00. Why? If you are required to complete a certain number of school days in each Subject for the year, this
field can help you quickly calculate if your student is lacking in one area or another as you progress through the year.
- Click or touch the Continue to Day and Date button or the Day and Date tab to move to the next section.
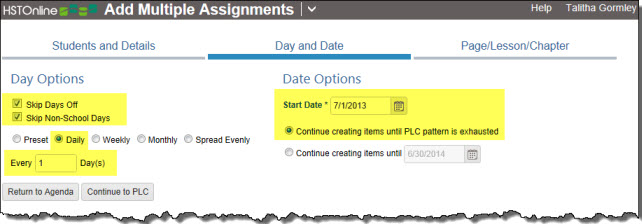
- In the Day and Date section:
 Day and Date
- Check the boxes to skip over Days Off and Non-School Days
- Choose the Daily option to enter an item on Every 1 Day. This is the default setting.
- Start Date: Enter the first day of your school year using the mm/dd/yyyy format or click on the Calendar icon to
select a date.
- Choose the option to Continue creating items until PLC pattern is exhausted.
- Click or touch the Continue to PLC button or the Page/Lesson/Chapter tab to move to the next section.
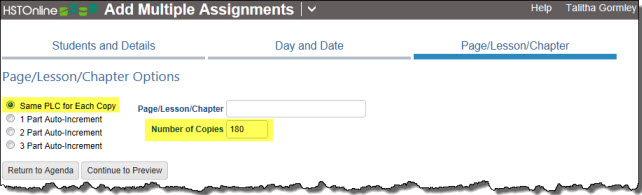
- In the Page/Lesson/Chapter section:
 Page/Lesson/Chapter
- Choose the Same PLC for each copy option. This is the default selection.
- In the Number of Copies field, enter the total number of school days you want to have for the year. In our example, we have entered 180.
- Click or touch the Continue to Preview button.
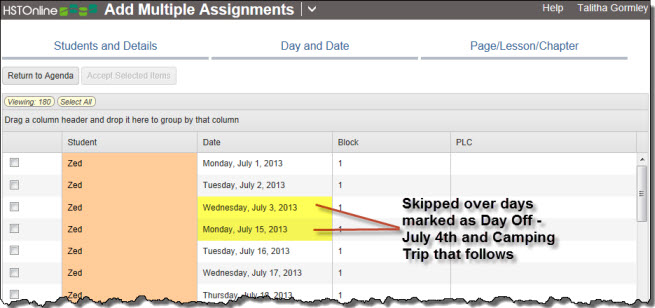
- The Preview will show you all the Assignments you are about to create.
 Preview
- The Preview shows the 180 items that will be created. Note that the items will have skipped over any Day Off entries that were already created for the Student, as well as your non-school days.
In this example, non-school days are Saturdays and Sundays so there are no Assignments on those dates. In addition, the pattern has skipped over July 4th through July 12th for the Independence
Day holiday and a family camping trip that follows.
- Click or touch the Select All badge and then click or touch the Accept Selected Items button to move all of these items to the Agenda.
- Repeat steps 2 through 6 for each Subject/Course that you want to schedule for your Student.
- The Agenda - Calendar View below shows the results of following these steps for Bible, Language Arts, Math, History, Science and PE.
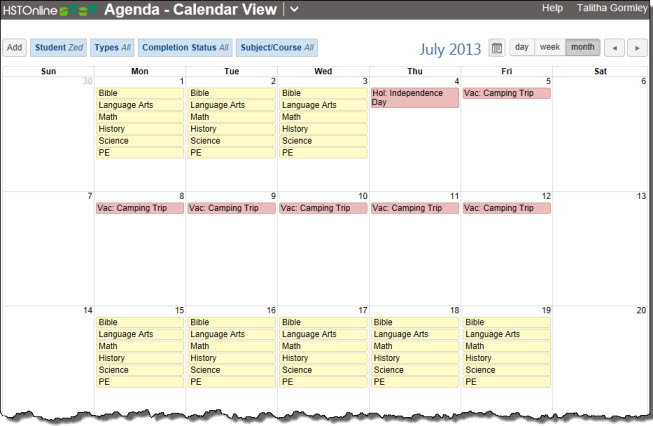 Agenda - Calendar View
- The items appear in this order each day based on the Block entries that were made. If all the items were created with a Block or Time of the same value, the Subjects would appear in
alphabetical order each day.
- By creating 180 days of work, in this example, all class work will be finished by April 7th!
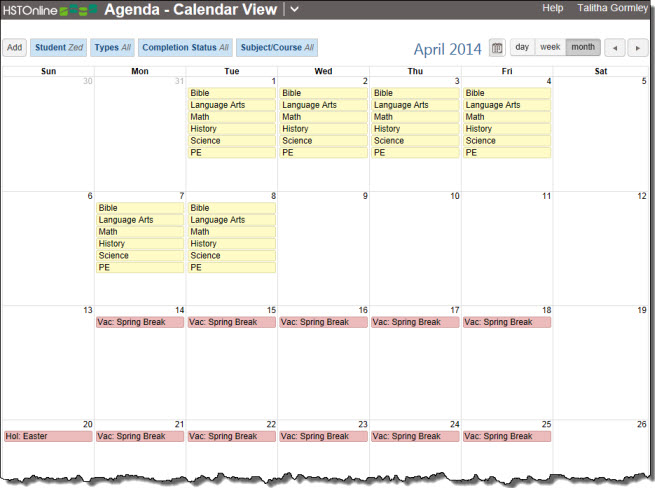 School Finished by April 7th!
- The school year I have set up runs from July 1, 2013 to June 30, 2014. It contains holidays for July 4th, Labor Day, Thanksgiving, Christmas, New Year's Day and Memorial Day. In addition, there
is a camping trip in early July, extra days off around Thanksgiving, a Winter break that runs from December 23rd through January 3rd, and a Spring break that runs from April 14th though April 25th.
- If we take no other days off and the Students work on each subject every day, we can be done our 180 day requirement by April 7th. That leaves us the rest of April (minus Spring break), all
of May (minus Memorial Day) and all of June to do make up work if necessary - that's 48 more days off that we can take and still have time to make up work by the end of year on June 30th!
- Now what?
- Now - start your school year. Let your Student work at his or your pace, whatever suits your homeschool best. At the end of each day, or every few days, or at the end of the week, you or your
Student can go in to these items and add details of the actual work that was done, entering grades where necessary. You can delete entries on days where you Student simply didn't get to that
Subject on a particular date.
- As noted above, if you need to make sure that your Student is reaching a required minimum days of study in any particular Subject, you can use the
Sessions field to help you track that. Simply add a 1.00 to the Sessions field for each item - you can do this on entry, on marking as completed, or
for any group of Assignments using the Multi-Edit action. Then you can use the
Time Spent/Sessions Report to keep track of how many Sessions your Student has in each area of study and adjust as needed.
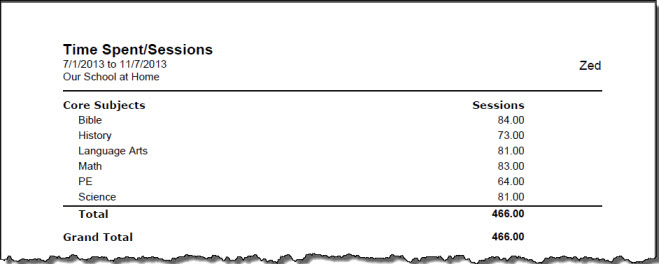 Time Spent/Sessions Report
- For example, the Sessions report above shows that our Student is lagging behind a bit in PE (64 sessions) and History (73 sessions) as compared to his other Subjects which are ranging
between 81 and 84 sessions each.
- If you prefer, you can also track this information using the Time Spent field, rather than Sessions.